background image

Fundor T

7

Installation

Only a trained worker is allowed to install
the Fundor T.
Observe the safety information!

l

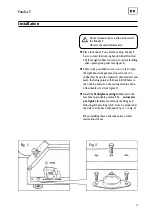
Place the Fundor T on a level worktop. Fundor T
has to contact the working bench with all four feet.
The front right rubber foot can be used for levelling
- after opening side panel (see figure 1).

l

There is the possibility to screw on two feet. Open
the right-hand side panel and unscrew the two
rubber feet. Fasten the separately delivered feet and
mark the fixing points at the bench. Drill holes in
the worktop and screw the casting machine down
with suitable screw (see figure 2).

l

Install the 

Multiplex melting torch

 next to the

machine in a suitable position.The

automatic

gas lighter

 facilities enormously the firing and

adjustingof the melting torch. It can be mounted at
the wall or at the back of Fundor T (pos. 7 in fig. 4).

When installing these units take notice of their
instructions for use.

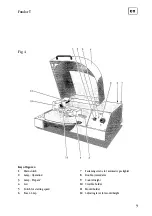
Fig. 1

Fig. 2

Summary of Contents for Fundor T

Page 1: ...Fundor T BA 85 478 06 235 00227 English Translation of the original instructions ...

Page 2: ...g instructions must be read and understood before the device is used This particularly applies to the Safety information The warranty is void in cases of damage which is caused by non observance of the operating instructions We will also not accept liability for any resulting consequential damages Symbols used This symbol indicates very important information Failure to comply with it may result in...

Page 3: ...bout the unit Unit description 6 Scope of delivery Wearing parts and Extras 6 Technical data 6 Operation Installation 7 Working 8 Care 10 Problems Troubleshooting 11 Spare parts list Circuit diagram Certificate of conformity Labels and stickers Disposal advice Appendix ...

Page 4: ...be easily accessible when the machine is operated Observe the national accident prevention regulations in addition to this operating manual l Handling the machine Prior to connection to the power supply check whether the specifications on the rating plate correspond to the supply network In the case of uncertainty consult an electrician The unit is categorised under protection class 1 and may only...

Page 5: ...sary to note the safety an danger pecautions in the instructions for use when installind and starting of Multiplex and automatic gas lighter Working l The counterweight of the mould ist to be correctly adjusted in the clicking points in order to prevent the out of balace and so a moving of the machine when centrifugal casting Danger of burns due to hot parts l Wear protective clothing protective a...

Page 6: ...ption Scope of delivery Fundor T with double jointed arm 200 240 V 50 60 Hz ________ Order No 25025 100 120 V 50 60 Hz ________ Order No 25026 with 1 pack Auromelt HF melting powder 1 pair of safety goggles 2 feet accepting screw 3 crucibles for precious metal alloys 3 crucibles for cobalt chrome and non precious metal alloys 2 replacement tension springs for the centrifugal arm 2 replacement fuse...

Page 7: ... the right hand side panel and unscrew the two rubber feet Fasten the separately delivered feet and mark the fixing points at the bench Drill holes in the worktop and screw the casting machine down with suitable screw see figure 2 l Install the Multiplex melting torch next to the machine in a suitable position The automatic gas lighter facilities enormously the firing and adjustingof the melting t...

Page 8: ...e for some alloys 4 Turn the double jointed arm 8 counter clockwise so that the counterweight 9 stands at the right fig 4 5 Set the counterweight for the size of mould being used by raising the weight movingit and engaging it securely again Example for amould of size 3 approach the counterweight to the figure 3 If the counterweight is not se correctly the out of balace of the centrifugal armmay mo...

Page 9: ...n switch 2 Lamp Operation 3 Lamp Prepare 4 Lid 5 Switch for starting speed 6 Fuse 4 Amp 7 Fastening screws for automatic gas lighter 8 Double jointed arm 9 Counterweight 10 Crucible holder 11 Mould holder 12 Adjusting lever for mould height ...

Page 10: ...rior to inserting the alloy Danger of burns due to hot parts Carry out maintenance and cleaning work prior to casting or once the unit has cooled down CAUTION Switch off the unit and pull out the plug prior to any care or maintenance Working Important We recommend to use the following base socket moulds for metal mould rings only Base socket mould for metal mould ring size 3 Order no 52 627 Base s...

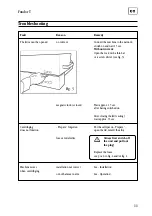
Page 11: ...d Wait approx 15 sec after having switched on After closing the lid casting wait approx 35 sec Centrifuging Prepare forgotten Put the calliper on Prepare does not function open the lid remelt the alloy fuses are defective Always first switch off the unit and pull out the plug Replace the fuses see pos 6 in fig 4 and or fig 1 Machine moves installation not correct See Installation when centrifuging...

Reviews: