59
860
76
D
B
-en/
03
35
5.0
00
32
English
⋅
en
Replacing the ring light protective glass
If the device is equipped with the optional ring light,
the protective glass on the ring light only needs to be
replaced if it is defective or so dirty that the lighting
provided is no longer adequate.
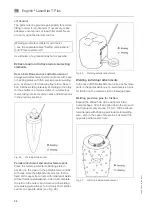
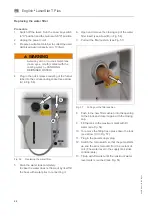
Fig. 51
Replacing the ring light protective glass
Procedure
1.
Switch off the laser: Turn the Laser key switch
to "0" position and the main switch "0" position.
2.
Open the working chamber door.
3.
Remove the ring light as described in the previ-
ous section (
→
REPLACING THE LENS PRO-
TECTIVE GLASS).
4.
Remove the three plastic screws, and replace
the glass.
5.
Screw the plastic screws in again carefully, but
not too tightly.
6.
Refit the ring light.
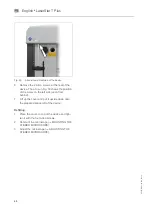
Replacing the splash protection window
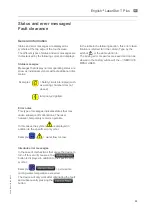
Fig. 52
Replacing the splash protection window
The observation window consists of two glasses:
•
The laser protective window (yellowish green
window on the outside - position (A) in the
figure below) prevents the emission of laser
radiation and ultra-violet light.
•
The splash protection window ((B) on the inside
of the working chamber) protects the laser pro-
tective window from soiling and damaging.
If the view of the working chamber is impaired, the
splash protection window should be replaced or
cleaned.
Procedure
1.
Switch off the laser: Turn the Laser key switch
to "0" position and the main switch "0" position.
2.
Open the working chamber door.
3.
Remove the two Allen screws ((position (C) in
Fig. 52) from inside the welding chamber, and
then remove the splash-protection window (B).
4.
Clean the splash-protection window with alco-
hol or a commercially available window-clea-
ning agent, or replace it - if necessary - with a
new one.
5.
Secure the splash-protection window in the
device using the two Allen screws (positions
(C)).
CAUTION
Do not scratch the splash-protection
window!


