62
860
76
D
B
-en/
03
35
5.0
00
32
English
⋅
LaserStar T Plus
en
Replacing the water filter
Procedure
1.
Switch off the laser: Turn the Laser key switch
to "0" position and the main switch "0" position.
2.
Unplug the power cord!
3.
Prepare a suitable container to collect the used
deionized water (capacity min. 10 liters).
4.
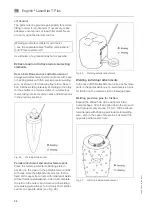
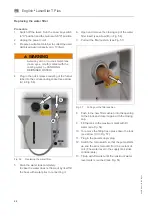
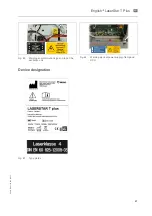
Plug in the quick release coupling of the funnel
tube into the corresponding socket (see arrow
(A) in Fig. 56).
Fig. 56
Replacing the water filter
5.
Drain the water tank completely.
In case the water does not flow out by itself fill
the hose with water prior to connecting it.
6.
Open and remove the closing cap of the water
filter insert (see arrow (B) in Fig. 56).
7.
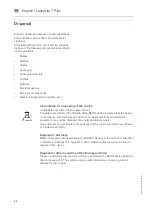
Pull out the filter cushion (see Fig. 57).
Fig. 57
Pulling out the filter cushion
8.
Push in the new filter cushion into the opening
to the block and close it again with the closing
cap.
9.
Fill the tank to the maximum mark with DI
water (see Fig. 54).
10. To remove the filling hose press down the lock
(see arrow (C) in Fig. 57).
11. Plug in the power supply plug.
12. Switch the main switch so that the pump starts
up and the air is removed from the coolant cir-
cuit. (The water level in the supply tank sinks
considerably.)
13. Fill up with DI-water until the maximum water
level mark is reached (see Fig. 54).
WARNING
Avoid any skin or mucous membrane
(nose, eyes, mouth) contact with the
cooling water (
→
HANDLING
DEIONISED WATER).


