24
A
-en
English
⋅
en
Commissioning
Before commissioning, set the device to the correct input voltage using the selector switch (12) on the back
of the device.
When moving the device from colder to warmer ambient temperatures (e.g. transport in the winter), allow it
to acclimatize for a minimum of 2 hours (to prevent the risk of flashovers inside the device).
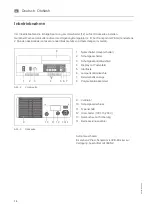
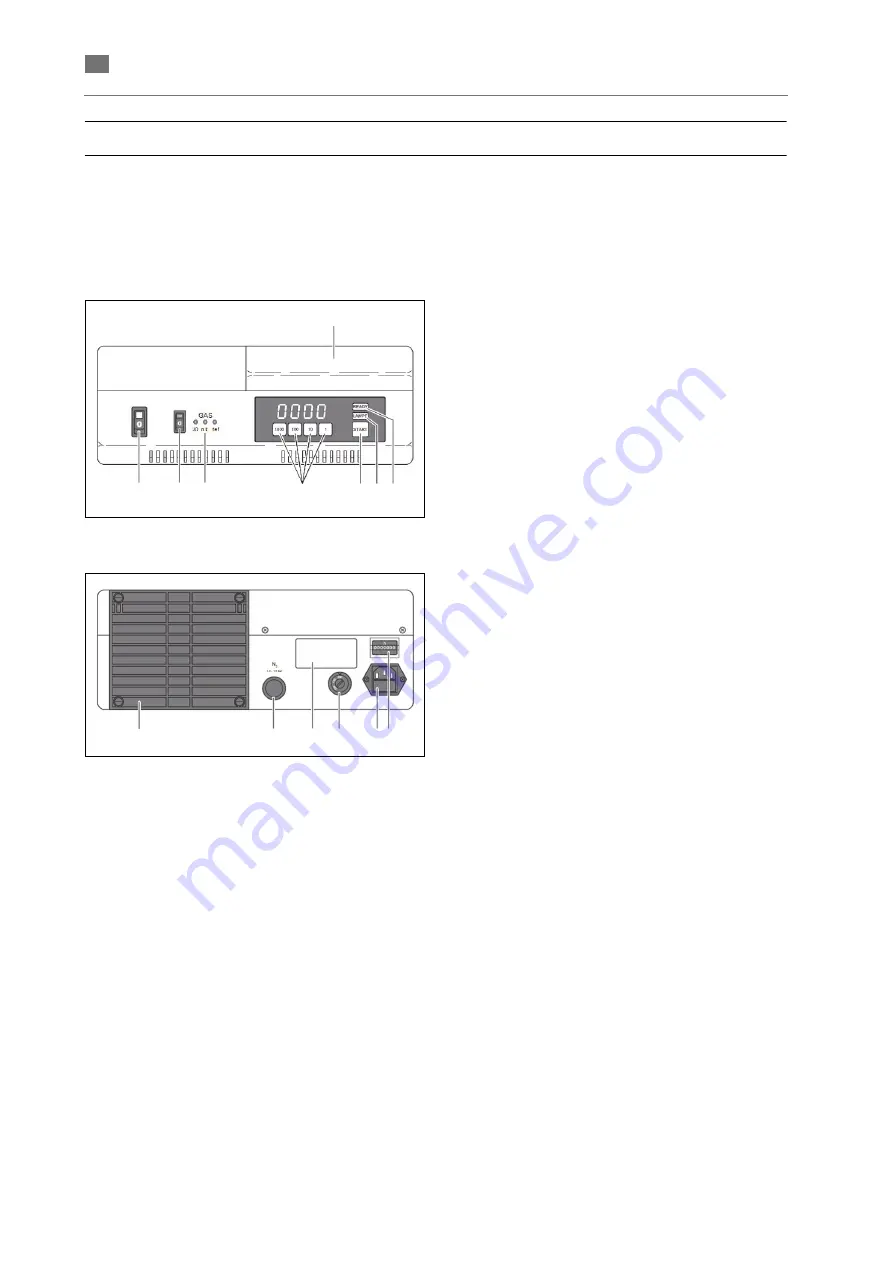
Fig. 2
Front side
Fig. 3
Rear side
1.
Power switch (mains switch)
2.
Protective gas switch
3.
Protective gas indicator lights
4.
Display with keypad
5.
Start button
6.
Lamp indicator lights
7.
Ready indicator
8.
Polymerization chamber
9.
Fan
10. Protective gas connection
11. Type plate
12. Selector switch (100, 115, 230 V)
13. Mains socket with fuse
14. Operating hour meter
Holding trays:
2 Plexi trays with UVB blockers are available,
labelled 360N2.
1
2
3
6 7
8
4
5
9
10
12
13 14
11
Summary of Contents for Otoflash
Page 1: ...Gerätedokumentation Miteinander zum Erfolg ...
Page 2: ......
Page 4: ......
Page 5: ...ORIGINAL BETRIEBSANLEITUNG Otoflash de Deutsch Otoflash ...
Page 19: ...TRANSLATION OF THE ORIGINAL OPERATING INSTRUCTIONS Otoflash en English Otoflash ...
Page 33: ...TRADUCTION DE LA NOTICE ORIGINALE Otoflash fr Français Otoflash ...
Page 47: ...TRADUCCIÓN DEL MANUAL ORIGINAL Otoflash es Español Otoflash ...
Page 61: ...TRADUZIONE DELLE ISTRUZIONI ORIGINALI Otoflash it Italiano Otoflash ...
Page 75: ......
Page 76: ......
Page 77: ......

