background image

(EN)


Controls

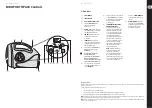
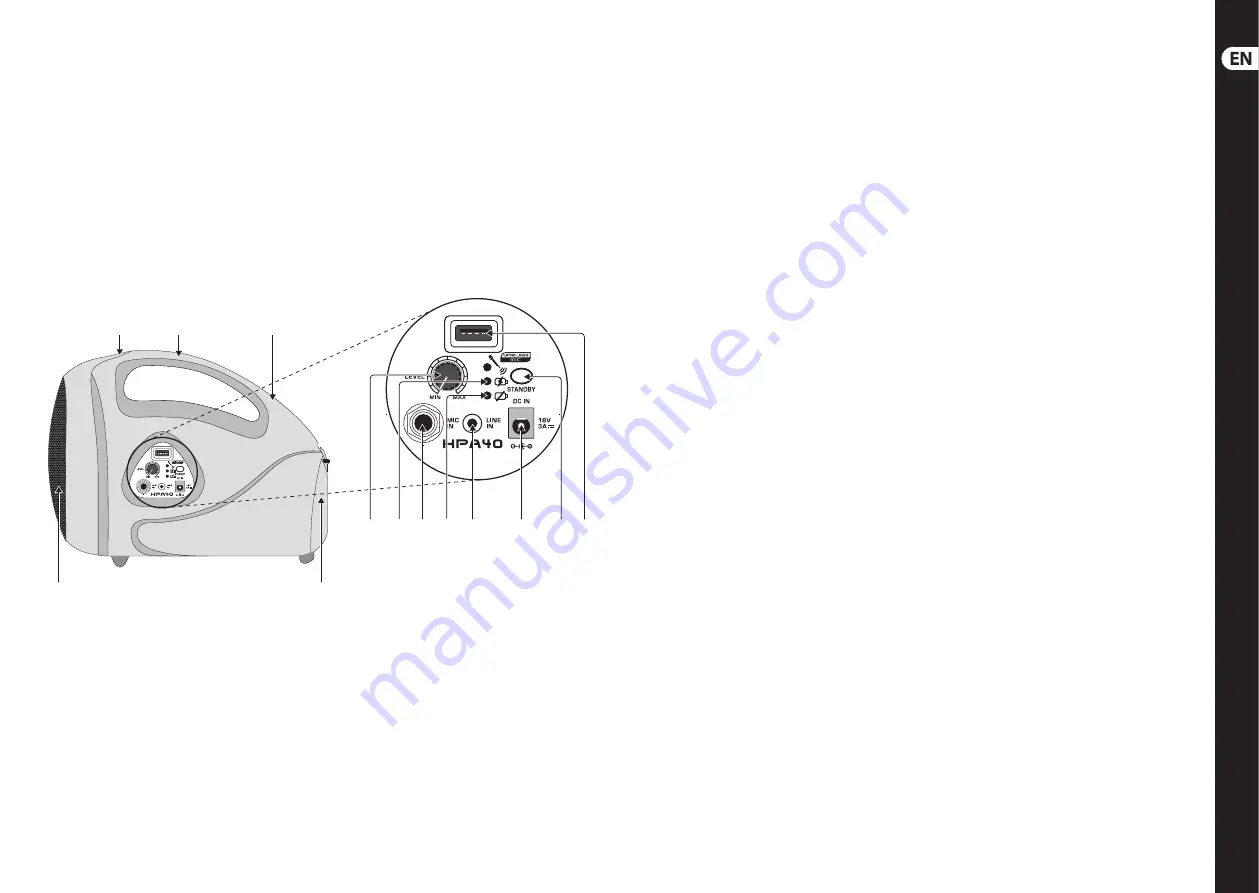
EUROPORT HPA40 Controls

(1) 

LOUDSPEAKER

.

(2) 

CARRY HANDLE

.

(3) 

HOLES FOR SHOULDER STRAP

.

(4) 

The rotary 

MIC LEVEL

 control 

allows you to adjust the 
volume level.

(5) 

POWER

 switch turns the device on 

and off . When turned on, the LED of 
the POWER switch lights up.

(6) 

LOW BAT

 LED indicates that the 

rechargeable battery needs to 
be charged.

(7) 

CHARGE

 LED fl ashes yellow as 

long as the rechargeable battery 
is charging. It goes out when the 
battery is fully charged.

(8) 

Connect the supplied BEHRINGER 
XM1800S microphone to the 

MIC IN

 input.

◊ 

◊ 

Never hold the microphone 
directly in front of the 
loudspeaker. Feedback hazard! 
When operating the device, 
keep the microphone behind the 
loudspeaker to avoid feedback.

(9) 

You can connect an external sound 
source (CD player, MP3 player, etc.) 
to the 

LINE IN

 input.

(10) 

Connect to the power supply via the 
polarized 

DC IN

 connector. A fi tting 

power adapter is supplied. Use the 
device only with the included 
power supply.

(11) 

COMPARTMENT FOR BATTERY 
AND SHOULDER STRAP

To insert the battery, open the 
compartment’s cover. The bottom 
half of the compartment is used 
for the battery. Open the latch to 
access the battery compartment. 
Insert the battery as follows: 
The terminals must face the device 
with the positive terminal (red) 
on the side of the HPA40 control 
panel (to the left, as seen from 
the rear panel). Insert the battery 
and close the latch. Close the 
battery compartment.


NOTE:

 The HPA40 ships with a 

rechargeable internal battery 
that can power continuous 
audio playback for up to 8 hours. 
We recommend that you fully 
charge the battery before your fi rst 
use. See the “Charging the battery” 
section for more information.

 The 

device’s 

SERIAL NUMBER


is found on the bottom side of 
the unit.

(12) 

DIGITAL WIRELESS

 USB input 

accepts the optional BEHRINGER 
ULM wireless microphone receiver. 
The LED indicates wireless 
microphone signal input. 

(1)

(3)

(2)

(3)

(7)

(6)

(11)

(12)

(8)

(9)

(5)

(10)

(4)

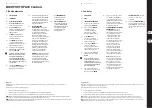
Charging the battery

The HPA40 ships with a rechargeable, internal battery that can power continuous audio playback for up to 8 hours. We recommend that you fully charge the 
battery before your fi rst use.

To charge the battery for the fi rst time, follow this procedure:

1. 

Turn off  the HPA40 by pressing the POWER switch.

2. 

Connect the unit to an AC power outlet. The CHARGE LED will light to indicate the battery is charging.

3. 

Keep the unit plugged in to AC power until the CHARGE LED indicates the battery has been fully charged.

NOTE:

 The HPA40 uses a sealed lead-acid gel battery, and the battery will slowly self-discharge when the HPA40 is not in use. Before storing the HPA40 for an 

extended period, fully charge the battery before storage, and then charge again every 3 months.

NOTE:

 The lead-acid battery needs to be recharged every 3 months for continued operation. Please replace the battery if the HPA40 operating time noticeably 

decreases, even after a full charge cycle.

8

EUROPORT HPA40

9

Quick Start Guide

Summary of Contents for EUROPORT HPA40

Page 1: ...Quick Start Guide Check out behringer com for Full Manual EUROPORT HPA40 40 Watt Handheld PA System with Microphone Wireless Microphone Option and Rechargeable Battery ...

Page 2: ...MUSICGroupIP Ltd 2015Allrightsreserved Fortheapplicablewarrantytermsand conditionsandadditionalinformation regardingMUSICGroup sLimited Warranty pleaseseecompletedetails onlineatmusic group com warranty Lasterminalesmarcadascon estesímbolotransportan corrienteeléctricade magnitudsuficientecomoparaconstituir unriesgodedescargaeléctrica Utilicesolocablesdealtavoz profesionalesydealtacalidadcon conec...

Page 3: ...oulapriseparexemple siunliquide ouunobjetapénétréàl intérieurdu châssis sil appareilaétéexposéàlapluie ouàl humidité s ilnefonctionnepas correctementouàlasuited unechute 15 L appareildoitêtreconnectéàune prisesecteurdotéed uneprotectionpar miseàlaterre 16 Lapriseélectriqueoulaprise IECdetoutappareildénuédebouton marche arrêtdoitresteraccessible enpermanence 17 Miseaurebut appropriéedeceproduit Ces...

Page 4: ...eoperação salvose possuirasqualifi caçõesnecessárias Paraevitarchoqueseléctricosnão procedaareparaçõesouintervenções quenãoasindicadasnasinstruçõesde operação Sóodeveráfazersepossuiras qualificaçõesnecessárias 1 Leiaestasinstruções 2 Guardeestasinstruções 3 Presteatençãoatodososavisos 4 Sigatodasasinstruções 5 Nãoutilizeestedispositivoperto deágua 6 Limpeapenascomumpanoseco 7 Nãoobstruaasentradasd...

Page 5: ...d close the latch Close the battery compartment NOTE The HPA40 ships with a rechargeable internal battery that can power continuous audio playback for up to 8 hours We recommend that you fully charge the battery before your first use See the Charging the battery section for more information The device s SERIAL NUMBER is found on the bottom side of the unit 12 DIGITAL WIRELESS USB input accepts the...

Page 6: ...te suministrado 11 COMPARTIMIENTO PARA BATAERÍA Y CORREA Para colocar la batería abra la tapa del compartimiento La batería debe colocarse en la parte inferior del compartimiento Desbloquee el seguro del compartimiento de la batería Coloque la batería de la siguiente manera los polos de la batería deben estar orientados hacia el aparato El polo positivo rojo debe quedar del lado del panel de contr...

Page 7: ...zadapter gehört zum Lieferumfang Verwenden Sie den HPA40 ausschließlich mit dem mitgelieferten Netzteil 11 FACH FÜR AKKU UND SCHULTERGURT Zum Einsetzen des Akkus öffnen Sie das Fach an seinem Verschluss Die untere Hälfte des Fachs dient zur Aufnahme der Batterie Öffnen Sie dann die Batterie Verriegelung um das Batteriefach freizugeben Richten Sie die Batterie zum Einführen wie folgt aus Die Kontak...

Page 8: ...iral cable System Data Power supply Built in rechargeable battery Rechargeable battery type 12 V DC 2 6 Ah Charging time appr 8 5 h Battery operating time up to 8 h External power input 18 V DC 3 A Adaptor input 100 240 V 50 60 Hz 1 5 A or 1 8 A UL version Adaptor output 18 V DC 3 A or 18 V DC 3 5 A UL version Mains connector Standard IEC receptacle Dimensions Weight Dimensions H x W x D 218 x 181...

Page 9: ...s lapage Support denotresiteInternet behringer com Sivotrepaysn estpas danslaliste essayezderésoudrevotre problèmeavecnotre aideenligne quevoustrouverezégalementdansla section Support dusitebehringer com Vouspouvezégalementnousfaireparvenir directementvotredemandederéparation sousgarantieparInternetsurlesite behringer comAVANTdenousrenvoyer leproduit 3 Raccordement au secteur Avantdereliercetéquip...

Page 10: ...llation If this equipment does cause harmful interference to radio or television reception which can be determined by turning the equipment off and on the user is encouraged to try to correct the interference by one or more of the following measures Reorient or relocate the receiving antenna Increase the separation between the equipment and receiver Connect the equipment into an outlet on a circui...

Page 11: ...We Hear You ...

Reviews: