background image

22

23

XD80USB

Quick Start Guide

XD80USB Getting started

(EN) 

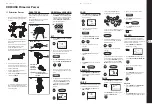
Getting started

PLAYING

Play the kit and adjust the volume in your headphones 
or external sound system to a safe listening level.

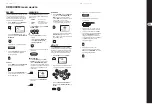
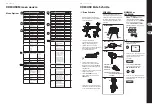
Each drum head or cymbal can give diff erent sounds 
depending on where it is hit: 

NORMAL or LEARNING

1.  Press and hold PAGE/SELECT to enter the 

NORMAL mode or LEARNING mode. (An LED 
shows the mode.) Note: If you are practicing or 
scoring in LEARNING mode, press PLAY/
PRACTICE or START/STOP to stop the play fi rst.

KIT

1.  In NORMAL mode, press KIT until NUM 

is displayed.

2.  Press + or – to select from 10 preset kits, 

or 5 user kits U11 to U15. Play each kit to hear 
how it sounds.

3.  Press KIT or PAGE/SELECT to display other kit 

options:

 NUM, VOL, REV, EQH, EQM, EQL

4.  Press + or – to adjust the range of each option. 

The settings aff ect all pads of the kit.

5.  The settings will not be saved unless you save 

them as a new user kit: Press SAVE/ENTER and 
press + or – to choose from U11 to U15. 
Press SAVE/ENTER again to save the new 
user kit.

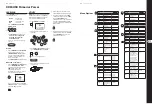
Crash and Ride

Kick

Hi-Hat

Snare and Toms

Head

Edge

Bow

Bow

Bow Shot with:
Pedal Open 
Pedal Half Open  
Pedal Closed
 

Pedal Only: Press down for “Chick”
 

   Press down and quick-release


   for “Splash”


Choke

Rim 

Kick

SONG

KIT

VOICE

PATTERN RHYTHM

LEARNING

PAGE/SELECT

NORMAL

BEAT

SONG

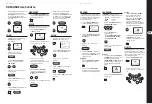
1.  In NORMAL mode, press SONG until NUM is 

displayed, then press START/STOP to play the 
current song.

2.  Press + or – to select from 60 diff erent songs. 

3.  Press SONG or PAGE/SELECT to display other 

song options: 

NUM, ACC, DRM 

4.  Press + or – to adjust the range of each option.

5.  Press START/STOP to start or stop the song.

6.  Press TEMPO and press + or – to adjust 

the tempo.

DRUM OFF

1.  In NORMAL mode, press DRUM OFF to mute/

unmute the drum track from the SONG.

VOICE

You can change the sound (voice) of each pad, and 
save the settings as a new user kit.

1.  In NORMAL mode, press VOICE until NUM 

is displayed.

2.  Press the pad button of the drum or cymbal 

you want to change.

3.  Press + or – to choose from 175 diff erent 

sounds. Press the pad to listen. The Hi-Hat has 
four options. 

4.  Press VOICE or PAGE/SELECT to display other 

voice options: 

NUM, VOL, PAN, PIT, REV, 

MID, P--S, P--N, H--C

5.  Press + or – to select the value of each option.

6.  When you like the way the pads sound, you can 

save this as a new user kit. Press SAVE/ENTER 
and press + or – to choose from U11 to U15. 
Press SAVE/ENTER again to save the new 
user kit.

CLICK

1.  In NORMAL mode, press CLICK to start the 

metronome, and press again to stop.

2.  Press PAGE/SELECT to display the metronome 

options: 

SIG, INT, VOL, VOC


3.  Press + or – to select the range.

4.  Press TEMPO, then press + or – to adjust.

5.  Press CLICK again to stop the metronome.

RECORD

You can record your playing, either on your own or 
playing to a song. The drum track can be turned off . 
Your playing and the song will be recorded, but not 
the internal drum track or metronome. 

1.  In NORMAL mode, press RECORD to enter the 

recording mode.

2.  Press PAGE/SELECT to display recording 

options: 

SNG, KIT, DPM, SIG, INT, DRM, PRC

3.  Press + or – to select the range.

4.  Press START/STOP or hit a drum to start 

the recording. Press  again to stop.

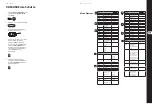
1.  Assemble the drum kit as shown in the 

assembly instructions and tighten 
all connections.

2.  Connect the cables to the drum pads, 

cymbals and foot pedals, as shown in the 
hook-up diagram.

3.  Connect headphones or make connections to 

any external sound equipment such as an 
external amplifi er, or active speaker. See the 
hook-up diagrams for some ideas.

4.  Connect the power supply adapter to the local 

mains supply. This universal adapter can accept 
mains voltages from 100 VAC to 240 VAC. 
Connect the DC output to the drum module. 

5.  Do not turn on the drum module until all 

connections have been made.

6.  Turn down the VOLUME control on the drum 

module, and turn on the POWER switch.

7.  If you are using external sound equipment, 

turn it on after the drum module. At the end of 
the session, turn any external sound equipment 
off  fi rst.

Power
Adapter

Phones

Phones

DC IN

Summary of Contents for XD80USB

Page 1: ...Check out behringer com for Full Manual Quick Start Guide XD80USB High Performance 8 Piece Electronic Drum Set with 175 Sounds 15 Drum Sets LCD Display and USB MIDI Interface...

Page 2: ...aci ndebeserrealizada nicamente porunt cnicocualificado Estes mbolo siemprequeaparece leadviertedelapresenciadevoltaje peligrososinaislardentrodelacaja estevoltajepuedesersuficienteparaconstituirunrie...

Page 3: ...qued lectrocution Utilisezuniquementdesc blesd enceintesprofessionnels dehautequalit avecfichesJackmono6 35mmoufiches verrouillagesd j install es Touteautreinstallationou modificationdoit treeffectu e...

Page 4: ...conectado rede el ctricacomocondutordeprotec ointacto 12 Seutilizarumafichaderedeprincipalouuma tomadadeaparelhosparadesligaraunidadede funcionamento estadeveestarsempreacess vel 13 Utilizeapenasliga...

Page 5: ...m Brackets Step 1 Stand Tighten all connections Asegure todas las conexiones Serrez tous les points d assemblage Alle Verbindungen festziehen Aperte todas as conex es Sharp Edges Bordes afilados Bords...

Page 6: ...10 11 XD80USB Quick Start Guide XD80USB Assembly 15 14 21 16 Step 6 Adjustments Step 4 Cymbals Step 5 Kick Drum Stand Step 3 Drums and Drum Module 17 17 17 17 3 19 19 18...

Page 7: ...Guide XD80USB Hook up Power Adapter Phones Phones DC IN Drum Module Connections Headphones Drum Practice 10 Hi Hat Snare Tom 1 Tom 2 Tom 3 Kick Hi Hat Pedal Crash 1 Ride Power Adapter BEHRINGER ULTRAT...

Page 8: ...ler V AMP3 Mic Guitar Bass Keyboard Bass Modeler BASS V AMP Mixer X2442USB Passive Speakers EUROLIVE B1520 PRO DC IN Power Adapter Computer MIDI through USB Power Adapter DC IN MIDI Controller Power A...

Page 9: ...EAT indicator 31 Moving display shows the metronome moving back and forth with the beat SLOW GOOD FAST gives feedback of your timing during practice 32 UTILITY REC LEARN CLICK indicates the current mo...

Page 10: ...t n PAGE SELECT Mant ngalo pulsado para cambiar entre los modos NORMAL y LEARNING p gina P lselo de forma puntual para ir pasando y elegir los distintos par metros disponibles 14 La touche UTILITY per...

Page 11: ...schen den NORMAL und LEARNING Modi Seiten umzuschalten Dr cken Sie die Taste kurz um die verf gbaren Parameter zyklisch durchzugehen und zu w hlen 14 O bot o UTILITY permite ajuste da sensibilidade th...

Page 12: ...button of the drum or cymbal you want to change 3 Press or to choose from 175 different sounds Press the pad to listen The Hi Hat has four options 4 Press VOICE or PAGE SELECT to display other voice o...

Page 13: ...ot change even if a new KIT or VOICE is chosen or when the power has been turned on and off 8 To reset all the pads back to their original default settings move to the DEF menu and press SAVE ENTER Al...

Page 14: ...Head Edge Bow Bow Bow Shot with Pedal Open Pedal Half Open Pedal Closed Pedal Only Press down for Chick Press down and quick release for Splash Choke Rim Kick SONG KIT VOICE PATTERN RHYTHM LEARNING P...

Page 15: ...a la reproducci n de la grabaci n 6 Pulse PLAY PRACTICE de nuevo para detener la reproducci n Si no hay nada grabado en pantalla aparecer la indicaci n EPy LEARNING ElmodoLEARNINGlepermiteensayaryapre...

Page 16: ...Bow Bow Shot with Pedal Open Pedal Half Open Pedal Closed Pedal Only Press down for Chick Press down and quick release for Splash Choke Rim Kick SONG KIT VOICE PATTERN RHYTHM LEARNING PAGE SELECT NORM...

Page 17: ...nte Slow trop rapide Fast ou en rythme Good 5 Appuyez nouveau sur PLAY PRACTICE pour arr ter Evaluation 6 En mode LEARNING appuyez sur START STOP pour commencer Le PATTERN RHYTHM ou BEAT s lectionn se...

Page 18: ...our tous les Pads ON or OFF DEF Default Settings param tres par d faut R initialisation de la configuration par d faut de tous les Pads Ld Menu Options XD80USB Mise en oeuvre XD80USB Erste Schritte DE...

Page 19: ...n mit einem Song aufnehmen Man kann die Drumspur ausschalten Ihre Performance und der Song werden ohne interne Drumspur oder Metronom aufgenommen 1 Dr cken Sie RECORD im NORMAL Modus um in den Aufnahm...

Page 20: ...uf ON 0 60 H C Hi Hat Steuerung 1 Classic 2 Rock 3 Jazz 4 808 1 4 CLICK SIG Taktart Wert 0 9 2 0 9 4 0 9 8 0 9 16 INT Intervall 1 4 1 8 1 12 1 16 1 2 3 8 VOL Lautst rke 0 32 VOC Voice 1 6 RECORD SNG S...

Page 21: ...r Chick Press down and quick release for Splash Choke Rim Kick SONG KIT VOICE PATTERN RHYTHM LEARNING PAGE SELECT NORMAL BEAT SONG 1 No modo NORMAL aperte SONG at que NUM seja exibido depois aperte ST...

Page 22: ...ads de volta a suas configura es padr o passe para o menu DEF e aperte SAVE ENTER Todos os pads ser o reconfigurados de uma s vez KIT NUM N mero do Kit 1 U15 VOL Volume do Kit 0 32 REV Reverbera o ON...

Page 23: ...sitebehringer com Vouspouvez galementnousfaireparvenirdirectementvotredemande der parationsousgarantieparInternetsurlesite behringer comAVANTdenousrenvoyerleproduit 3 Raccordement au secteur Avantdere...

Page 24: ...ill not occur in a particular installation If this equipment does cause harmful interference to radio or television reception which can be determined by turning the equipment off and on the user is en...

Page 25: ...We Hear You...

Reviews: