background image

User Guide Revision 1.12 


43 

8.2.3.


PID Operating Mode Selection 

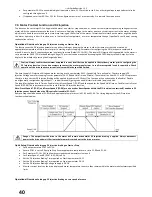
For default operation the drive response to an increase in feedback signal is to decrease motor speed and vice versa to adjust the feedback 
signal back to the set-point. This is referred to as ‘Direct Mode’ PID control. For example when pressure increases in a pumping system and the 
feedback signal increases then the drive response is to slow the pump to reduce the pressure. This mode of operation is the default drive 
behaviour and can be selected by setting P3-04=0 (User PID operating mode = Direct Mode). 
The alternative operating mode is when an increase in feedback signal requires an increase in motor speed. This is referred to as ‘Inverse 
mode’ PID control. For example on a condenser fan control where the feedback signal increases with the load on the condenser increases and 
the fan is reduced to operate at a higher speed. This mode of operation can be selected by setting P3-04=1 (User PID operating mode = Inverse 
mode). 
PID operating mode selection is summarised in the following table. 
 

Parameter P3-04 Setting 

Mode Selected 

Feedback Behaviour 

Motor Behaviour 

Direct Mode 

Signal Increases 

Speed decreases 

Signal decreases 

Speed increases 

Inverse Mode 

Signal Increases 

Speed increases 

Signal decreases 

Speed decreases 


8.2.4.


PID Controller Output Limits 

The output from the PID controller can be limited by settings within the drive not associated with the maximum and minimum speed limits set 
in drive parameters P1-01 and P1-02. This means that different maximum and minimum values can be applied when the drive switches from 
PID control to a preset speed (via digital input) or variable limits can be applied. Parameter P3-09 – PID Output Limit Control sets the method 
used for determining the PID output limits. The following options are available. 
 

Parameter P3-09 

Description 

Digital preset limit value (P3-07 and P3-08) will be used to limit PID controller output 

Analog input 1 (terminal 6) will be used as the maximum output limit 

Analog input 1 (terminal 6) will be used as the minimum output limit 

Analog input 1 (terminal 6) will be used as an offset value and added to the PID controller output 

 
 The basic PID block diagram shown in section 8.1 shows the limits applied when P3-09 is set to 0. When other values are set for P3-09 the 
limits for the PID output are defined by the methods listed in the table above. 
 
When P3-09=0 (default) the limits are set digitally by parameters P3-07 and P3-08 and limits for the PID controller are calculated as follows. 
Upper Limit = P3-07 * P1-01: (A value of 100% limits the maximum speed of the PID controller to the maximum speed limit defined in P1-01). 
Lower Limit = P3-08 * P1-01 
 

8.2.5.


PID Controller Ramp Rates 

The drive standard ramp rates, as defined by P1-03 and P1-04 are normally active whilst the drive operates in PID mode. P3-11 (Maximum PID 
error to enable ramps) can be set to define a threshold PID error level, whereby ramps are enabled or disabled based on the magnitude of the 
PID error. If the difference between the set-point and feedback values is less than the threshold set in P3-11 then the internal ramp times of 
the drive are disabled. Where a greater PID error exists, the ramp times are enabled. This allows the rate of change of motor speed on large 
PID errors to be limited, whilst smaller errors are reacted to quickly. Setting P3-11 to 0 means that the drive ramps are always enabled.  
 

Caution: Care must be taken in adjusting P3-11. Disabling the ramps may cause the motor to react dramatically to larger errors in 
the PID control and tuning of the PID controller might be adversely effected.  


8.2.6.


PID Controller Gains values and Tuning 

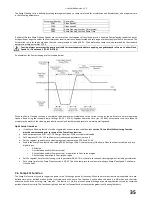
As with any PID controller, the response and behaviour of the system is controlled by the Proportional Gain (P3-01), the Integral Time Constant 
(P3-02) and the Differential Time Constant (P3-03). Correct setting of these parameters is essential for stable and reliable system operation. 
There are many methods and text books available explaining how these terms work and how they can be tuned, and so only a brief summary is 
given below. 
 

P3-01 Proportional Gain: Range 0.1 to 30.0, Default Setting 1.0 

Proportional gain acts as a multiplier of the difference between the Feedback and Set-point signals. The PID controller firstly determines the 
PID Error, assuming direct operation 
PID Error = PID Set-point – PID Feedback 
 
The proportional gain is then used to multiply this error. If the Integral and Differential Time constants are both set to zero, 
PID Output = Proportional Gain x (PID Set-point – PID Feedback) 
 
A large value of P-gain will cause a greater change in output frequency for a small difference between the Feedback and Set-point. If the value 
is too large, the system is likely to be unstable and motor output speed will often overshoot the set-point. Higher values are acceptable on 
dynamic applications requiring fast response. Lower values should be used for slower responding systems, such as fan and pump control 
applications. If the system tends to overshoot, reducing the P gain will have an effect of reducing the overshoot. 
 

P3-02 Integral Time Constant: Range 0.0 to 30.0, Default Setting 1.0 

The integral time constant is a time based function, which modifies the output of the PID controller based on the change in PID Error over a 
defined time period. The effect of the Integral Time Constant is always to try to reduce the PID Error towards zero (so that Feedback = Set-

Summary of Contents for HVAC H2

Page 1: ......

Page 2: ...or Delta connection according to the motor voltage rating in section 4 5 Motor Nameplate Details Motor Rated Voltage P1 07 Motor Rated Current P1 08 Motor Rated Frequency P1 09 Motor Rated Speed Opti...

Page 3: ...echanical Mounting Information can be found in section 3 5 Control Terminal Configuration based on factory settings Hardware Link the terminals as shown optionally through switch contacts to enable dr...

Page 4: ...to enable drive operation Control Terminals Based on the factory default parameter settings Run Stop 10K Speed Pot Close the switch to run enable open to stop Motor Cable o For correct cable size in s...

Page 5: ...fined by EN61800 3 2004 can be achieved Drive Type Rating EMC Category Cat C1 Cat C2 Cat C3 1 Phase 230 Volt Input BFI H2 No additional filtering required Use shielded motor cable 3 Phase 230 400 Volt...

Page 6: ...Standard LED Keypad IP20 Drives 25 5 4 Drive Operating Displays Standard LED Keypad IP20 Drives 25 5 5 Keypad Layout and Function Standard OLED Keypad IP55 and IP66 Drives 25 5 6 Drive Operating Displ...

Page 7: ...available 57 11 7 Parameter Group 8 HVAC Function Specific Parameters 57 11 8 Parameter Group 9 Advance drive control logic configuration 59 11 9 Parameter Group 0 Monitoring Parameters Read Only 60 1...

Page 8: ...ntrol cables whilst power is applied to the drive or to the external control circuits Within the European Union all machinery in which this product is used must comply with Directive 98 37 EC Safety o...

Page 9: ...xx 7 5 18 3 BFI H2 34 0240 3KF12 xx 11 24 3 200 240V 10 1 Phase Input kW Model with Filter kW Output Current A Frame Size BFI H2 0043 22 1KF1X xx BFI H2 22 0043 1KF1D xx 0 75 4 3 2 BFI H2 22 0070 1KF...

Page 10: ...3KF1N xx 7 5 30 4 BFI H2 44 0460 3KF1N xx 11 46 4 BFI H2 54 0610 3KF1N xx 15 61 5 BFI H2 54 0720 3KF1N xx 18 5 72 5 BFI H2 64 0900 3KF1N xx 22 90 6 BFI H2 64 1100 3KF1N xx 30 110 6 BFI H2 64 1500 3KF...

Page 11: ...ation in a pollution degree 2 environment is permissible UL Listed ring terminals lugs must be used for all bus bar and grounding connections 3 4 Mechanical dimensions and Mounting IP20 Units Drive Si...

Page 12: ...er Terminal Torque Settings All Sizes 1 Nm 8 85 lb in 3 6 Mechanical dimensions and mounting IP55 Drive Size A B C D E F G H I mm in mm in mm in mm in mm mm in mm in mm in mm in 4 440 17 32 418 16 46...

Page 13: ...me Size 7 8 Nm 3 7 Mechanical dimensions and mounting IP40 Units Drive Size A B C D E F G H I J mm in mm in mm in mm in mm in mm in mm in mm in mm in mm in 8 2000 78 74 1925 75 79 1950 76 77 733 28 86...

Page 14: ...s for drives mounted in non ventilated metallic enclosures Drive Size X Above Below Y Either Side Z Between Recommended airflow mm in mm in mm in CFM m3 min 2 75 2 95 50 1 97 46 1 81 11 3 100 3 94 50...

Page 15: ...al and suitably flat surface The Enclosure must be anchored to an adjacent wall using the mounting points provided All Enclosure vents must remain clear with airflow unobstructed The mounting site and...

Page 16: ...icated until the screw slot is vertical Using a suitable flat blade screwdriver rotate the four retaining screws indicated until the screw slot is vertical Terminal Cover Release Screws Using a suitab...

Page 17: ...11 6 Frame Size 7 Using a suitable flat blade screwdriver rotate the two retaining screws indicated until the screw slot is vertical Using a suitable flat blade screwdriver rotate the four retaining...

Page 18: ...User Guide Revision 1 12 18 3 11 7 Frame Size 8 Open Access to Control Terminal Wiring and Options Module Slot Access to Power and Motor Wiring...

Page 19: ...1 x 22mm and 2 x 28mm 1 PG13 5 and 2 PG16 1 x M20 and 2 x M25 UL rated ingress protection Type is only met when cables are installed using a UL recognized bushing or fitting for a flexible conduit sy...

Page 20: ...4 1 2 Protective Earth Conductor The Cross sectional area of the PE Conductor must be at least equal to that of the incoming supply conductor 4 1 3 Safety Ground This is the safety ground for the dri...

Page 21: ...wed before removing the terminal covers or connection The maximum permissible short circuit current at the drive Power terminals as defined in IEC60439 1 is 100kA An optional Input Choke is recommende...

Page 22: ...onnection STAR always gives the higher of the two voltage ratings Incoming Supply Voltage Motor Nameplate Voltages Connection 230 230 400 Delta 400 400 690 400 230 400 Star 4 6 Motor Thermistor Connec...

Page 23: ...otor earth must be connected to the drive Optional Brake Resistor DC Bus Connections Where a Brake resistor is used it must be connected to the BR and DC terminals Protective Earth Ground connection T...

Page 24: ...re parameter changes UP Used to increase speed in real time mode or to increase parameter values in parameter edit mode DOWN Used to decrease speed in real time mode or to decrease parameter values in...

Page 25: ...Press Display shows Press Display shows Press Display shows Etc 5 4 Drive Operating Displays Standard LED Keypad IP20 Drives Display Status Drive mains power applied but no Enable or Run signal appli...

Page 26: ...xit parameter edit mode and to store parameter changes Up Button Used to increase speed in real time mode or to increase parameter values in parameter edit mode Down Button Used to decrease speed in r...

Page 27: ...the drive can be stored internally within the drive as the standard default settings This does not affect the procedure for returning the drive to factory default settings as described above P6 29 Sav...

Page 28: ...ress the Navigate button to select Language 5 11 Selecting between Hand and Auto Control Standard OLED Keypad IP55 and IP66 Drives The active control source is shown on the OLED display Use the Hand a...

Page 29: ...ve units are factory set with acceleration and deceleration ramp rates set to 30 seconds The default value is suitable for the majority of HVAC applications but can be altered by changing the values i...

Page 30: ...ected to the drive analog input 1 or 2 T6 or T10 and is selected as the feedback to the drive PID controller See parameter menu 3 for PID configuration parameters and feedback selection Operational Ov...

Page 31: ...below Drives can be connected using the RJ45 data cables and the RS485 Data Cable Splitter as shown above up to a maximum of 5 drives Part numbers are as follows Product Code Description OPT J45SP BFI...

Page 32: ...gy Optimiser P1 06 must remain disabled Set Parameter P1 14 101 to allow access to extended parameters On the Network Master In Menu 3 Configure parameters for the PID Control Ensure the network seria...

Page 33: ...operating curve in order to model normal operation A graphical representation of the Load Profile Monitoring Function is shown below Operational Overview In order to use the Load Profile Monitoring F...

Page 34: ...is used to remove blockages from a pump The pump clean function can be manually triggered by a digital input or can be triggered automatically on start up or when the drive detects an over torque cond...

Page 35: ...Setup Overview If the Pump Cleaning function is to be triggered by an over torque condition then section 7 4 Load Profile Monitoring Function must be commissioned prior to set up of the Pump Clean fun...

Page 36: ...ion in parameter P8 02 7 7 Bypass Control Function The Bypass Control function allows the motor to be operated either from the drive variable speed control or direct on line on the incoming supply fix...

Page 37: ...bypass control and is connected directly to the Bypass contactor Relay 2 is configured for drive control and is connected directly to the Drive Output Contactor Under normal operation the drive will...

Page 38: ...r will be opened there will be a short delay defined by P8 13 the Drive Output contactor will close and the drive will take over operation of the motor If the enable input is removed from the drive th...

Page 39: ...ed whilst drive is in Fire Mode Display Trip O Volt Over Voltage on DC Bus U Volt Under Voltage on DC Bus h O I Fast Over current Trip O I Instantaneous over current on drive output Out F Drive output...

Page 40: ...rrent levels are within the specified limited The time to apply DC Injection Voltage on motor starting is set by parameter P6 11 Speed Hold Time on Enable The time to apply DC Injection Voltage on mot...

Page 41: ...y Mode parameter P2 27 must be 0 This will disable Standby Mode and ensure Boost Voltage is applied whilst the drive is enabled with zero speed reference Ramp to Stop should be enabled P1 05 0 and app...

Page 42: ...ction for control of motor speed The PID Set point can be a digital or analog reference provided to the drive Feedback is via one of the two analog inputs contained with the drive standard control ter...

Page 43: ...ler to the maximum speed limit defined in P1 01 Lower Limit P3 08 P1 01 8 2 5 PID Controller Ramp Rates The drive standard ramp rates as defined by P1 03 and P1 04 are normally active whilst the drive...

Page 44: ...r the drive The wake mode level is used to trigger the drive returning out of sleep mode to normal operation Setting different thresholds for the sleep and wake levels allows boundaries to be set that...

Page 45: ...is connected to drive analog input 1 terminal 6 The following parameter changes are made to configure the HVAC unit to accept the set point signal from the control system P3 05 1 Sets the PID set poi...

Page 46: ...e larger than or equal to the threshold before the pump prime time P3 16 expires Failure of the Pump prime mode indicates a leak or burst pipe within the pump system and will result in the drive shutt...

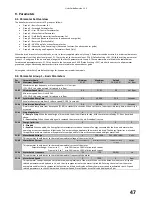
Page 47: ...rom 0 to base speed P 1 09 in seconds P1 04 Deceleration Ramp Time 0 0 6000 0 30 0 Seconds Deceleration ramp time from base speed P1 09 to standstill in seconds When set to zero fastest possible ramp...

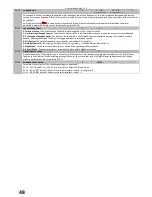
Page 48: ...ns using the internal or remote Keypad Pressing the keypad START button toggles between forward and reverse 3 PID Control The output frequency is controlled by the internal PID controller 4 Fieldbus C...

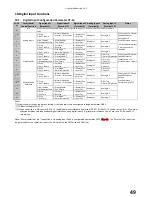
Page 49: ...Run Enable O Forward C Reverse O Remote Ctrl C Local Ctrl Analog In 1 O Preset 1 C Preset 2 8 O Stop C Run Enable O Fire Mode 1 C Normal Operation 1 O Remote Ctrl C Local Ctrl Analog In 1 O Preset 1...

Page 50: ...e functions are enabled See section 7 6 Pump Stir function and section 8 PID control applications When HVAC functions are disabled Preset speed 7 can be selected as per normal operation and is selecte...

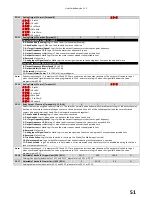
Page 51: ...tive and therefore the normally open contact is closed terminals 14 and 15 will be linked together and the normally closed contact is opened terminals 14 and 16 will no longer be connected together 0...

Page 52: ...an existing parameter for example to display conveyer speed in metres per second based on the output frequency This function is disabled if P2 21 is set to 0 If P2 21 is set 0 the variable selected i...

Page 53: ...on or reset the drive will not start if Digital Input 1 remains closed The Input must be closed after a power on or reset to start the drive Following a Power On or Reset the drive will automatically...

Page 54: ...t digital reference set point used for the PID Controller P3 07 PID Output Upper Limit P3 08 100 0 100 0 Limits the maximum value output from the PID controller P3 08 PID Output Lower Limit 0 0 P3 07...

Page 55: ...tune Enable 0 1 0 When set to 1 the drive immediately carries out a non rotating auto tune to measure the motor parameters for optimum control and efficiency Following completion of the auto tune the...

Page 56: ...nk Temperature 0 to 100 0 to 100 C 5 User Register 1 Can be accessed by PLC program or group 9 parameters 4 User Register 2 Can be accessed by PLC program or group 9 parameters 7 P0 80 Value P0 80 val...

Page 57: ...r Parameters as Default 0 1 0 Setting this parameter to 1 saves the current parameter settings as User default parameters When the User carries out a 3 button default parameter command UP DOWN and STO...

Page 58: ...32 0 Open Activation 1 Closed Activation P8 10 Fire Mode Speed P1 01 P1 01 5 Hz Rpm Sets the operational frequency of the drive when Fire Mode is selected Drive will maintain operation at this freque...

Page 59: ...for Reverse run direction control P9 07 Reset Input Source Defines the source of the signal to be used for the Reset input P9 08 External Trip Input Source Defines the source of the signal to be used...

Page 60: ...oviding an auto tune has been successfully completed P0 19 Cascade Run Time Log Hrs Run Time values for variable speed and DOL pumps used in cascade function 5 entry log 0 Master 1 DOL1 2 DOL2 3 DOL3...

Page 61: ...suspended on drive trip P0 38 Heatsink Temperature Log 30s Diagnostic log for heatsink temperature Values logged every 30S with 8 samples total Logging suspended on drive trip P0 39 Ambient Temperatu...

Page 62: ...Minutes and Seconds since date of manufacture P0 68 User ramp value Displays the User ramp value received from the Fieldbus interface This ramp function is only active when P5 07 1 Enabled P0 69 I2C e...

Page 63: ...face allows connection to a Modbus RTU network as described below 12 2 Modbus RTU Communications 12 2 1 Modbus Telegram Structure The drive supports Master Slave Modbus RTU communications using the 03...

Page 64: ...rive Healthy 1 Drive Tripped The Upper Byte will contain the relevant fault number in the event of a drive trip Refer to section 15 1 for a list of fault codes and diagnostic information 7 Output Freq...

Page 65: ...P to 250kW 350HP 480V rms AC 18kA rms AC All the drives in the above table are suitable for use on a circuit capable of delivering not more than the above specified maximum short circuit Amperes symme...

Page 66: ...8 18 2 5 16 100 11 15 26 5 32 30 10 8 24 4 14 100 15 20 32 9 40 40 16 8 30 6 12 100 18 5 25 46 6 63 60 16 4 39 10 10 100 22 30 54 1 63 60 25 4 46 10 8 100 30 40 69 6 80 80 35 3 61 16 6 100 37 50 76 9...

Page 67: ...Frequency 50 60Hz 5 Variation Short Circuit Capacity Voltage Rating Min kW HP Max kW HP Maximum supply short circuit current 230V 0 37 0 5 18 5 25 5kA rms AC 230V 22 30 75 100 10kA rms AC 400 460V 0 7...

Page 68: ...r Relay Hysteresis Band P2 12 Analog Output 1 Format P6 10 Enable PLC Operation P2 13 Analog Output 2 Function Select P6 11 Speed Hold Time On Enable P2 14 Analog Output 2 Format P6 12 Speed Hold Time...

Page 69: ...9 Remote Down Input Source P9 04 Run REV Input Source P9 32 Fire Mode Input Source P9 05 Latch Function Enable P9 33 Analog Output 1 Source P9 06 Reverse Enable P9 34 Analog Output 2 Source P9 07 Rese...

Page 70: ...k the drive ambient temperature Ensure the drive internal cooling fan is operating Ensure that the required space around the drive as shown in section 3 8 thru 3 10 has been observed and that the cool...

Page 71: ...e Enable Circuit Error Buffer Output Hardware Enable Circuit Fault 40 Autotune fail 1 Autotune Failed Measured motor stator resistance varies between phases Ensure the motor is correctly connected and...

Page 72: ...User Guide Revision 1 12 72 82 H2MAN BE_V1 11...

Reviews: