22
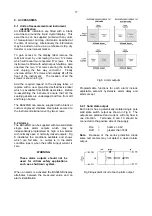
9.2.12 Adjusting alarm setpoints from the
display mode
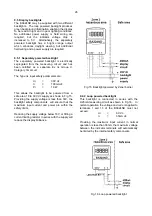
Access to the alarm setpoints from the indicator
display mode is obtained by operating the
P
and
Up
push-buttons simultaneously as shown in Fig
12. If the setpoints are not protected by a security
code the alarm setpoint prompt 'SP1' will be
displayed. If the setpoints are protected by a
security code, 'COde' will be displayed first.
Pressing
P
again will enable the alarm security
code to be entered digit by digit using the
Up
and
Down
buttons to change the flashing digit, and the
P
push-button to move to the next digit. If the
correct code is entered pressing
E
will cause alarm
setpoint prompt 'SP1' to be displayed. Pressing
the
Up
or
Down
button will toggle the display
between the two alarm setpoint prompts 'SP1' and
'SP2'.
If an incorrect security code is entered, or a button
is not pressed within ten seconds, the indicator will
automatically return to the display mode.
Fig 12 Setpoint adjustment from the display mode
To adjust an alarm setpoint select 'SP1' or 'SP2'
and press
P
which will reveal the current setting.
Each digit of the setpoint may be adjusted using
the
Up
and
Down
push-buttons, and the
P
button
to move to the next digit.
When the required setpoint has been entered,
pressing
E
will return the display to the 'SP1' or
'SP2' prompt from which the other setpoint may be
selected, or the indicator may be returned to the
display mode by pressing
E
again.
Direct access to the alarm setpoints is only
available when the menu is enabled - see section
9.2.11
9.3 Lineariser
The indicator can be supplied with a sixteen point
lineariser which may be adjusted to compensate
for almost any non linear variable. For example, a
level signal from a horizontal cylindrical tank may
be linearised by the indicator to display the tank
contents in linear volumetric units.
The addition of linearising software does not affect
the intrinsic safety of the indicator.
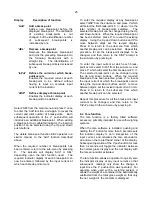
Fig 13 shows a typical linearising characteristic.
Up to sixteen break-points may be programmed to
occur at any input current between 4 and 20mA.
The slope between adjacent break-points may be
set anywhere between -1250 and +1250 display
counts per milliamp. Greater slopes may be
programmed, but the indicator performance will be
degraded. A linear characteristic can be obtained
by programming just two points, one at 4mA and
the other at 20mA.
Fig 13 Typical indicator characteristic
The lineariser software does not change the main
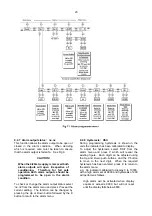
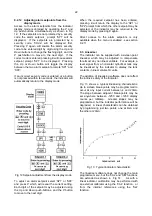
programme menu, but the 'CAL' and 'SEt' functions
are extended as shown in Fig 14. As with a
linear indicator, calibration may be performed with
an external calibrator using the 'CAL' function, or
from the internal references using the 'Set'
function.

