background image

42/EN

Troubleshooting

Machine does not start.

•  Power cable is unplugged. >>> Check if the power cable is plugged in.
•  Fuse is blown. >>> Check the fuses in your house.
•  Water is cut. >>> Make sure that the water inlet tap is open.
•  Door of the machine is open. >>> Make sure that you have closed the door of the 

machine.

•  On / Off button is not pressed. >>> Make sure that you have turned on the machine by 

pressing the On / Off button.

Dishes are not washed clean

•  Dishes are not placed orderly in the machine. >>> Load the dishes as described in the 

user manual.

•  Selected programme is unsuitable. >>> Select a programme with a higher temperature 

and cycle time.

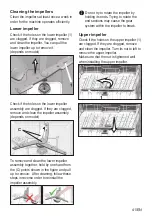
•  Impellers are stuck. >>> Prior to starting the programme, turn the lower and upper 

impellers by hand to make sure that they rotate freely.

•  Impeller holes are clogged. >>> Lower and upper impeller holes might be clogged 

with food remnants such as lemon pips. Clean the impellers regularly as illustrated in 

section “Cleaning and Care”.

•  Filters are clogged. >>> Check if the filter system is clean. Clean the filter system 

regularly as illustrated in section “Cleaning and Care”.

•  Filters are installed incorrectly. >>> Check the filter system and make sure that it is 

installed correctly.

•  Baskets are overloaded.  >>> Do not overload the baskets in excess of their capacity.
•  Detergent is stored under unsuitable conditions. >>> If you are using powder 

detergent, do not store the detergent package in humid places. Keep it in a closed 

container if possible. For ease-of-storing, we recommend you to use tablet detergents.

•  Detergent is not sufficient. >>> If you are using powder detergent, adjust the amount of 

detergent according to the soiling degree of your dishes and/or programme definitions. 

We recommend you to use tablet detergents for optimum results.

•  Rinse aid is not sufficient.  >>> Check the rinse aid indicator and add rinse aid if 

necessary. Increase the rinse aid setting if there is enough amount of rinse aid in the 

machine.

•  Detergent dispenser lid is left open. >>> Make sure that the detergent dispenser lid is 

closed tightly after adding detergent.

Dishes are not dry at the end of cycle

•  Dishes are not placed orderly in the machine. >>> Place your dishes in a way that no 

water will accumulate in them.

8-

Summary of Contents for BDFN36640C

Page 1: ...Dishwasher User s Manual EN 17 9326 0100_BEKO_B8L_EN 06 12 21 9 05 BDFN36640CX ...

Page 2: ...duct We hope that you get the best results from your product which has been manufactured with high quality and state of the art technology Therefore please read this entire user manual and all other accompanying documents before using the product Follow all warnings and information in the user manual Thus you can protect yourself and your product against potential dangers Keep the user manual If y...

Page 3: ...23 Tray Wash Supports 24 SoftTouch Accessory 24 Lower Basket Glass Holder 24 Lower basket multipurpose height adjustable service rack 25 Lower basket bottle wire 26 Upper basket multipurpose service rack 26 Bottle and Dish Holder on the Lower Basket 27 Adjusting the height of the upper basket 28 Upper basket multi function service rack 29 Upper basket height adjustable rack 29 Collapsible upper ba...

Page 4: ...tion Bed breakfast type hotels boardinghouses This product must be used to do the domestic type dishes only This product is not suitable for commercial or collective use The service life of your product is 10 years During this period original spare parts will be available to operate the product properly Safety for children vulnerable persons and pets This product can be used by children at and abo...

Page 5: ...s on the power cable Power cable must not be bent excessively pinched or come into contact with any heat sources Do not use extension cords multi sockets or adapters to operate the product Plug must be easily accessible If this is not possible the electrical installation where the product is connected must contain a device which conforms to the electrical regulations and disconnects all poles from...

Page 6: ...operly the door will not be closed completely and cause hot steam to escape Otherwise it might cause serious burns and injuries and harm your furniture Do not install the product close to heat sources heater stove and etc or under the cooking area of a hob If the product is going to be used inside a wardrobe cabinet module keep the doors of the wardrobe cabinet module open during operation in case...

Page 7: ...omplete When you pull the upper and lower baskets out completely the door of the product will bear all the weight of the baskets Do not sit or put other loads on the door otherwise the product may tilt Maximum washing capacity of the product is stated in the section called Technical Specifications To prevent possible injuries always place the sharp and pointed dishes such as service fork bread kni...

Page 8: ... the product was purchased Each household performs important role in recovering and recycling of old appliance Appropriate disposal of used appliance helps prevent potential negative consequences for the environment and human health 2 Maintenance and cleaning safety Do not wash the product by spreading or pouring water onto it Do not use sharp or abrasive tools when cleaning the product Do not use...

Page 9: ...ials specified in the Directive Package information Packaging materials of the product are manufactured from recyclable materials in accordance with our National Environment Regulations Do not dispose of the packaging materials together with the domestic or other wastes Take them to the packaging material collection points designated by the local authorities ...

Page 10: ...elevant standards These values may vary according to the usage of the product and ambient conditions Note for test institutions Data required for performance tests shall be provided upon request Requests can be e mailed to the following address dishwasher standardloading com Do not forget to provide the code stock number and serial number of the product to be tested in your request e mail along wi...

Page 11: ...r 4 Cutlery basket depends on model 5 Door 6 Rating Label 7 Control panel 8 Detergent dispenser 9 Lower basket 10 Filters 11 Salt reservoir lid 12 Upper basket rail 13 Upper cutlery basket depends on model 14 Tabletop depends on model 15 Fan drying system depends on model 3 15 15 ...

Page 12: ...g or under the counter models The warranty will be void if this is done When placing the product pay attention not to damage the floor walls piping etc Do not hold the product from its door or panel to move it Appropriate installation location In the area where this product is installed there must not be a lockable sliding or hinged door that will restrict full opening of the product s door Make s...

Page 13: ...aximum If the water pressure exceeds 10 bars a pressure relief valve should be installed in between NOTICE The water supply and draining hoses must be securely fastened and remain undamaged NOTICE Open the taps completely after making the connections to check for water leaks Aquasafe depends on the model The Aquasafe system protects against water leaks that may occur at the hose inlet Water contac...

Page 14: ...se when the product is used without grounding in accordance with the local regulations Connection must comply with national regulations Power cable plug must be easily accessible after installation Plug in the product to a grounded socket which is protected by a fuse of 10 Amperes The specified voltage must be equal to your mains voltage Do not make connections via extension cables or multi plugs ...

Page 15: ... follows 1 Connect the green yellow or green earth wire to the terminal in the plug marked E or with the symbol or coloured green and yellow or green 2 Connect the blue neutral wire to the terminal in the plug marked N or coloured black 3 Connect the brown live wire to the terminal in the plug marked L or coloured red With the alternative plugs a 13A fuse must be fitted either in the plug or adapt...

Page 16: ...ness must be softened if it is over 7 dH Otherwise hardness ions will accumulate on the dishes that are washed and may affect the washing rinsing and drying performances of the machine Adjusting the water softening system Washing performance will increase when water softening system is adjusted properly 5 Read Quick Guide Adjusting Water Softening System before this section The regeneration of the...

Page 17: ...for the environment Liquid detergents without chlorine may not remove tea and coffee stains from cups Adding salt Water softening system needs to be regenerated in order for the product to operate with the same performance continuously Dishwasher salt is used for this purpose Use only special softening salts produced particularly for the dishwashers in your machine It is recommended to use granule...

Page 18: ...nt dispenser There is the risk of explosion Put the detergent into the detergent dispenser just before operating the machine as illustrated below 1 Push the latch to right to open the detergent dispenser lid A depends on model 2 Put suggested amount of powder liquid gel or tablet detergent in the reservoir Inside the detergent dispenser there are level markings that help you use appropriate amount...

Page 19: ...or rinse aid effect Some types of these detergents contain special purpose components such as glass and stainless steel protectors These tablets show their effects up to a certain water hardness level 21 dH Water softening salt and rinse aid must also be used together with the detergent if the water hardness level is above the mentioned level The best washing performance in dishwashers is obtained...

Page 20: ...washer just as it happens in handwashing as well Some delicate glass types and crystals may become dull in time We strongly recommend you to check if the tableware you are going to purchase is suitable for washing especially in the dishwasher Placing the dishes into the dishwasher Depending on the capacity of your dishwasher you can use your dishwasher in the optimum way with respect to energy con...

Page 21: ...21 EN Suggestions for loading the dishwasher Lower basket Upper basket Improper Loading Of Dishware Improper Loading Of Dishware ...

Page 22: ...pace while placing your dishes in the lower basket and free up space for your dishes of different sizes Cutlery basket depends on model Cutlery basket is designed to wash your dishes such as knife fork spoon etc in an efficient manner Since the cutlery basket can be moved A B you can create more space while placing your dishes in the lower basket and free up space for your dishes of different size...

Page 23: ... horizontal or vertical position by holding them from their stems and pushing in the direction of arrow Collapsible lower basket tines depends on model There are foldable tines A located at the lower basket of the machine are designed for an easier placement of large pieces such as pans bowls etc You can create larger spaces by folding each tines individually or all of them at once To bring the co...

Page 24: ...gramme and function selection SoftTouch Accessory depends on model The SoftTouch Accessory found in the lower basket of your machine enables a safe washing for your fragile glasses Lower Basket Glass Holder depends on model Lower Basket Glass Holder found in the lower basket of your machine enables a safe washing for your oversized and tall glasses ...

Page 25: ...ower or upper position or close them to create a wider space in your lower basket Make sure that the impeller does not touch the dishes you placed on the racks To close the racks 1 Fold the rack A 2 Slide the rack up B 3 Put the rack in vertical position C 4 Slide the rack down and lock it by the tabs D You may open the racks in the same process in reverse order To adjust the height of the racks 1...

Page 26: ...ket multipurpose service rack to remove it if you do not want to use it If you want to use the upper basket multipurpose service rack again you can easily attach it to the side section of your upper basket Lower basket bottle wire depends on model The bottle wire is designed for easier washing of long pieces with wide mouths You may take out the bottle wire from the basket when not in use by pulli...

Page 27: ...ringing the wires to horizontal position by holding them from their ends may cause them to be bent Thus it is advisable to bring the wires to horizontal or vertical position by holding them from their bottom Tray Washing Support depends on model You may use the tray washing supports if you want to wash a tray on your lower basket Refer to the Additional Functions section to select the proper progr...

Page 28: ...e A 2 Lower the basket to the next lower position 3 Release the basket when it catches on to the next lower position Repeat the same operation if the height is not adequate 1 2 3 1 To raise the basket hold the wires of the basket and pull the basket upwards with both hands while the basket is at the lowermost position B 2 Release the basket when it catches on to the next upper position with a Clic...

Page 29: ...acing of the stemware with proper sizes on the upper basket You may remove the upper basket multi function service rack by lifting it upwards when you do not want to use it You may reinstall the upper basket multi function service rack on the side of your upper basket easily to use it again Upper basket height adjustable rack depends on model Use the lower and upper parts of the height adjustable ...

Page 30: ...on Collapsible upper basket wires depends on model You can use collapsible wires when you need a larger space for your dishes in the upper basket of your machine To bring the collapsible wires into horizontal position grab the wire from the middle position and push them in the direction of arrow in the figure Place your larger dishes into the area created To bring the wires back to vertical positi...

Page 31: ...n models with partial movement feature pushing the bar 1 on the handle enables the central tray of the basket to get to the lower position and the system gets unlocked Thus right and left side trays can be used as moving parts The free space enabled by the side trays allows long parts to be loaded in the upper basket When the central tray is in the lower position you can load long high items such ...

Page 32: ...unction buton again until the function indicator turns off Preparation of the machine 1 Open the door of the dishwasher 2 Load your dishes as described in the user manual 3 Ensure that lower and upper propellers are rotating freely 4 Add adequate amount of detergent in the detergent compartment Program selection 1 Turn on your machine by pressing the On Off button when the door is closed 2 Check t...

Page 33: ...nction Depends on model This function operates the lower impeller with a higher pressure and higher speed to enable a better washing for dishes such as pans and trays with stubborn dried soiling Half Load function Depends on model It is used to operate the machine without loading it completely 1 Load your dishes in the machine as you like 2 Turn the machine on with On Off key 3 Select the desired ...

Page 34: ...tion depends on the model If there is an economic electricity tariff in your area you can use the delay function to wash your dishes at respective hours You may delay the start time of the selected program up to 24 hours 1 With the door closed press the delay button after selecting the washing program and other additional functions 2 When you press the Delay button 1h is displayed on the Display I...

Page 35: ...e door is closed 2 Child Key Lock indicator shall be turned off and the key lock shall be cancelled Please refer to the Quick Use Card for the use of sub menu additional functions Functions Under the Settings Menu depends on the model Additional functions are available under the settings menu of your machine depending on the model When the door is closed after turning on your machine with the On O...

Page 36: ...leaning function is enabled at F 1 position and is disabled at F 0 position 4 Exit the settings menu by pressing the On Off button for 3 seconds Your settings will be saved automatically Interior Lighting Depends on the Model Suitable models are equipped with a light that illuminates the interior of your machine when the door is opened 1 When the door is closed after turning on your machine with t...

Page 37: ...at the water softener is removed after rinsing operation your machine resumes operation at drying cycle after keeping silent for a while Cancelling Resetting the program With the door closed press the Start Pause Cancel button for 3 seconds Display shows 0 01 after a 3 2 1 countdown Wait for discharge to complete The discharge is completed within 2 minutes and your machine will sound an audible wa...

Page 38: ...n overflow and the E 01 icon will flash on the Program indicator As long as the overflow continues the safety algorithm will operate and try to discharge the water in the machine If the overflowing stops and the safety procedure is completed the E 01 icon will turn off If the E 01 icon does not turn off the error is permanent and you should call the service InnerClean depends on model This program...

Page 39: ...ne cleaning agents monthly This operation will help removal of leftovers and limescale from the interior of the machine If water has remained in the machine drain the water by performing the procedures under the topic Cancelling a programme If the water cannot be discharged remove the filters as specified in the Cleaning the filters section and check if there are any leftover deposits that have ac...

Page 40: ...aning system available on your machine If your machine has auto filter cleaning feature do not remove the micro filter cleaning mechanism 4 for cleaning Cleaning the hose filter Damages on the machine that may be caused by impurities coming from the urban supply water or your own water installation such as sand dirt rust etc can be prevented by means of the filter attached to the water inlet hose ...

Page 41: ...pends on model C To remove and clean the lower impeller assembly together hold by one hand from the C points shown in the figure and pull up to remove After cleaning follow these steps in reverse order to reinstall the impeller assembly Do not try to rotate the impeller by holding its ends Trying to rotate the end sections may cause the gear system within the impeller to break Upper impeller Check...

Page 42: ... clean Clean the filter system regularly as illustrated in section Cleaning and Care Filters are installed incorrectly Check the filter system and make sure that it is installed correctly Baskets are overloaded Do not overload the baskets in excess of their capacity Detergent is stored under unsuitable conditions If you are using powder detergent do not store the detergent package in humid places ...

Page 43: ...ffee or lipstick stains remain on dishes Selected programme is unsuitable Select a programme with a higher temperature and cycle time Surface quality of the kitchen utensils is deteriorated Tea and coffee stains or other dye spots may not be cleaned in dishwasher when they have penetrated in deteriorated surfaces Desired washing performance can not be obtained on kitchen utensils with deteriorated...

Page 44: ...kept waiting in machine dirt must be removed by prewash or dishes must be washed without being kept waiting Electric installation is not grounded Check if your machine is connected to the actual grounding line Otherwise the static electric created in the product causes arcs on the surfaces of metal items creating pores removing the protective cover on the surface and causing discoloration Intensiv...

Page 45: ...ervoir lid is tightly closed after finishing the filling process Run the prewash programme to remove the salt that spilled inside the machine Since the salt granules that will remain under the lid will dissolve during prewash causing the lid loosen check the lid once again at the end of the programme Water hardness setting is low or salt level is insufficient Measure the hardness of the supply wat...

Page 46: ...at the lid of the rinse aid reservoir is closed after adding rinse aid Kitchen utensils are broken Dishes are not placed orderly in the machine Load the dishes as described in the user manual Baskets are overloaded Do not overload the baskets in excess of their capacity Water remains in the dishwasher at the end of the programme Filters are clogged Check if the filter system is clean Clean the fil...

Page 47: ...his guarantee is in addition to your statutory rights as a consumer If you have any questions about these rights please contact the retailer from which you purchased the product In certain circumstances it is possible that your statutory rights may offer additional or higher levels of protection than those offered under the terms of this guarantee What is covered by this guarantee Repairs to the p...

Page 48: ...for all Washing Machines Dishwashers and Electric Cookers as incorrect installation may result in you having to pay for the cost of repairing the product 5 Gas Cookers must be professionally installed by a Gas Safe or Gas Networks Ireland for Republic of Ireland registered gas installer 6 This guarantee is given in respect of products purchased and used within the United Kingdom and the Republic o...

Page 49: ...oof of purchase The Manufacturer reserves the right to charge for the reasonable cost of any service call if You cannot provide evidence that your product is covered by this guarantee Where a service call has been made and the engineer finds that there is no fault with your product That your product has not been installed or operated in accordance with the User Instructions Booklet That the fault ...

Page 50: ...et User guide The product model and serial number is printed on the Rating Label affixed to the appliance The Retailer Purchased from and Date of purchase will be printed on your purchase receipt or other proof of purchase paperwork Recording of these details alone will not count as proof of purchase A valid proof of purchase is required for requesting service under guarantee Model number Serial n...

Page 51: ...er to the instructions contained within the extended guarantee agreement document otherwise please call us using the appropriate number above where service can be obtained at a charge Should you experience any difficulty in obtaining service please call us on 0333 207 9710 or 01 862 3411 Contact us though our website Send us a secure message through our online contact us form Please visit our webs...

Reviews: