background image

EN

6

  Maintenance and cleaning

 ** We recommend that you switch off 

the appliance at the socket outlet and 

pull out the mains plug before cleaning.

 ** Never use any sharp abrasive  

instrument, soap, household cleaner, 

detergent and wax polish for cleaning.

 ** Use lukewarm water to clean the 

cabinet of the appliance and wipe it 

dry.

 ** Use a damp cloth wrung out
in a solution of one teaspoon of  
bicarbonate of soda to one pint of  
water to clean the interior and wipe it 
dry.
 ** Make sure that no water enters the 
lamp housing.
 ** If the appliance is not going to be  
used for a long period of time switch it 
off, remove all food, clean it and leave 
the door ajar.
 ** Any dust that gathers on the  
condenser, which is located at the  
back of the appliance, should be  
removed once a year with a vacuum 
cleaner.
** Check door seals regularly to ensure  
they are clean and free from food 
particles.
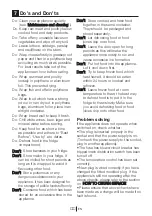
** Removal of door tray.

• To remove door racks, remove
all the contents and then simply push


the door rack upwards from the base.


** Make sure that the special plastic


container (drain tray) at the back of the


appliance which collects defrost water


is clean at all times. If you want to


remove the tray to clean it follow the


instructions below: 

• Switch off at the socket outlet and

pull out the mains plug.

• Push the lug down with the tip of a

screw driver & pull out with a jerk

movement.

• Clean the drain tray and wipe it dry.

• Reassemble reversing the

sequence and operations.

Summary of Contents for BLQSDW177

Page 1: ...EN Instruction of use Built In Cooler BLQSDW177 ...

Page 2: ......

Page 3: ...er on the last page of this user manual and store in a safe location close to the appliance for easy future reference This user manual may also be applicable for several other models Differences between models will be listed If you have any questions or concerns please call our contact centre or find help and information online at www beko co uk Explanation of symbols used throughout this User Man...

Page 4: ...sing of your old refrigerator 8 Placing and Installation 8 Installation instructions 9 Transportation instructions 8 Replacing the interior light bulb 9 Reversing the door 13 4 Before operating 14 Final Check 14 5 Operating the product 15 Control Panel 15 Suggested arrangement of food in the appliance 16 Problem solving 18 6 Maintenance and cleaning 17 7 Do s and Don ts 18 Defrosting 15 Standard g...

Page 5: ...H XLIR MX MW ZEPMH JSV SXLIV QSHIPW 1 Control Panel 2 Movable shelves 3 Wine rack 4 Interior light on left wall 5 Vegetable drawers 6 Defrost water collection channel drain tube 7 Crisper cover 8 Front feet 9 Adjustable door shelves 10 Bottle shelf Congratulations on your choice of a Beko quality Appliance which has been designed to give you service for many years 2 9 9 9 9 10 1 3 2 2 2 6 5 5 7 8 ...

Page 6: ...ons on page 9 for information on suitable location To obtain the best possible performance and trouble free operation from your appliance it is very important to carefully read these instructions On delivery check to make sure that the product is not damaged and that all the parts and accessories are in perfect condition Ensure that the plug remains readily accessible Do not use multiple adapter o...

Page 7: ...t The appliance must be positioned so that the plug is accessible WARNING When positioning the appliance ensure the supply cord is not trapped or damaged Should the mains lead of the appliance become damaged or should it need replacing at any time it must be replaced by a special purpose made mains lead which can only be obtained from a Beko authorised service agent Warning This appliance must be ...

Page 8: ...nic equipment WEEE This product has been manufactured with high quality parts and materials which can be reused and are suitable for recycling Do not dispose of the waste product with normal domestic and other wastes at the end of its service life Take it to the collection center for the recycling of electrical and electronic equipment Please consult your local authorities to learn about these col...

Page 9: ...as they could overheat Transportation instructions 1 The appliance should be transported only in a vertical upright position The packing as supplied must be intact during transportation 2 If during the course of transport the appliance has to be transported horizontally it must only be laid on its right hand side when standing in the front of the appliance After bringing it to upright position it ...

Page 10: ... Gently remove the plug from the receptacle Never pull the mains cord you may damage the appliance In the case of transportation ensure you locate the plug in the receptacle provided to avoid transit damage IMPORTANT Make sure that mains cable is not caught under the appliance during and after carrying moving the appliance to avoid the mains cable becoming cut or damaged Do not allow children to p...

Page 11: ...abinet must be left open completely to kitchen wall in order to allow sufficient air circulation to cool down the condenser unit for energy efficiency min 200 cm2 1778 1788 mm min 200 cm2 1775 mm 1701 mm 40 mm No wooden backwall EN ...

Page 12: ...min 200 cm2 min 200 cm2 Xmm 1778 1788 mm 1701 mm 40 mm 4mm EN See Installation Diagram for detailed Installation Instructions ...

Page 13: ...ing the legs of it as illustrated in the figure The corner where the leg exists is lowered when you turn in the direction of black arrow and raised when you turn in the opposite direction Taking help from someone to slightly lift the refrigerator will facilitate this process EN ...

Page 14: ...Remove plastic plugs 3 5 5 Refit hinge 1 as lower hinge 8 on the left hand side step 6 6 Put the door back in its place 9 7 Refit lower hinge 4 as top hinge 10 on the left hand side step 7 8 Refit plastic plugs 3 5 into the screw holes on the right hand side 11 12 Reversing the door Proceed in numerical order ...

Page 15: ...interior light will come on 4 You will hear a noise as the compressor starts up The liquid and gases sealed within the refrigeration system may also give rise to noise whether the compressor is running or not which is quite normal 5 Front edges of the cabinet may feel warm This is normal These areas are designed to be warm to avoid condensation 6 Do not load the appliance immediately it is switche...

Page 16: ...e the door and then open again Door open alarm will be activated again after 1 minute later In case of sensor failure the warning icon will lit If the button Alarm off is pressed the warning will be cleaned 5 5 Vacation Function In order to activate vacation function press this button for 3 seconds and the vacation mode indicator will be activated When the vacation function is activated is display...

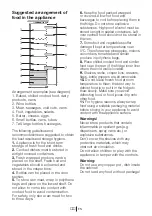
Page 17: ... hygiene 1 Appliance is for the short term storage of fresh food and drinks 2 Cooked dishes must be stored in airtight covered containers 3 Fresh wrapped produce can be placed on the shelf Fresh fruit and vegetables should be cleaned and stored in the crisper bins 4 Bottles can be placed in the door section 5 To store raw meat wrap in polythene bags and place on the lowest shelf Do not allow to co...

Page 18: ...an it and leave the door ajar Any dust that gathers on the condenser which is located at the back of the appliance should be removed once a year with a vacuum cleaner Check door seals regularly to ensure they are clean and free from food particles Removal of door tray To remove door racks remove all the contents and then simply push the door rack upwards from the base Make sure that the special pl...

Page 19: ...ive ice formation Don t Put hot food into the appliance Let it cool down first Don t Try to keep frozen food which has thawed it should be eaten within 24 hours or cooked and refrozen Don t Leave frozen food at room temperature to thaw the best way to defrost food is to put it in the fridge to thaw slowly Make sure you avoid defrosting food or food juices drip onto other food Problem solving If th...

Page 20: ... consumable items including but not limited to ice trays scrapers cutlery baskets filters and light bulbs Repairs necessary as a direct or indirect result of Accidental damage misuse or abuse of a product An attempted repair of a product by anyone other than a Beko Approved Engineer the Engineer Installation or use of a product where such installation or use fails to meet the requirements containe...

Page 21: ... inconvenience and to meet requests for specific timed appointments this cannot be guaranteed We will not be liable for delays or if it is unable to carry out a repair because a convenient appointment cannot be arranged Will there be any charge for the repairs It is your responsibility to provide evidence to the Engineer that your product is covered by this guarantee with a proof of purchase The M...

Page 22: ...around the product must be easily accessible to the Engineer without the need for cabinets or furniture to be removed or moved It is your responsibility to ensure our Engineers have a clean and safe environment to carry out any repairs Please have your Model number and Serial number available when you call us as you may be required to input your serial number into your telephone keypad during your...

Page 23: ......

Page 24: ...4578336544 AA EN Beko plc Beko House 1 Greenhill Crescent Watford Hertfordshire WD18 8QU Tel 0845 6004911 Fax 0845 6004922 e mail service beko co uk website www beko co uk ...

Reviews: