


30/EN
Operating the product
6-
On/Off Key
When you press the On/Off key, the
indicator lights illuminate on the display
for ON position. The lights turn off in OFF
position.
Programme Selection /
Programme Cancel key
Select the desired programme using the
“programme selection keys” and press the
button.
To cancel the running programme, open the
door of the machine and press and hold the
Programme Start/Pause/Cancel key for 3
seconds.
After the 3 - 2 - 1 countdown, 0:01 is
displayed, close the door of the product
and wait for the draining process complete.
Draining is completed in 2 minutes and the
machine gives an audible warning when it
is completed.
Function Keys
If you press any of the Function keys
during programme selection or time delay
selection, an affirmative key signal will be
heard provided that the relevant function
is supported by the selected programme.
Function will be deemed selected when the
indicator of the selected function is lit.
To cancel the selected function, keep the
function key pressed until the function
indicator disappears.
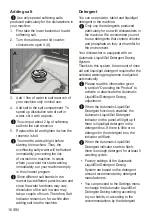
Preparing the machine
1. Open the door of the dishwasher.
2. Place the dishes in accordance with
the instructions in the user manual.
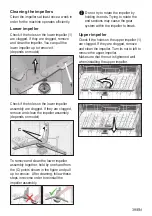
3. Make sure that the upper and lower
impellers rotate freely.
4. Put adequate amount of detergent into
the detergent dispenser.
Programme selection
1. Press the On/Off button to turn on your
machine.
2. Check the Salt and Rinse Aid indicators
and add salt and/or rinse aid if needed.
3. Refer to the table of "Programme data
and average consumption values"
to determine a washing programme
suitable for your dishes.
4. Selected programme will start when
you close the door of your machine.
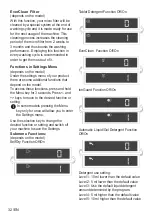
Auxiliary functions
Washing programmes of your dishwasher
are designed to obtain the best cleaning
effect, considering the type of the soiling,
soiling degree and properties of the dishes
to be washed.
Auxiliary functions allow you save from
time, water and power.
Auxiliary functions may cause changes
in the programme duration.
Auxiliary functions are not suitable for
all washing programs. Indicator of the
auxiliary function that is not compatible
with the programme will not be active.
Read “Safety Instructions” section first!
Read “Quick Quide” before this
section.


