background image

24

Dishwasher / User’s Manual

/40 EN

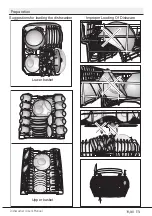
Operating the product
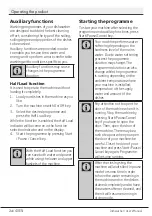
Auxiliary functions

Washing programmes of your dishwasher 

are designed to obtain the best cleaning 

effect, considering the type of the soiling, 

soiling degree and properties of the dishes 

to be washed.

Auxiliary functions are provided in order 

to enable you to save time, water and 

energy and to perform a more comfortable 

washing with conditions specific to you.

C

Auxiliary functions may cause 

changes in the programme 

duration.

Starting the programme

To start your machine after selecting the 

programme and auxiliary functions, press 

Start/Pause/Cancel key.

C

Your machine performs water 

softening depending on the 

hardness level of the mains 

water. Due to water softening 

process the programme 

duration may change. The 

programme duration can also 

change while the programme 

is running depending on the 

ambient temperature where 

your machine is installed, 

temperature of the supply 

water and amount of the 

dishes.

C

Pay attention not to open the 

door of the machine when it is 

running. Stop the machine by 

pressing Start/Pause/Cancel 

key if you have to open the 

door. Then, open the door of 

the machine. There may be a 

rush of vapour when you open 

the door of your machine; be 

careful. Close the door of your 

machine and press Start/Pause/

Cancel key again. Programme 

will resume running.

C

After the rinsing step, the 

machine will wait silent in pause 

mode for some time in order 

to have the water remaining in 

the machine and on the dishes 

drained completely and to have 

the water softener cleaned, and 

then it will resume running in 

drying mode.

Half Load function

It is used to operate the machine without 

loading it completely.

1.  Load your dishes in the machine as you 

like.

2.  Turn the machine on with On/Off key.
3.  Select the desired programme and 

press the Half Load key. 

While the function is enabled, the Half Load 

indicator will become on in the function 

selection indicator and on the display.

4.  Start the programme by pressing Start 

/ Pause / Cancel key.

C

With the Half Load function you 

can save both water and power 

while using the lower and upper 

baskets of the machine.

Summary of Contents for DFS05C10W

Page 1: ...DFS05X11W DFS05C10W DFS05J1W DFS05Q10W DFS05X11X EN Document Number 15 9316 0100_AC_BEKO_A5_EN 19 06 18 10 28 Dishwasher User s Manual ...

Page 2: ...DFS05X11W DFS05C10W DFS05J1W DFS05Q10W DFS05X11X EN Document Number 15 9316 0100_AC_BEKO_A5_EN 19 06 18 10 28 Dishwasher User s Manual ...

Page 3: ... local authorities Please read this user manual first Dear Customer We hope that you get the best results from your product which has been manufactured with high quality and state of the art technology Therefore please read this entire user manual and all other accompanying documents carefully before using the product and keep it as a reference for future use If you handover the product to someone...

Page 4: ...ging material collection points designated by the local authorities Please read this user manual first Dear Customer We hope that you get the best results from your product which has been manufactured with high quality and state of the art technology Therefore please read this entire user manual and all other accompanying documents carefully before using the product and keep it as a reference for ...

Page 5: ... Water softening system 12 Adjusting the water softening system 12 Adding salt 14 Detergent 15 Tablet detergents 16 Rinse aid 17 Items not suitable for washing in the dishwasher 17 Placing the dishes into the dishwasher 18 Cutlery basket 20 Upper basket rack 20 Collapsible lower basket tines 21 5 OPERATING THE PRODUCT22 Keys 22 Preparing the machine 22 Programme selection 22 Auxiliary functions 24...

Page 6: ...ses must be securely fastened and remain undamaged Unplug the product when not in use Never wash the product by spreading or pouring water onto it There is the risk of electric shock Never touch the plug with wet hands Never unplug by pulling on the cable always pull out by grabbing the plug The product must be unplugged during installation maintenance cleaning and repairing procedures Always have...

Page 7: ...ldren s safety Electrical products are dangerous for the children Keep children away from the product when it is in use Do not let them to tamper with the product Do not forget to close the door of the product when leaving the room where it is located Store all detergents and additives in a safe place away from the reach of the children Disposing of packaging material Packaging materials are dange...

Page 8: ...f its service life Take it to the collection center for the recycling of electrical and electronic equipment Please consult your local authorities to learn about these collection centers Compliance with RoHS Directive The product you have purchased complies with EU RoHS Directive 2011 65 EU It does not contain harmful and prohibited materials specified in the Directive Package information Packagin...

Page 9: ...eller 3 Lower impeller 4 Silverware basket 5 Door 6 Rating Label 7 Control panel 8 Detergent dispenser 9 Lower basket 10 Filters 11 Salt reservoir lid 12 Upper basket rail 13 Upper cutlery basket depends on model 14 Tabletop depends on model 15 Fan drying system depends on model 15 ...

Page 10: ...the quality of the product C Figures in this manual are schematic and may not match the product exactly C Values stated on the markings of the product or in the printed documents accompanying the product are obtained in the laboratory on basis of the relevant standards Depending on operational and environmental conditions of the product these values may vary Note for test institutions Data require...

Page 11: ...Place the product on a solid and flat floor that has sufficient load carrying capacity The product must be installed on a flat surface in order for the door to be closed comfortably and securely Do not install the product at places where temperature may fall below 0ºC Place the product on a rigid floor Do not place it on a long pile rug or similar surfaces B Ensure the power cable does not get tra...

Page 12: ...sting the feet If the door of the product cannot be closed properly or if the product wobbles when you push it slightly then you need to adjust the feet of the product Adjust the feet of the product as illustrated in the relevant section A Diswashers door must be aligned properly otherwise hot steam can escape Danger of serious burns other injury or may damage furniture Electrical connection Befor...

Page 13: ... which is cut off as a plug with a bared cord could cause a shock hazard if inserted into a socket elsewhere in the house The moulded plug on this appliance incorporates a 13A fuse Should the fuse need to be replaced an ASTA approved BS1362 fuse of the same rating must be used Do not forget to refit the fuse cover In the event of losing the fuse cover the plug must not be used until a replacement ...

Page 14: ... reduces the hardness of incoming water This system softens the supply water to a level that will allow washing the dishes with the required quality C The mains water hardness must be softened if it is over 7 dH Otherwise hardness ions will accumulate on the dishes that are washed and may affect the washing rinsing and drying performances of the machine Adjusting the water softening system Cleanin...

Page 15: ...er the new setting is stored Programme Selection key rotates in 5 steps regardless of the number of the programmes contained on the machine 5 Press Start Pause Cancel key for once to store the level you have selected Water hardness level adjustment table Hardness Level English Water Hardness dE German Water Hardness dH French Water Hardness dF Position of Program Selection Key Water Hardness Level...

Page 16: ...salt under this condition salt will not be consumed and the Salt indicator will not illuminate C If you move your house it is necessary to readjust water hardness level of your machine by considering the information given above according to the hardness level of the supply water in your new location Your machine will display the most recently adjusted water hardness level Adding salt Water softeni...

Page 17: ...g results Contact the manufacturer of the detergent for further questions A Do not put solvents into the detergent dispenser There is the risk of explosion Put the detergent into the detergent dispenser just before operating the machine as illustrated below 1 Push the latch to right to open the detergent dispenser lid A 2 Put suggested amount of powder liquid gel or tablet detergent in the reservo...

Page 18: ...y run 3 After the empty washing cycle review the user manual and readjust the water hardness level so as to suit the water supply 4 Make the appropriate rinse aid settings 1 2 3 C Use powder or liquid gel detergent in short programmes without prewash since the solubility of the tablet detergent changes depending on the temperature and time Tablet detergents In addition to the conventional tablet d...

Page 19: ... pieces or pieces that are not resistant to heat as well as copper and tin plated containers in the dishwasher C Decorative prints of chinaware as well as aluminium and silver items may get discoloured or tarnished after washing in the dishwasher just as it happens in handwashing as well Some delicate glass types and crystals may become dull in time We strongly recommend you to check if the tablew...

Page 20: ...dle sections of baskets if possible Place the heavily soiled and bigger items in the lower basket and smaller delicate and light items in the upper basket Place the hollowed dishes such as bowls glasses and pans upside down in the dishwasher Thus accumulation of water in deep hollows is prevented A To prevent possible injuries always place the sharp and pointed dishes such as service fork bread kn...

Page 21: ...Dishwasher User s Manual 19 40 EN Preparation Suggestions for loading the dishwasher Lower basket Upper basket Improper Loading Of Dishware ...

Page 22: ...sket is designed to wash your dishes such as knife fork spoon etc in an efficient manner Since the cutlery basket can be moved A B you can create more space while placing your dishes in the lower basket and free up space for your dishes of different sizes Upper basket rack depends on model ...

Page 23: ...o bring the collapsible tines into horizontal position grab the tines from mid position and push them in the directions of arrows B To bring the tines back to vertical position just lift them up Collapsible tines will click into the latch again C C Bringing the tines to the horizontal position by holding them from the tips may cause them to bend Therefore it will be appropriate to bring the tines ...

Page 24: ...tup pause or cancel the selected program Preparing the machine 1 Open the door of the dishwasher 2 Place the dishes in accordance with the instructions in the user manual 3 Make sure that the upper and lower impellers rotate freely 4 Put adequate amount of detergent into the detergent compartment 5 Check if the Salt and Rinse Aid indicators light and add salt and or rinse aid if needed 6 Close the...

Page 25: ...shes that are scraped or pre cleaned Medium High Medium Low Medium Low 205 115 120 58 30 10 5 14 8 15 10 6 10 4 0 83 1 28 1 18 1 12 0 77 Degree of Soiling Energy kWh Prewash Wash Dry Duration min Water I Programme Table The consumption values shown in the table were determined under standard conditions Differences may therefore occur under practical conditions Reference programme for testing insti...

Page 26: ...dishes C Pay attention not to open the door of the machine when it is running Stop the machine by pressing Start Pause Cancel key if you have to open the door Then open the door of the machine There may be a rush of vapour when you open the door of your machine be careful Close the door of your machine and press Start Pause Cancel key again Programme will resume running C After the rinsing step th...

Page 27: ...ase it when the Washing and Drying lights start flashing Water in the machine will be discharged in 45 seconds The programme will have been cancelled once the Washing and Drying lights go off and the End light becomes on Then you can select and operate a new programme C There might be residues of detergent or rinse aid left in the machine and or on the pieces being washed depending on the step in ...

Page 28: ...ill increase the drying effectiveness of your machine 5 When you set the Programme Selection Knob to the Off position again the machine will enter the normal mode Rinse Aid Amount Position of program selection knob Rinse Aid Adjustment Indicator 1 dose of rinse aid is dispensed 1 Washing lamp on the panel will illuminate 2 doses of rinse aid are dispensed 2 Drying lamp on the panel will illuminate...

Page 29: ... with or without detergent based on the degree of soil If water has remained in the machine drain the water by performing the procedures under the topic Canceling a programme If the water cannot be discharged remove the filters as specified in the Cleaning the filters section and check if there are any leftover deposits that have accumulated at the bottom of the machine blocking the water path Cle...

Page 30: ...nt of the filters will reduce washing efficiency Cleaning the hose filter Damages on the machine that may be caused by impurities coming from the urban supply water or your own water installation such as sand dirt rust etc can be prevented by means of the filter attached to the water inlet hose Check the filter and the hose regularly and clean them if necessary 1 Turn off the tap and remove the ho...

Page 31: ...if the holes on the lower impeller 1 are clogged If they are clogged remove and clean the impeller You can pull the lower impeller up to remove it Upper impeller Check if the holes on the upper impeller 1 are clogged If they are clogged remove and clean the impeller Turn its nut to left to remove the upper impeller Make sure that the nut is tightened well when installing the upper impeller ...

Page 32: ...filter system is clean Clean the filter system regularly as illustrated in section Cleaning and Care Filters are installed incorrectly Check the filter system and make sure that it is installed correctly Baskets are overloaded Do not overload the baskets in excess of their capacity Detergent is stored under unsuitable conditions If you are using powder detergent do not store the detergent package ...

Page 33: ...e tensions of Teflon and water are different water droplets will remain as beads on the Teflon surface Tea cafe or lipstick stains remain on dishes Selected programme is unsuitable Select a programme with a higher temperature and cycle time Surface quality of the kitchen utensils is deteriorated Tea and cafe stains or other dye spots may not be cleaned in dishwasher when they have penetrated in de...

Page 34: ...e the salt granules that will remain under the lid will dissolve during prewash causing the lid loosen check the lid once again at the end of the programme Salty food remnants have remained on dishes for a long time If cutlery soiled with such foods will be kept waiting in machine dirt must be removed by prewash or dishes must be washed without being kept waiting Electric installation is not groun...

Page 35: ...d lustre porcelains are not suitable for washing in the dishwasher Manufacturers of some glassware and porcelain tableware items do not recommend washing such kitchen utensils in the dishwashers either Dishes are scratched C Kitchen utensils that contains or are made of aluminium should not be washed in dishwasher Salt leakage exists Pay attention not to spill salt around the salt filling hole whi...

Page 36: ...er tap water with a tissue paper or fork will be sufficient Rinse aid has spilled into the machine when adding rinse aid Take care that rinse aid is not spilled in the machine when you are filling it Clean any spilled rinse ait with the help of a tissue paper towel Lid of the rinse aid reservoir is left open Make sure that the lid of the rinse aid reservoir is closed after adding rinse aid Kitchen...

Page 37: ...ct This guarantee is in addition to your statutory rights as a consumer If you have any questions about these rights please contact the retailer from which you purchased the product In certain circumstances it is possible that your statutory rights may offer additional or higher levels of protection than those offered under the terms of this guarantee What is covered by this guarantee Repairs to t...

Page 38: ...ed in the User Instructions Booklet provided with your product 4 Professional installation by a qualified Electrical Domestic Appliance Installer is recommended for all Washing Machines Dishwashers and Electric Cookers as incorrect installation may result in you having to pay for the cost of repairing the product 5 Gas Cookers must be professionally installed by a Gas Safe or Gas Networks Ireland ...

Page 39: ...d Will there be any charge for the repairs It is your responsibility to provide evidence to the Engineer that your product is covered by this guarantee with a proof of purchase The Manufacturer reserves the right to charge for the reasonable cost of any service call if You cannot provide evidence that your product is covered by this guarantee Where a service call has been made and the engineer fin...

Page 40: ...g Instruction Booklet User guide The product model and serial number is printed on the Rating Label affixed to the appliance The Retailer Purchased from and Date of purchase will be printed on your purchase receipt or other proof of purchase paperwork Recording of these details alone will not count as proof of purchase A valid proof of purchase is required for requesting service under guarantee Mo...

Page 41: ...uarantee please refer to the instructions contained within the extended guarantee agreement document otherwise please call us using the appropriate number above where service can be obtained at a charge Should you experience any difficulty in obtaining service please call us on 0333 207 9710 or 01 862 3411 Contact us though our website Send us a secure message through our online contact us form Pl...

Page 42: ......

Reviews: