background image

 36

Dryer / User Manual

be adversely affected and it can get 

damaged.

•  The rear surface of the tumble dryer shall 

be placed against a wall.

B

DANGER! 

Do not place the dryer on the power cable.

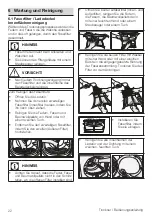
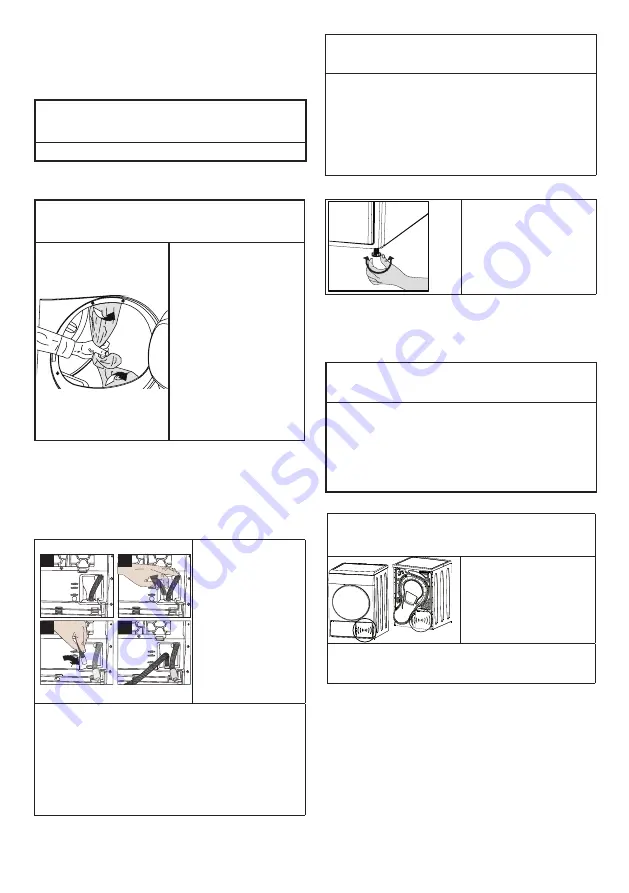
3.2 Removing the transportation 

safety assembly

A

WARNING!

•  Remove the 

transportation 

safety assembly 

before using the 

dryer for the first 

time.

•  If the door swing 

side of your 

appliance can 

be modified, see 

the reversible 

door mounting 

instructions.

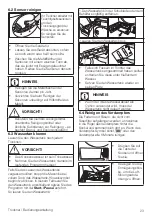
3.3 Connecting to the drain

You can directly drain accumulated water 

through the water drain hose supplied with 

the product instead of periodically draining the 

water collected in the water tank.

Connecting the water drain hose

1

3

4

2

1-2

 Pull hose at 

the behind of 

the dryer by 

hand in order 

to disconnect 

it from where it 

is connected. 

Do not use 

any tools to 

remove the 

hose.

3

  Connect one end of the drain hose 

supplied with the dryer to the connection 

point from where you removed the hose of 

the product in previous step.

4

  Connect the other end of the drain hose 

directly to the wastewater drain or to the 

washbasin.

C

NOTE

•  Water drain hose should be attached to a 

height of maximum 80 cm.

•  Make sure that the water drain hose is not 

stepped on and it is not folded between 

the drain and the machine.

•  If there is an accessories pack supplied 

with your product, please see the detailed 

description.

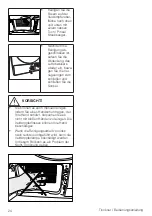
3.4 Adjusting the feet

•  Turn the feet to 

left or right until 

the dryer stands 

level and firmly.

3.5 Transportation of the dryer

Drain all water that has remained in the dryer.

If direct water drain connection is made, then 

remove the hose connections.

A

WARNING!

•  We recommend carrying the dryer in 

upright position. If it is not possible to 

carry the machine in the upright position, 

we recommend carrying it by tilting 

towards the right side when looked from 

the front.

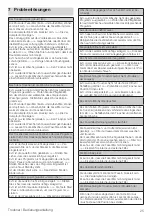
3.6 Warnings about sounds

C

NOTE

•  It is normal to 

hear a metallic 

noise from the 

compressor 

sometimes during 

operation.

•  Water collected during operation is 

pumped to water tank. It is normal to 

hear pumping noise during this process.

3.7 Changing the illumination lamp 

In case an illumination lamp is used in your 

laundry dryer.To change the Bulb/LED used 

for illumination of your tumble dryer, call your 

Authorized Service.The lamp(s) used in this 

appliance is not suitable for household room 

illumination. The intended purpose of this 

lamp is to assist the user to place laundry in 

the tumble dryer in a comfortable way. The 

lamps used in this appliance have to withstand 

extreme physical conditions such as vibrations 

and temperatures above 50 °C

Summary of Contents for DH 8736 RX0

Page 1: ...Trockner Bedienungsanleitung 2960312090_DE 200319 1447 DE EN DH 8736 RX0 Dryer User Manual ...

Page 2: ... und befolgen die hierin enthaltenen Anweisungen Verwenden Sie diese Anleitung für das auf dem Deckblatt angegebene Modell Lesen Sie bitte die Bedienungsanleitung Die Symbole In der Bedienungsanleitung verwenden wir folgende Symbole BGEFAHR Warnung vor Stromschlägen GEFAHR Warnung vor Brandgefahr Dieses Produkt wurde mit Hilfe neuester Technologie unter umweltfreundlichen Bedingungen hergestellt A...

Page 3: ...en Trockner und Untergrund darf nicht durch Materialien wie Teppich Holz oder Klebeband verringert werden Dies kann zu Problemen mit Ihrem Trockner führen AVORSICHT Lassen Sie Aufstellung und Reparaturen grundsätzlich nur durch den autorisierten Kundendienst ausführen Der Hersteller haftet nicht bei Schäden die durch das Einwirken nicht autorisierter Personen verursacht werden Achten Sie unbedingt...

Page 4: ...dung des Trockners entstehen Betriebsspannung und erforderliche Sicherung sind am Typenschild angegeben Die am Typenschild angegebene Spannung muss mit der Spannung Ihrer lokalen Stromversorgung übereinstimmen AVORSICHT Ziehen Sie den Netzstecker wenn Sie den Trockner nicht benutzen Trennen Sie den Trockner während Installations Wartungs Reinigungs und Reparaturarbeiten von der Stromversorgung Ber...

Page 5: ...erden Der Trockner kann beschädigt werden falls sich Metalleinlagen im laufenden Betrieb lösen GEFAHR Was in puncto Brandgefahr zu beachten ist Die nachstehend aufgeführten Wäschestücke und Artikel dürfen zur Vermeidung von Brandgefahr nicht im Trockner getrocknet werden Ungewaschene Textilien Textilien die mit Öl Azeton Alkohol Benzin Kerosin Fleckentferner Terpentin Paraffin und Paraffinentferne...

Page 6: ...n Garage etc AVORSICHT Achten Sie darauf dass keine Haustiere in den Trockner steigen können Überprüfen Sie das Innere des Trockners vor der Inbetriebnahme Stützen Sie sich nicht auf der geöffneten Gerätetür ab andernfalls kann der Trockner umkippen Rund um den Trockner dürfen sich keinen Fusseln ansammeln 1 2 Aufstellung auf der Waschmaschine Wenn das Gerät auf einer Waschmaschine aufgestellt wer...

Page 7: ...Gerätetür bei Nichtbenutzung des Trockners geschlossen 1 5 Übereinstimmung mit der WEEE Richtlinie und Entsorgung von Altgeräten Dieses Produkt erfüllt die Vorgaben der EU WEEE Direktive 2012 19 EU Das Produkt wurde mit einem Klassifizierungssymbol für elektrische und elektronische Altgeräte WEEE gekennzeichnet Dieses Gerät wurde aus hochwertigen Materialien hergestellt die wiederverwendet und rec...

Page 8: ... Typenschild finden Sie hinter der Tür des Trockners C HINWEIS Im Zuge der Produktverbesserung können sich die technischen Daten des Trockners ohne Vorankündigung ändern Bei den Abbildungen in dieser Anleitung handelt es sich um schematische Darstellungen die möglicherweise nicht exakt mit dem Gerät übereinstimmen Die an Kennzeichnungen an der Maschine oder in anderer mit dem Trockner gelieferter ...

Page 9: ... dies nicht der Fall ist lassen Sie die nötigen Arbeiten durch einen qualifizierten Elektriker oder Techniker ausführen C HINWEIS Vorbereitungen des Aufstellungsortes des elektrischen Anschlusses und des Wasserablaufs liegen in Ihren Händen AVORSICHT Schauen Sie sich das Gerät vor der Installation genau an achten Sie auf Defekte Falls der Trockner beschädigt ist lassen Sie ihn nicht installieren B...

Page 10: ...ches aber brennbares Kältemittel Stellen Sie sicher dass der Lufteinlass des Trockners offen und gut belüftet ist Halten Sie mögliche Flammenquellen vom Trockner fern 3 2 Transportsicherungen entfernen A VORSICHT Entfernen Sie die Transportsicherungen bevor Sie das Gerät zum ersten Mal benutzen Wenn die Klappenrichtung Ihres Produkts änderbar ist lesen Sie die Montageanweisung für reversible Klapp...

Page 11: ... transportieren Falls ein Transport in aufrechter Position nicht möglich sein sollte sollte das Gerät von vorne betrachtet zur rechten Seite geneigt transportiert werden 3 6 Hinweise zu Geräuschen CHINWEIS Gelegentlich wird ein metallisches Geräusch vom Kompressor erzeugt das ist völlig normal Im Betrieb gesammeltes Wasser wird in den Wassertank gepumpt In dieser Phase sind Arbeitsgeräusche der Pu...

Page 12: ...weise trocknen Küchenhandtücher und Tischdecken schneller als dicke Badehandtücher Halten Sie sich bei der Programmauswahl an die Bedienungsanleitung Öffnen Sie die Gerätetür im Betrieb nur dann wenn es wirklich notwendig ist Falls Sie die Tür unbedingt öffnen müssen achten Sie darauf dass die Tür nicht lange geöffnet bleibt Bei Modellen mit einer Kondensatoreinheit reinigen Sie den Kondensator ei...

Page 13: ...wolle Synthetisch Express 30 Wäscheständer Zeit Programme Mix Tageswäsche Express Hemden 30 Wolle auffrischen 5 Endzeitpunktschalter 6 Rapidry Taste 7 Alarmton Taste 8 Trockenheitseinstellungen Auswahltaste 5 2 Bildschirmsymbole 1 2 4 5 6 7 8 3 Restzeitanzeige Filterfach Reinigung Warnsymbol Filterreinigung Warnsymbol Kindersicherung Warnsymbol Schranktrocken Wassertank Warnsym bol Ablauf Dauer Kn...

Page 14: ... Sekunde gedrückt Wenn der Trockner zum ersten Mal benutzt wird wird das Deklarationsprogramm Trockenschrank gewählt C HINWEIS Das Programm startet nicht sofort durch Drücken der Ein Aus Abbrechen Taste Starten Sie das Programm mit der Ein Aus Abbrechen Taste nach der Programmauswahl 5 4 Programmauswahl Ihr Trockner hat 16 verschiedene Programme Delicates Freshen Up Wählen Sie das gewünschte Progr...

Page 15: ...ocken Sie können Ihre gesamte Synthetikwäsche Hemden T Shirts Unterwäsche Tischde cken usw mit diesem Programm trocknen Schranktrocken kein Bügeln erforderlich 4 800 75 Wäscheständer Trocknungszeit Hier können Sie aus Zeitprogrammen zwischen 10 und 160 Minuten Dauer wählen um den gewünschten Trocknungsgrad bei niedriger Temperatur zu erreichen In diesem Programm läuft der Trockner für die eingeste...

Page 16: ...tilien die über ein Etikett zum Trocknen verfügen in einem Stück trocknen In diesem Programm können Sie Doppelsteppdecken Kissen und Mäntel als einzelnes Wäschestück trocknen Trocknen Sie Ihre Kleidung wie Ja cken usw indem Sie sie umstülpen 800 165 Express 30 Verwenden Sie dieses Programm um 2 Hem den zum Bügeln bereit zu haben 0 5 1200 30 Energieverbrauchswerte Programme Kapazität kg Schleuderge...

Page 17: ...nstimmung mit dem EM 61121 2012 Standard bestimmt Abhängig von Wäscheart Drehzahl Umweltbedingungen und den Spannungswerten können die tatsächlichen Verbrauchswerte von den Werten in der Tabelle abweichen 5 6 Hilfsfunktionen Akustische Warnung Die Maschine gibt eine akustische Warnung aus wenn das Programm beendet ist Verwenden Sie die Tonwarnstufen Taste um den Tonpegel einzustellen C HINWEIS Sie...

Page 18: ...n finden Sie unter 6 Wartung und Reinigung Wenn der Wassertank sich füllt während das Programm läuft beginnt die Warn LED zu blinken und die Maschine geht in den Stand By In diesem Fall leeren Sie das Wasser aus dem Wassertank und starten Sie das Programm indem Sie den Start Pause Knopf drücken Die Warnanzeige erlischt und das Programm läuft weiter Reinigung der Filterschublade Ein Warnsymbol leuc...

Page 19: ... Schalten Sie das Gerät erneut ein und wiederholen Sie den Verzögerung Einstellungsprozess für die von Ihnen gewünschte Dauer Wenn Ihre Maschine sich erstmalig anschaltet geschieht dies mit dem Erklärungsprogramm Baumwolle Schranktrocken Abbruch der Endzeitfunktion Wenn Sie die Zeitverzögerung stoppen und das Programm unverzüglich starten wollen Drücken Sie den An Aus Abbruch Schalter 3 Sekunden l...

Page 20: ...wünschte Programm mittels des Programmselektionsknopfes Drücken Sie den Start Pause Schalter um das neue Programm zu starten Hinzufügen und Entfernen von Kleidung während des Bereitschaftsdienstes Wenn Sie Wäsche hinzufügen oder entfernen möchten nachdem das Trocknen Programm startet Drücken Sie den Start Pause Schalter um die Maschine in den Stand By Modus zu versetzen Trocknen wird gestopt Öffne...

Page 21: ...Abkühlen das Belüftungsprogramm starten 5 13 Programmende Wenn das Programm endet werden die Warnsymbole für die Faserfilterreinigung und den Wassertank auf der Programmbeobachtungsanzeige aktiviert Die Befülltür kann geöffnet werden und die Maschine wird für einen zweiten Lauf bereit Um den Trockner auszuschalten drücken Sie den An Aus Abbruch Schalter C HINWEIS Die Funktion Faltenvorbeugung akti...

Page 22: ...ehen Reinigen Sie die Federn Fasern und Baumwollpellets von Hand oder mit einem weichen Tuch Entfernen Sie den zweiteiligen Faserfilter indem Sie den zweiten äußeren Filter hochziehen C HINWEIS Achten Sie darauf dass die Feder Faser und Baumwollpellets nicht in den Schlitz fallen wo die offenen Filter installiert sind Öffnen Sie beide Teilfaserfilter Innen und Außenfilter reinigen Sie die Federn d...

Page 23: ... im laufenden Programm heraus Falls Sie das Leeren des Wassertanks vergessen sollten stoppt die Maschine bei vollem Tank das Wassertank Hinweissymbol beginnt zu blinken In diesem Fall leeren Sie den Wassertank anschließend setzen Sie das Programm mit der Start PauseTaste fort So leeren Sie den Wassertank 1 Den Wassertank in der Schublade oder dem Behälter sorgfältig entfernen 2 Leeren Sie den Wass...

Page 24: ...e gen Sie die Ver riegelungen zum schließen und schließen Sie die Sockel AVORSICHT Sie können es auch manuell reinigen indem Sie einen Handschuh tragen der Ihre Hand schützt Versuchen Sie es nicht mit bloßen Händen zu reinigen Die Verdampferflossen können Ihre Hand beschädigen Wenn die Reinigungsarbeit von links nach rechts durchgeführt wird kann die Verdampferlampe beschädigt werden In diesem Fal...

Page 25: ...lt Stellen Sie sicher dass die Ladetür richtig verriegelt ist Evtl ist ein Stromausfall erfolgt sein Die Taste Start Pause Abbrechen drücken um das Programm zu starten Evtl ist der Wassertank voll Wassertank entleeren Wäsche ist eingegangen hat sich verfilzt oder ist be schädigt Evtl wurde für die Art der Wäsche nicht das geeignete Programm ausgewählt Prüfen Sie die Pflegeetiket ten auf der Wäsche...

Page 26: ...uchen Sie nicht das defekte Gerät selbst zu reparieren C HINWEIS Wenn sie Probleme mit irgendeinem Teil Ihres Produkts haben können Sie mit Angabe der Modellnummer Ihres Produkts das neue Teil vom Kundenservice anfordern Betrieb des Produkts mit Nicht originalteilen kann zu Fehler am Produkt führen Von etwaigen Fehlern wegen Verwendung von Nicht Originalteilen übernehmen der Hersteller und der Dis...

Page 27: ...des beim Standardbaumwollprogramm bei vollständiger Beladung PO W Durchschnittskondensationseffizienz des Standardbaumwollprogrammes bei partieller Beladung Cdry1 2 Gewichtete Kondensationseffizienz des Standardbaumwollprogrammes bei vollständiger und partieller Beladung C t 5 Gewichteter Durchschnittswert L WA ausgedrückt in dB A re 1 pW 1 Skale von A höchste Effizienz bis D geringste Effizienz 2...

Page 28: ......

Page 29: ... cover page Read the instructions Explanation of symbols Throughout this user manual the following symbols are used BDANGER Warning against electric shock DANGER Warning against fire hazard AWARNING Warning for hazardous situations with regard to life and property This product was manufactured using the latest technology in environmentally friendly conditions WARNING Warning against hot surfaces W...

Page 30: ...d the floor should not be reduced with materials such as carpet wood and tape This will cause problems with the dryer AWARNING Always have the installation and repairing procedures carried out by the Authorized Service Manufacturer shall not be held liable for damages that may arise from procedures carried out by unauthorized persons Never wash the dryer by spraying or pouring water onto it There ...

Page 31: ...ot in use Unplug the dryer from the mains during installation maintenance cleaning and repair works Do not touch the plug with wet hands Never unplug by pulling on the cable always pull out by grabbing the plug BDANGER Do not use extension cords multi plugs or adaptors to connect the dryer to power supply in order to decrease the risk of fire and electric shock Power cable plug must be easily acce...

Page 32: ...rial chemicals Items such as lighter match coins metal parts needle etc may damage the drum set or may lead to functional problems Therefore check all the laundry that you will load into your dryer Never stop your dryer before the programme completes If you must do this remove all laundry quickly and lay them out to dissipate the heat DANGER Clothes that are washed inadequately may ignite on their...

Page 33: ...urning gas or other fuels 1 2 Mounting over a washing machine A fixing device should be used between the two machines when installing the dryer above a washing machine The fitting device must be installed by the authorized service agent Total weight of the washing machine and the dryer with full load when they are placed on top of each other reaches to approx 180 kilograms Place the products on a ...

Page 34: ...U RoHS Directive 2011 65 EU It does not contain harmful and prohibited materials specified in the Directive 1 7 Package information Packaging materials of the product are manufactured from recyclable materials in accordance with our National Environment Regulations Do not dispose of the packaging materials together with the domestic or other wastes Take them to the packaging material collection po...

Page 35: ...r installations is under customer s responsibility AWARNING Prior to installation visually check if the dryer has any defects on it If the drier is damaged do not have it installed Damaged products cause risks for your safety Let your dryer wait for 12 hours before starting to use it 3 1 Appropriate installation location Install the dryer on a stable and level surface Dryer is heavy Do not move it...

Page 36: ...t stepped on and it is not folded between the drain and the machine If there is an accessories pack supplied with your product please see the detailed description 3 4 Adjusting the feet Turn the feet to left or right until the dryer stands level and firmly 3 5 Transportation of the dryer Drain all water that has remained in the dryer If direct water drain connection is made then remove the hose co...

Page 37: ...s earlier than thick bathroom towels Follow the instructions in the user manual for programme selection Do not open the loading door of the machine during drying unless necessary If you must open the loading door do not keep it open for a long time Do not add wet laundry while the dryer is in operation For models with a condenser unit clean the condenser once in a month or after every 30 operation...

Page 38: ... Delicates Jeans BabyProtect Extra dry Cupboard dry plus Sport Freshen Up Start pause cancel Cottons Synthetics Mix Express 30 Drying Rack TimeDry Daily Bedding Duvet DownWear Express Shirt 30 Wool Refresh Hygiene BabyProtect Shirts Cottons Eco Refreshment Low temparature select Remaining time indicator Clean filter drawer warning symbol Filter cleaning warning symbol Child lock warning symbol Clo...

Page 39: ...for the first time declaration program cupboard dry cottons is selected C NOTE Program doesn t start immediately only by pressing the On Off Cancel button Start the program with the On Off Cancel button after program selection 5 4 Program selection Your dryer has 16 different programs Mix Mix Verluchten Rafraîchir Hemden 30 Chemises 30 Select the desired program by turning the program selection bu...

Page 40: ...etc You can put your laundry in the wardrobe without ironing 4 800 75 Drying Rack TimeDry You may select from time programmes between 10 and 160 minutes to achieve the desired drying level at low temperature In this programme tumble drier s operation lasts for the set time independently from the dryness of laundry This product is available to be used with a drying basket as option For products tha...

Page 41: ...ou can dry double duvet pillow or coats as single piece of laundry Dry your cloths such as coats and jackets turned inside out 800 165 Express Super Short Use this program to have 2 shirts ready for ironing 0 5 1200 30 Energy consumption values Programmes Capacity kg Spin speed in washing machine rpm Approximate amount of remaining humidity Energy consumption value kWh Cottons Eco 8 1000 60 1 48 C...

Page 42: ... your washing machine and wrung with recommended wringing speed Shirt might remain slightly damp at the end of the program It is recommended not to leave the shirts inside the drying machine Energy Label standard program EN 61121 2012 All the values on the chart are identified according to EN 61121 2012 standard Consumption values may vary from the valued in the chart depending on laundry type wri...

Page 43: ...For detailed information See 6 Maintenance and cleaning If the water tank fills up while the program continues the warning symbol starts flashing and the machine goes into stand by In this case empty the water tank and start the program by pressing the Start Stand by button Warning symbol turns off and program resumes Cleaning the filter drawer Warning symbol flashes periodically to remind that fi...

Page 44: ...wardrobe dry Cancelling the end time function If you want to cancel the end time countdown and start the program immediately Press the On Off Cancel button for 3 seconds to cancel the program Press the On Off Cancel button to start you previously selected program 5 8 Starting the program Press the Start Stand by button to start the program Indicating start of the program Start symbol turns on sepa...

Page 45: ...door after you remove or add laundry Press the Start Stand by button to start the program C NOTE Adding laundry after the drying operation starts may cause the dried laundry inside the machine to mix with wet laundry and leave the laundry damp at the end of operation Adding or removing laundry during drying may be repeated as many times as you wish But this operation continuously interrupts the dr...

Page 46: ...s the On Off Cancel button C NOTE Wrinkle Prevention function activates the 2 hour Wrinkle Prevention program if laundry isn t taken out of machine after completion of the program Clean the fibre filter after each drying See 6 1 Cleaning Lint Filter Loading Door Inner Surface Empty the water tank after each drying See 6 3 Draining the water tank 5 14 Odor Feature Read the ProScent manual for the u...

Page 47: ...fibres and cotton balls with hand or with a soft cloth Remove the second part outer filter by pulling it upwards C NOTE Ensure that hair fibre and cotton balls do not fall into the slot where the filters are installed Open both fibre filters inner and outer filters remove the hair fibre cotton balls with your damp hand or a vacuum cleaner or a cloth Clean both filters under water running in revers...

Page 48: ...r tank is full and the Water Tank warning symbol will flash If this is the case drain the water tank and press Start Pause button to resume the drying cycle To drain the water tank 1 Remove the water tank in the drawer or container carefully 2 Drain the water in the tank If there is lint accumulation in the funnel of the water tank clean it under running water Place the water tank into its seat C ...

Page 49: ... You can clean by hand provided you wear protective gloves Do not try to clean with bare hands Evaporator fins may damage your hands Cleaning by left to right movements may damage the evaporator fins This may lead to drying issues ...

Page 50: ...elect a program suitable for the clothes Water drips from the loading door Fibres might have gathered on the inner sides of the loading door and the loading door gasket Clean the inner surfaces of the loading door and the loading door gasket surfaces Loading door opens by itself Loading door might be closed completely Push the loading door until the closing sound is heard Water tank warning symbol...

Page 51: ...e at full load kWh Energy consumption of the standard cotton programme at partial load kWh Power consumption of the off mode for the standart cotton programme at full load PO W Power consumption of the left on mode for the standart cotton programme at full load PL W The duration of the left on mode min Standard cotton programme 3 Programme time of the standard cotton programme at full load Tdry mi...

Page 52: ......

Reviews: