background image

Stand fan / User Manual

9 / 12 EN

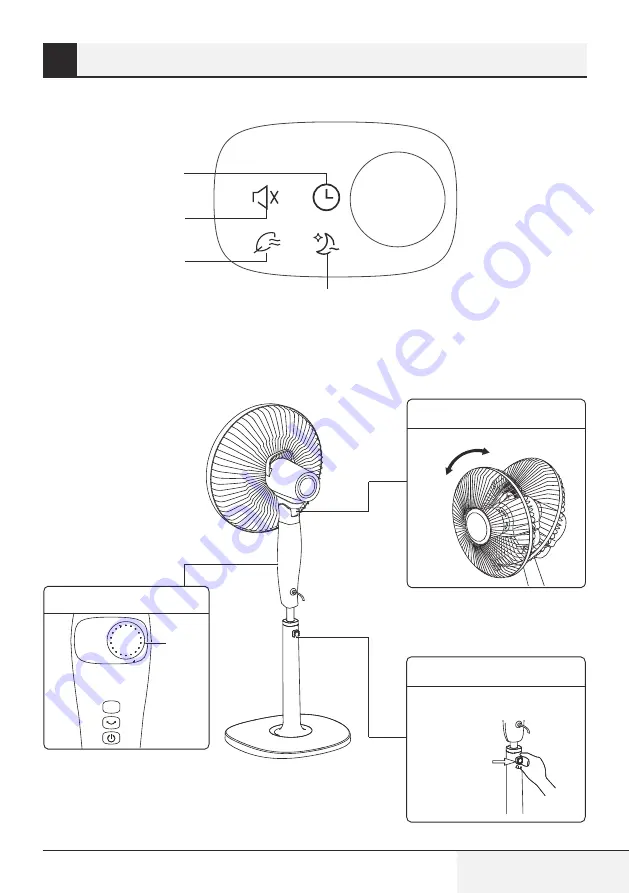
3.2 Instructions for display of body

1

2

4

3

1.  Sleep wind display

2.  Natural wind display

3.  Silent display

4.  PRO/timer display

3.3 Instructions for operation of body

MODE

Tilt adjustment

Height adjustment

Body key

Turn counterclockwise and loosen for 

performing height adjustment.

Drive 

plate

Height 

adjustment 

key

Manual

Instructions for use

Summary of Contents for EFS7000W

Page 1: ...Stand fan User Manual EFS7000W EN ...

Page 2: ...re use If you handover the product to someone else give the user manual as well Follow all warnings and information in the user manual Meanings of the symbols Following symbols are used in the various section of this manual C Important information or useful hints about usage A Warning for hazardous situations with regard to life and property Warning to actions that must never perform B Warning for...

Page 3: ... 6 2 1 Name of components 6 3 Instructions for use 8 3 1 Instructions for key of remote controller 8 3 2 Instructions for display of body 9 3 3 Instructions for operation of body 9 4 Other 10 4 1 Maintenance instruction 10 4 2 Cleaning 10 4 3 Technical data 10 5 Disposal 11 CONTENTS ...

Page 4: ...ceandknowledgeiftheyhavebeengiven supervisionorinstructionconcerninguseoftheapplianceinasafe wayandunderstandthehazardsinvolved Childrenshallnotplay withtheappliance Cleaningandusermaintenanceshallnotbe madebychildrenwithoutsupervision Whentheapplianceisnotinuseandbeforecleaning unplugthe appliancefromtheoutlet Whenthefanwasassembled therotorbladeguardshallnotbe takenoffanymore Correctdisposalofth...

Page 5: ...roduct for environmental safe recycling Rules for safe operation Never insert fingers pencils or any other object through the grille when fan is running Disconnect fan when moving from one location to another Be sure fan is on a stable surface when operating to avoid overturning Do not use fan in window rain may create electrical hazard Household use only ...

Page 6: ...umn with the groove on the base and fixate them using the base nut Base installation 1 Motor shaft 2 Rear grill 3 Pole 4 Base 5 Base nut 6 Tighten knob 7 Remote control hook 8 Tighten knob 9 Motor C Considerate hint Remove parts from the component before performing installation 2 Installation instructions ...

Page 7: ...ss guards sequentially with both hands Self catch installation Guard catch 2 3 4 1 1 Front grill 2 Lock nut of blade Lock nut of blade anticlockwise and then install the front fan cover 3 Blade Pull the blade to rotate after installing so as to ensure that the blade can be normally rotated 4 Lock nut of grill Screw the lock nut of grill clockwise and in the meantime fix the rear grill ...

Page 8: ...4 Battery installation Rear cover Push Open 1 On Off 2 Mode 3 PRO timer 4 OSC 5 Drive plate C Considerate hint 1 Install the battery with positive side facing up 2 Effective Range of Remote Control within 5 m distance and 30 degree deflection in front of Product 3 Instructions for use ...

Page 9: ...nd display 2 Natural wind display 3 Silent display 4 PRO timer display 3 3 Instructions for operation of body MODE Tilt adjustment Height adjustment Body key Turn counterclockwise and loosen for performing height adjustment Drive plate Height adjustment key Manual 3 Instructions for use ...

Page 10: ...se wipe the exterior parts with a soft cloth soaking a mild detergent 4 Do not use any abrasive detergent or solvents to avoid scratching the surface Do not use any of the following as a cleaner gasoline thinner 5 Do not allow water or any other liquid into the motor housing or interior parts 4 2 Cleaning 1 Be sure to unplug from the electrical supply source before cleaning 2 Plastic parts should ...

Page 11: ...2 Beyoglu Istanbul Turkey C Note Donotdisposeofelectricalappliancesasunsortedmunicipalwaste useseparate collectionfacilities Contactyourlocalgovernmentforinformationregardingthecollection systemsavailable Ifelectricalappliancesaredisposedofinlandfillsordumps hazardous substancescanleakintothegroundwaterandgetintothefoodchain damagingyour healthandwell being ...

Page 12: ...www beko com ...

Page 13: ...Ventilateur sur pied Manuel de l utilisateur EFS7000W FR ...

Page 14: ...teur Veuillezrespectertousles avertissementsetlesinstructionscontenusdanscemanueldel utilisateur Signification des symboles Les symboles de sécurité ci après sont utilisés dans ce manuel C Indique des informations importantes ou des conseils utiles relatifs à l utilisation du produit A Indique un danger qui pourrait entraîner des blessures la mort ou des dégâts matériels Avertissement relatif aux ...

Page 15: ...ions d utilisation 8 3 1 Instructions relatives aux touches de la télécommande 8 3 2 Instructions relatives à l affichage sur le ventilateur 9 3 3 Instructions relatives au fonctionnement du rafraîchisseur d air 9 4 Autres instructions 10 4 1 Consignes d entretien 10 4 2 Nettoyage 10 4 3 Données techniques 10 5 Mise au rebut 11 Tables des matières ...

Page 16: ...s capacités physiques sensorielles ou mentales restreintes ou manquant de connaissances ou d expérience si celles ci sont surveillées ou ont été informées quant à l utilisation sûre de l appareil et des risques existants Les enfants ne doivent pas jouer avec l appareil Le nettoyage et l entretien ne doivent pas être effectués par des enfants laissés sans surveillance Débranchez l appareil de la pr...

Page 17: ...on recyclage en toute sécurité Consignes de sécurité Ne tentez jamais d introduire vos doigts un crayon ou tout autre objet à travers la grille lorsque le ventilateur est en marche Débranchez le ventilateur lorsque vous le déplacez d un endroit à un autre Assurez vous que le ventilateur est placé sur une surface stable lorsqu il est en marche afin d éviter qu il ne se renverse Ne mettez pas le ven...

Page 18: ...ice du socle puis les fixer ensemble à l aide de l écrou du socle Installation du socle 1 Axe du moteur 2 Grille arrière 3 Pied 4 Socle 5 Écrou du socle 6 Molette de serrage 7 Crochet pour la télécommande 8 Molette de serrage 9 Moteur C Remarque bienveillante Retirez les pièces de l élément avant de commencer l installation 2 Instructions d installation ...

Page 19: ...e indiqué Installation à fixation auto déformante Dispositif de fixation des grilles 2 3 4 1 1 Grille avant 2 Écrou de blocage de l hélice Serrez l écrou de l hélice dans le sens inverse des aiguilles d une montre puis installez la grille avant du ventilateur 3 Hélice Après avoir installé l hélice faites la tourner afin de vous assurer qu elle ne se bloque pas 4 Écrou de blocage de la grille Visse...

Page 20: ...sser Ouvrir 1 Touche Marche Arrêt 2 Touche Mode 3 Touche Programmation Minuterie 4 Touche Oscillation 5 Molette de réglage C Remarque bienveillante 1 Installez la pile en veillant à orienter le côté positif vers le haut 2 Portée effective de la télécommande jusqu à 5 m de distance dans un angle de 30 degrés en faisant face au ventilateur 3 Instructions d utilisation ...

Page 21: ...nt du mode silencieux 4 Voyant de la programmation Minuterie 3 3 Instructions relatives au fonctionnement du rafraîchisseur d air MODE Réglage de l inclinaison Réglage de la hauteur Touches du ventilateur Pour ajuster la hauteur desserrer en tournant dans le sens inverse des aiguilles d une montre Molette de réglage Molette de réglage de la hauteur Manuel 3 Instructions d utilisation ...

Page 22: ...ux 4 N utilisez aucun solvant ni détergent abrasif car ils pourraient rayer la surface de l appareil N utilisez aucun des produits suivants pour nettoyer l appareil essence dissolvant 5 Ne laissez pas de l eau ou tout autre liquide s infiltrer dans le boîtier du moteur ou mouiller les composants intérieurs 4 2 Nettoyage 1 Avant de le nettoyer assurez vous que l appareil est bien débranché de sa so...

Page 23: ...on triés Déposez les dans des infrastructures dédiées à la collecte sélective Contactez votre administration locale pour obtenir des renseignements concernant les systèmes de collecte disponibles Lorsque des appareils électriques sont jetés dans des décharges des substances dangereuses peuvent s infiltrer jusqu aux eaux souterraines et contaminer la chaîne alimentaire constituant ainsi un risque p...

Page 24: ...www beko com ...

Page 25: ...Ventilatore a piantana Manuale dell utente EFS7000W IT ...

Page 26: ...otto a qualcun altro gli fornisca anche il manuale dell utente Segua tutte le avvertenze e le informazioni riportate nel manuale dell utente Significato dei simboli I seguenti simboli sono utilizzati in diverse sezioni di questo manuale C Informazioni importanti o suggerimenti pratici sull utilizzo A Avvertenza per situazioni di pericolo relative a vita e proprietà Prestare attenzione alle operazi...

Page 27: ... Nome dei componenti 6 3 Istruzioni per l uso 8 3 1 Istruzioni per il telecomando 8 3 2 Istruzioni per la visualizzazione del ventilatore 9 3 3 Istruzioni per il funzionamento del ventilatore 9 4 Istruzioni supplementari 10 4 1 Istruzioni per la manutenzione 10 4 2 Pulizia 10 4 3 Dati tecnici 10 5 Smaltimento 11 SOMMARIO ...

Page 28: ...i o mentali ridotte anche in caso di mancata esperienza o conoscenza solo se controllati e istruiti all uso sicuro dell elettrodomestico e informati sui possibili rischi Non consentire ai bambini di giocare con l apparecchio La pulizia e la manutenzione non devono essere effettuate dai bambini senza sorveglianza Quando l apparecchio non è in uso e prima della pulizia scollegarlo dalla presa di cor...

Page 29: ... il riciclaggio sicuro nel rispetto dell ambiente Regole per il funzionamento sicuro Non inserire mai dita matite o altri oggetti attraverso la griglia mentre la ventola è in movimento Scollegare il ventilatore quando lo si sposta da un luogo a un altro Durante il funzionamento accertarsi che il ventilatore sia posizionato su una superficie stabile per evitare che si ribalti Non utilizzare il vent...

Page 30: ...nalatura sulla base quindi fissarle insieme utilizzando il dado della base Installazione della base 1 Albero motore 2 Griglia posteriore 3 Asta 4 Base 5 Dado della base 6 Stringere la manopola 7 Gancio del telecomando 8 Stringere la manopola 9 Motore C Suggerimenti Prima dell installazione rimuovere le parti dal componente 2 Istruzioni per l installazione ...

Page 31: ... mani Installazione del fermo automatico Fermo della protezione 2 3 4 1 1 Griglia anteriore 2 Dado di serraggio della griglia Avvitare in senso antiorario il dado di serraggio della ventola e quindi installare la copertura della ventola anteriore 3 Pala Far girare la ventola dopo l installazione per verificare che sia in grado di ruotare normalmente 4 Dado di serraggio della griglia Avvitare il da...

Page 32: ...tteria Coperchio posteriore Premere Aprire 1 On Off Accensione Spegnimento 2 Mode Modalità 3 PRO Timer 4 OSC 5 Ghiera C Suggerimenti 1 Installare la batteria con il polo positivo rivolto verso l alto 2 Portata utile del telecomando entro 5 m di distanza e una deviazione di 30 davanti al prodotto 3 Istruzioni per l uso ...

Page 33: ...flusso naturale 3 Visualizzazione silenzioso 4 Visualizzazione PRO timer 3 3 Istruzioni per il funzionamento del ventilatore MODE Regolazionedell inclinazione Regolazione dell altezza Tasti ventilatore Per effettuare la regolazione dell altezza girare il ventilatore in senso antiorario e allentarlo Ghiera Tasto di regolazione altezza Manuale 3 Istruzioni per l uso ...

Page 34: ...a polvere 3 Pulire le parti esterne con un panno morbido imbevuto di detergente delicato 4 Non utilizzare detergenti o solventi abrasivi per evitare di graffiare la superficie Non utilizzare benzina o solventi come detergenti 5 Non lasciare che acqua o altri liquidi penetrino nell alloggiamento del motore o nelle parti interne 4 2 Pulizia 1 Accertarsi di scollegare l alimentazione prima di eseguir...

Page 35: ...differenziati ma servirsi di impianti per la raccolta appositi Contattare l ente territoriale preposto per informazioni concernenti i sistemi di raccolta disponibili Se le apparecchiature elettriche sono smaltite in discariche le sostanze pericolose possono penetrare nelle falde acquifere ed entrare nella catena alimentare diventando un pericolo per la salute ...

Page 36: ...www beko com ...

Page 37: ...Standventilator Bedienungsanleitung EFS7000W DE ...

Page 38: ...alls Sie das Produkt an Dritte weitergeben überreichen Sie auch diese Bedienungsanleitung Beachten Sie alle Warnungen und Informationen in dieser Bedienungsanleitung Erläuterung der Symbole Die folgenden Symbole finden Sie im Verlauf der Bedienungsanleitung C Wichtige Information oder nützliche Hinweise für den Gebrauch A Warnung vor Situationen die eine Gefahr für Leben und Sacheigentum darstelle...

Page 39: ...sanleitungen 6 2 1 Teileübersicht 6 3 Gebrauchsanleitungen 8 3 1 Tasten auf der Fernbedienung 8 3 2 Anleitungen für das Display 9 3 3 Gebrauchsanleitungen für das Gerät 9 4 Andere Funktionen 10 4 1 Wartung 10 4 2 Reinigung 10 4 3 Technische Daten 10 5 Entsorgung 11 INHALTSVERZEICHNIS ...

Page 40: ...rch Kinder ab 8 Jahren und Personen mit eingeschränkten körperlichen sensorischen oder geistigen Fähigkeiten oder ohne Erfahrung und Wissen sofern sie beaufsichtigt und über den sicheren Gebrauch des Geräts angeleitet werden und die damit einhergehenden Gefahren verstehen Kinder dürfen nicht mit dem Gerät spielen Reinigungsarbeiten und Benutzerwartungen dürfen von Kindern nur unter Aufsicht durchg...

Page 41: ...ler bei dem Sie das Produkt erworben haben Dort kann das Produkt für das umweltgerechte Recycling entgegengenommen werden Anleitungen für den sicheren Gebrauch Stecken Sie während des Gebrauchs weder Finger noch Stifte oder andere Gegenstände durch die Schutzabdeckung Trennen Sie den Ventilator vom Netzstrom bevor Sie diesen an einen anderen Ort stellen Stellen Sie den Ventilator während des Gebra...

Page 42: ...Rille am Sockel aus und befestigen Sie die Komponenten mit der Sockelmutter Installation des Sockels 1 Motorwelle 2 Rückseitiges Schutzgitter 3 Stange 4 Sockel 5 Sockelmutter 6 Knopf festziehen 7 Haken Fernbedienung 8 Knopf festziehen 9 Motor C Hinweis Entfernen Sie die Teile bevor Sie mit der Installation beginnen 2 Installationsanleitungen ...

Page 43: ...lbstverriegelung Verriegelung Schutzgitter 2 3 4 1 1 Vorderes Schutzgitter 2 Sicherungsmutter des Flügelblatts Drehen Sie die Sicherungsmutter des Flügelblatts entgegen dem Uhrzeigersinn und installieren Sie dann das vordere Schutzgitter 3 Flügel Ziehen und drehen Sie das Flügelblatt nach der Installation um zu gewährleisten dass sich das Flügelblatt ordnungsgemäß drehen lässt 4 Sicherungsmutter d...

Page 44: ... Hinteres Schutzgitter Drücken Öffnen 1 On Off Ein Aus 2 Mode Modus 3 PRO Timer Taste 4 OSZILLATION 5 Leistungsregler C Hinweis 1 Installieren Sie die Batterie mit der positiven Seite nach oben gerichtet 2 Effektive Reichweite der Fernbedienung 5 m und 30 Grad an der Vorderseite des Geräts 3 Gebrauchsanleitungen ...

Page 45: ...ind Schlafmodus 2 Natürlicher Wind 3 Lautlos 4 PRO Timer 3 3 Gebrauchsanleitungen für das Gerät MODE Neigungswinkel einstellen Höhe einstellen Gerätetasten Entgegen dem Uhrzeigersinn drehen und lösen um die Höhe einzustellen Leistungsregler Hohenverstellung Manuell 3 Gebrauchsanleitungen ...

Page 46: ...ischen Sie die äußeren Teile mit einem weichen Lappen und etwas mildem Reinigungsmittel vorsichtig ab 4 Verwenden Sie keine Scheuermittel oder Lösungsmittel da anderenfalls die Oberfläche beschädigt werden könnte Verwenden Sie keine der nachfolgenden Reinigungsmittel Benzin Verdünner 5 Lassen Sie weder Wasser noch andere Flüssigkeiten in das Motorgehäuse oder die inneren Teile eindringen 4 2 Reini...

Page 47: ...normalen Hausmüll sondern getrennt an entsprechenden Sammelstellen Wenden Sie sich an Ihre Behörde vor Ort um nähere Informationen über verfügbare Sammelstellen zu erhalten Falls elektrische Geräte auf Müllhalden oder Deponien entsorgt werden können gefährliche Substanzen in das Grundwasser und in die Nahrungskette gelangen und dadurch Risiken für die Gesundheit und das Wohlbefinden verursachen ...

Page 48: ...www beko com ...

Reviews: