background image

EN

28

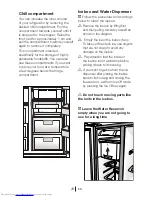
Icebox and Water Dispenser

C

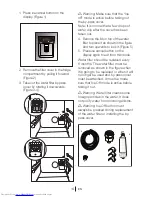
 Follow the procedure and warnings 

below to clean the icebox:

A

 Remove the Icebox by lifting first 

and then pulling towards yourself as 
shown in the diagram.

A

   Empty the ice in the Icebox if any. 

To take out the stuck ice, use objects 
that are not sharp to avoid any 
damage on the Icebox.

A

   Pay attention that the inside of 

the Icebox is not wet/damp before 
placing it back to its housing.

A

  If you want to get ice from the ice 

dispenser after placing the Icebox 
back to its housing and closing the 
freezer door,  exit from Ice Off mode 
by pressing the Ice Off key again.

A

 Do not touch moving parts like 

the knife in the Icebox. 

C

 Leave the Water Reservoir 

empty when you are not going to 
use for a long time

Chill compartment

You can increase the inner volume 
of your refrigerator by removing the 
desired chill compartment. Pull the 
compartment towards yourself until it 
is stopped by the stopper. Raise the 
front part for approximately 1 cm and 
pull the compartment towards yourself 
again to remove it completely.
This compartment intended 
specifically for the storage of highly 
perishable foodstuffs. You can also 
use these compartments if you want 
to store your food at a temperature 
a few degrees below the fridge 
compartment.

Summary of Contents for GL32APB

Page 1: ...GNE V320 S GNE V321APX GL32APB ...

Page 2: ...d checked under the most meticulous quality control procedures will provide you with years of good service For this we recommend you to carefully read the entire manual of your product before using it and keep it at hand for future reference This manual Will help you use your appliance quickly and safely Read the manual before installing and operating your product Follow the instructions especiall...

Page 3: ...reparation 18 5 Using your refrigerator 19 Setting the fridge compartment temperature 20 Setting the freezer compartment temperature 20 Fresh Freeze Function 20 Quick Qool Function 21 Vacation Button 21 Auto Eco Button Special Economy function 21 Key Lock Button 21 Water Dispenser Illumination 21 Water Ice Type Selection 21 Ice Water Dispenser 21 Using the Ice Dispenser 22 Ice Off 22 Using the wat...

Page 4: ...djustable front legs 16 Blue light 17 Water reservoir 18 Ventilation lid 19 Freezer compartment drawers 20 Freezer Compartment glass shelves 21 Ice duct lid 22 Freezer compartment interior light 23 Fresh Freeze compartment 24 Ice container OPTIONAL C Figures that take place in this instruction manual are schematic and may not correspond exactly with your product If the subject parts are not includ...

Page 5: ...sal information and facilities available See Installation Instructions on on page 8 for information on suitable location To obtain the best possible performance and trouble free operation from your appliance it is very important to carefully read these instructions On delivery check to make sure that the product is not damaged and that all the parts and accessories are in perfect condition Ensure ...

Page 6: ... to be replaced an ASTABEAB approved BS 1362 fuse of the same rating must be used Do not forget to refit the fuse cover In the event of losing the fuse cover the plug must not be used until a replacement fuse cover has been fitted Colour of the replacement fuse cover must be the same colour as that visible on the pin face of the plug Fuse covers are available from any good electrical store IMPORTA...

Page 7: ...ance is kept to a minimum particularly in summer We recommend you use a cool bag or a special carrier bag to carry frozen food 3 Do not leave the door s of your appliance open longer than necessary and ensure they are closed properly after each opening 4 Defrost frozen food in the fridge compartment so that frozen food acts as an ice pack to assist cooling in the fridge ...

Page 8: ... Is the interior of the refrigerator dry and can the air circulate freely in the rear of it 2 Clean the interior of the refrigerator as recommended in the Maintenance and cleaning section 3 Plug the refrigerator into the wall outlet When the door is open the respective interior light will come on 4 You will hear a noise as the compressor starts up The liquid and gases sealed within the refrigerati...

Page 9: ...order to protect children against any danger Placing and Installation B Caution Never plug the refrigerator into the wall outlet during installation Otherwise risk of death or serious injury may arise A If the entrance door of the room where the refrigerator will be installed is not wide enough for the refrigerator to pass through than call the authorised service to have them remove the doors of y...

Page 10: ...ll facilitate this process Door height adjustment In case there is a problem with the alignment of the doors with respect to each other they may be aligned by ascension vertically in the order given below Ensure that door shelves are empty when adjusting the door height 2 Loosen the three screws of the hinges of the lower door which you wish to escalate with the help of a screwdriver as shown in t...

Page 11: ...ompartment door is higher than the fridge compartment door bring them to the same level by turning the elevation screw on the freezer compartment side in the direction of arrow using a M6 Allen wrench as illustrated in Figure D After bringing the doors to the same level by elevating the front part with the aid of the elevation screws doors of the refrigerator shall close properly If the doors do n...

Page 12: ...f the door you want to adjust C Adjust the door appropriately as you desire by loosing the screws C Fix the door you have adjusted by tightening the screws without changing the position of the door Adjusting the gap between the upper door C You can adjust the gap between the fridge compartment doors as illustrated in the figures C Replace the hinge cover and fix with the screw Center Screw ...

Page 13: ... may be connected to the refrigerator for water supply the mains cold water supply and water in a jug A pump should be used for jug water usage Check that the parts stated below are supplied with your appliance 1 Union for connection of the water pipe to the rear of the appliance 2 3 pieces of pipe clips In case required to secure the water pipe C Note Since the following parts are not required in...

Page 14: ...igerator inlet valve by pressing downwards firmly 2 Fix union as seen in the opposite figure by squeezing by hand on the refrigerator inlet valve a Water Pipe b Union c Valve C Note 1 You should not need to tighten the union with a tool to achieve water tight assembly In case of a leak use a spanner or a pair of pliers to tighten the union To fit the water filter follow the instructions below refe...

Page 15: ... as shown in the figure when it is going to be replaced or when it will no longer be used and by pass cover must be attached It must be made sure that Ice Off mode is active before taking it out A Warning Water filter cleans some foreign particles in the water It does not purify water from microorganisms A Warning Ice Off button must always be pressed during replacement of the water filter or inst...

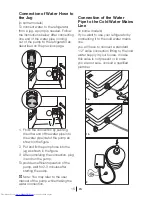
Page 16: ...you will have to connect a standard 1 2 valve connection fitting to the cold water supply in your house In case this valve is not present or in case you are not sure consult a qualified plumber 1 Finish the connection by pushing the other end of the water pipe into the water pipe inlet of the pump as shown in the figure 2 Put and fix the pump hose into the jug as shown in the figure 3 After comple...

Page 17: ...r pipe to suitable points by means of the pipe clips supplied to avoid any damage or displacement or accidental disconnection A Warning After turning on the water valve make sure that there is no leakage at both connection points of the water pipe In case of a leak turn off the valve immediately and tighten all joints again using a spanner or a pair of pliers A Warning Make sure that standard 1 2 ...

Page 18: ...penser Water flow may be irregular in the beginning Irregular water flow will be normalized after the air in the system is discharged C At the initial startup of the refrigerator approx 12 hours must pass before cold water can be obtained C Water mains pressure must be between 1 8 bars for the operation of Ice Water Dispenser smoothly For this check that 1 glass of water 100 cc can be filled in 10...

Page 19: ...lease make sure that the interior of your refrigerator is cleaned thoroughly C If two refrigerators are to be installed side by side there should be at least 2 cm distance between them C When you operate your refrigerator for the first time please observe the following instructions during the initial six hours The door should not be opened frequently It must be operated empty without any food in i...

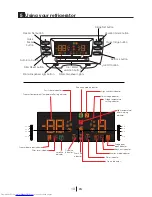
Page 20: ...ndicator Freezer Compartment Temperature Setting indicator Filter reset indicator Auto Eco indicator Cube Ice indicator Crash Ice indicator Key Lock indicator High temperature error warning indicator 24 C 22 C 20 C 18 C 2 C 4 C 6 C 8 C Filter Reset button Quick fridge button Vacation mode button Vacation mode indicator Water indicator No ice indicator Freezer door open indicator Fridge temperature...

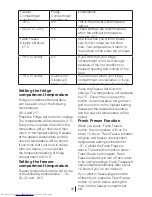
Page 21: ...to the highest setting Release at the desired temperature and the new set temperature will be stored If you think that your food is colder than you desire you can adjust the temperature setting of fridge compartment to 6 or 8 Setting the freezer compartment temperature Freezer temperature can be set at one of the following temperatures 18 20 22 and 24 C Press the Freezer Set button to change The t...

Page 22: ...or of the fridge compartment is kept closed for a long time when this function is selected the fridge compartment will switch to a more economic operation mode to safe electricity automatically When the Auto Eco button is pressed again this function is deactivated Key Lock Button The key lock is activated when this button is pressed for 3 seconds and all buttons and the dispenser latch will not wo...

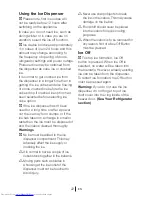
Page 23: ...n smell or taste then the ice must be disposed of and the icebox cleaned thoroughly Warnings C No ice must be added to the ice dispenser compartment This may adversely affect the ice supply or crushing the ice A It is normal to have a couple of ice cubes stuck together in the icebank A Moving parts such as blades in a housing at the ice outlet of the dispenser must not be touched to avoid injury A...

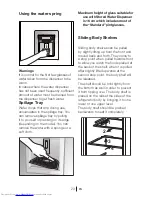
Page 24: ...it to one lower or one upper level The body shelf should be pushed backwards to seat it completely 1 2 3 4 Using the water spring Warnings It is normal for the first few glasses of water taken from the dispenser to be warm In cases where the water dispenser has not been used frequently sufficient amount of water must be drained from the dispenser to get fresh water Spillage Tray Water drops that d...

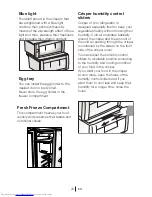
Page 25: ...nal values Crisper humidity control sliders Crisper of your refrigerator is designed especially fresh to keep your vegetables freshly without loosing their humidity Cold air circulates basically around the crisper and the amount of the cold air passing through the crisper is controlled by the sliders on the front side of the crisper cover You can adjust the humidity control sliders to a suitable p...

Page 26: ...ulb immediately Replacement light bulb can easily be obtained from a good local electrical or DIY store Recommendations for preservation of frozen food Prepacked commercially frozen food should be stored in accordance with the frozen food manufacturer s instructions for a 4 star frozen food storage compartment To ensure that the high quality achieved by the frozen food manufacturer and the food re...

Page 27: ...EN 26 ...

Page 28: ...t no water enters the lamp housing and other electrical items B If your refrigerator is not going to be used for a long period of time unplug the power cable remove all food clean it and leave the door ajar C Check door seals regularly to ensure they are clean and free from food particles A To remove door racks remove all the contents and then simply push the door rack upwards from the base Protec...

Page 29: ...e freezer door exit from Ice Off mode by pressing the Ice Off key again A Do not touch moving parts like the knife in the Icebox C Leave the Water Reservoir empty when you are not going to use for a long time Chill compartment You can increase the inner volume of your refrigerator by removing the desired chill compartment Pull the compartment towards yourself until it is stopped by the stopper Rai...

Page 30: ...er degree Decreasing the time the door left open or using it less frequently Covering the food stored in open containers with a suitable material Wipe the condensation using a dry cloth and check if it persists Compressor is not running Protective thermic of the compressor will blow out during sudden power failures or plug out plug ins as the refrigerant pressure in the cooling system of the refri...

Page 31: ...e seal Damaged broken seal causes the refrigerator to run for a longer period of time in order to maintain the current temperature Freezer temperature is very low while the fridge temperature is sufficient The freezer temperature is adjusted to a very low temperature Adjust the freezer temperature to a warmer degree and check Fridge temperature is very low while the freezer temperature is sufficie...

Page 32: ...e liquid spilling or spraying Liquid and gas flows happen in accordance with the operating principles of your refrigerator It is normal and not a fault There is a noise like wind blowing Air activators fans are used in order to allow the refrigerator to cool efficiently It is normal and not a fault Condensation on the inner walls of refrigerator Hot and humid weather increases icing and condensati...

Page 33: ...probably not completely vertical on the floor and it might be rocking when slightly moved Adjust the elevation screws The floor is not level or strong Make sure that the floor is level and capable to carry the refrigerator Crispers are stuck The food might be touching the ceiling of the drawer Rearrange food in the drawer ...

Page 34: ... in freezers or fridge freezers Food loss insurance is often included within your household contents insurance policy or may be available separately from your retailer Important notes Your Beko product is designed and built for domestic household use only The guarantee will be void if the product is installed or used in commercial or non residential domestic household premises The product must be ...

Page 35: ... Gas Dual Fuel Cookers 0845 6004905 Washing Machines 0845 6004906 Dishwashers Republic of Ireland All Refrigeration All Cookers 01 862 3411 Washing Machines Dishwashers Before requesting service please check the trouble shooting guide in the Operating Instructions as a charge may be levied where no fault is found even though your product may still be under guarantee Service once the manufacturers ...

Page 36: ...Printed in Turkey Part no Revision no BEKO plc Beko House Caxton Way Watford Hertfordshire WD18 8UF Tel 0845 6004911 Fax 0845 6004922 e mail service beko co uk website www beko co uk AF 48 8558 0000 ...

Reviews: