background image

6

REPOSITIONING THE DOOR

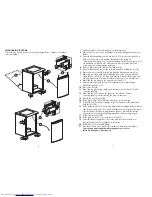
Follow the step by step instructions and the diagram below. Numbers in brackets

refer to diagrams.

7


1. 

Switch off at the socket outlet and pull out the mains plug.


2.

 Remove all food, loose items and fittings from inside the appliance and door

      shelves.
  

3.

 Carefully tilt the appliance on its back side. (1) (You may need somebody to

       help you.) Take care not to damage the appliance by laying  on
       some protective material (e.g. its original packaging). Make sure that you tilt
       the appliance on its back side, otherwise compressor oil may block the
       pipes and you may damage the appliance.
  

4. 

Unscrew and remove the LHS front feet and bolt (2).


5. 

Unscrew the bolts and remove the bottom hinge while holding the door (3).


6.

 Remove the door carefully from the top hinge by sliding down wards (4).


7. 

Reposition top hinge bushing and blanking plug on the opposite side and

       stand the door safely (5). You may find it easier to remove the bushing and
       the plug with the tip of a small screwdriver. Take care not to mark the door.

  8. 

Reposition the top hinge on the opposite side (6 and 11).

  9. 

Unscrew and remove the frozen food compartment door plastic hinge

      while holding the door (7).

10. 

Remove the door (8).

11. 

Reposition the plastic hinge bushing on the opposite side (9 and 12) after

       removing the plug.

12. 

Reposition the door catch on the opposite side (10 and 15) after

       removing the plug, while removing the plug on inner liner.

13. 

Reverse the door and refit (13).

14. 

Fit the plastic hinge (14) while removing the plugs on inner liner.

15.

 To refit the door, locate the top hinge in the door, attach to the cabinet and

       hold the door (18).

16.

 Fit the bottom hinge (19). If necessary adjust and then tighten the bolts. Ensure,

       that the door opens and closes easily and that there are no gaps allowing air
       into the cabinet. If there are gaps between the door seal and the cabinet,
       adjust the door seal by gently pulling away from the door using fingers.

17.

 Fit the other front feet (20).

18. 

Fit the plugs on the holes on inner liner (16 and 17).

19.

 Carefully stand your appliance. (You may need somebody to help you.)

       Adjust the front feet (See Installation Instructions)

20.

 Put back all, loose items and fittings.

21. 

Wait for at least 4 hours to allow the system to settle before switching on.


Spare plastic parts supplied with the appliance are for your

      future use during door repositioning.

1

60°

17

14

7

20

16

15

8

6

2

3

4

5

12

13

18

11

19

9

10

Summary of Contents for RA610

Page 1: ...ft 2 Star Fridge BEKO plc Beko House Caxton Way Watford Hertfordshire WD18 8UF Tel 01923 654650 Fax 01923 819653 e mail service beko co uk website www beko co uk Printed in Turkey Part no 48 3010 00 01 Revision no 1 ...

Page 2: ...ch are potentially flammable if exposed to fire Therefore take care not to damage the cooling circuit pipes of the appliance in transportation and in use In case of a damage do not expose the appliance to fire potential ignition source and immediately ventilate the room where the appliance is situated We suggest you contact your local authority for disposal information and facilities available We ...

Page 3: ...ain fuse box If in doubt contact a qualified electrician ELECTRICAL REQUIREMENTS Before you insert the plug into the wall socket make sure that the voltage and the frequency shown in the rating plate inside the appliance corresponds to your electricity supply Rating label is on the left hand side of fridge liner We recommend that this appliance is connected to the mains supply via a suitable switc...

Page 4: ...Make sure the plastic evaporating pan at the back of the product collects water properly 1 If possible avoid placing the appliance near cookers radiators or in direct sunlight as this will cause the compressor to run for long periods If installed next to a source of heat or refrigerator maintain the following minimum side clearances 2 No gap is required at sides and top See item 3 below to ensure ...

Page 5: ...the frozen food compartment door plastic hinge while holding the door 7 10 Remove the door 8 11 Reposition the plastic hinge bushing on the opposite side 9 and 12 after removing the plug 12 Reposition the door catch on the opposite side 10 and 15 after removing the plug while removing the plug on inner liner 13 Reverse the door and refit 13 14 Fit the plastic hinge 14 while removing the plugs on i...

Page 6: ...ermostat and may be set between 1 and 5 the coldest position When the appliance is switched on for the first time the thermostat should be adjusted so that after 24 hours the average fridge temperature is no higher than 5 C 41 F We recommend setting the thermostat half way between the 1 and 5 setting and monitoring to obtain the desired temperature i e towards 5 you will obtain a colder temperatur...

Page 7: ...roughly Insert the plug into the wall socket and switch on the electricity supply 10 STARTING Final Check Before you start using the refrigerator check that 1 The feet have been adjusted for perfect levelling 2 The interior is dry and air can circulate freely 3 Clean the interior as recommended under CLEANING AND CARE 4 Insert the plug into the wall socket and switch on the electricity supply When...

Page 8: ... Defrosting Do Keep raw meat and poultry below cooked food and dairy products Do Take off any unusable leaves on vegetables and wipe off any soil Do Leave lettuce cabbage parsley and cauliflower on the stem Do Wrap cheese firstly in greaseproof paper and then in a polythene bag excluding as much air as possible For best results take out of the fridge compartment an hour before eating Do Wrap raw m...

Page 9: ...e that above checks have been made as a charge will be made if no fault is found 15 GUARANTEE DETAILS Your new Beko product is guaranteed against the cost of breakdown repairs for twelve months from the date of the original purchase What is covered Repairs necessary as a result of faulty materials defective components or manufacturing defect The cost of functional replacement parts but excluding c...

Page 10: ...0 241 1320 Gas Dual Fuel Cookers 0870 241 1321 Washing Machines 0870 241 0357 Dishwashers Republic of Ireland All Refrigeration All Cookers 01 862 3411 Washing Machines Dishwashers Before requesting service please check the trouble shooting guide in the Operating Instructions as a charge may be levied where no fault is found even though your product may still be under guarantee Service once the ma...

Reviews: