background image

8

 / English

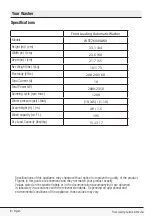
Front-Loading Automatic Washer

Important Safety Instructions

cartons!

•  Do not mix chlorine bleach with ammonia or acids such as vinegar and/or rust remover when 

washing. This mixture can produce hazardous fume which may cause death.

•  Do not operate this appliance if it is damaged, malfunctioning, partially disassembled, or has 

missing or broken parts, including a damaged cord or plug.

•  Store laundry detergents and additives in a cool, dry place out of children’s reach due to danger of 

chemical poisoning and skin irritation. Follow the manufacturers’ instructions when using laundry 

products.

•  Do not machine wash fiberglass materials. Small particles can stick to fabrics washed in following 

cycles and may lead to skin irritation.

•  Do not wash items stained with vegetable oil, cooking oil or petroleum. These items may contain 

some flammable oils after laundering and the fabric may smoke or catch fire by itself.

•  Be sure to unplug the power cable before attempting maintenance or cleaning of your appliance to 

minimize the risk of electric shock. Always unplug the cable by grasping the plug, not the cord.

•  Do not use wet hands when plugging/unplugging the power cable.

•  Check the water inlet and drain hose connections regularly for any leakage. Hoses should be 

replaced every 5 years.

•  Do not leave the washer door open to prevent children hurt themselves by hanging on the door or 

going inside the drum.

•  Be careful when the appliance is draining hot water. Danger of burning!

•  At the end of a washing day, turn off the


water faucets to prevent any leakage that may occur due 

to a  faulty condition of the appliance.

•  Check the appliance and inlet hose connections for water leakage after each use. If there is 

leakage, turn off the appliance and water faucets and call service.

•  Do not machine wash items having large or heavy metal parts such as buttons or buckles. These 

items could severely damage the appliance.

•  Always be sure to empty all foreign materials from the pockets of your clothing as small items such 

as coins, pins etc could severely damage the appliance.

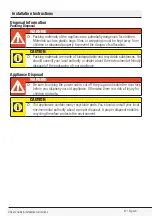
•  Do not install and operate the appliance in places exposed to temperatures below freezing. Frozen 

water may cause severe damage by bursting hoses and pump. 

•  Make sure that shipping bolts are removed before you operate the washer. If service is required as 

a result of not removing the bolts, it will not be covered by the warranty.

•  Make sure that the wash drum is empty before you load the washer.

•  Do not store and use any flammable and combustible substances such as lint, paper and 

chemicals near the appliance.

•  Always follow the manufacturer’s instructions when you are using a descaling agent. Be sure that 

descaling agent contains rust-protective materials and rinse the washer a few times thoroughly 

after the descaling process


(See, Descaling the washer).

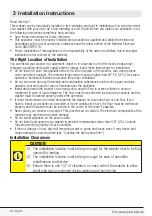
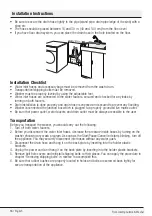
•  Install and operate the washer on a solid floor to prevent vibration or movement. It is not 

recommended to install and operate the washer on wooden floor or on a carpet.

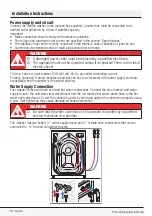
•  The rated voltage of your washer is 208/240V, so it should not be directly connected to the mains 

of 110/120V. A special junction box will be provided and used for the mains connection

 (

See, 

Installation Instructions for Grounding Instructions and Requirements).

•  If  an abnormal sound is heard during the washer operation, refer to the “Troubleshooting”


of this 

guide.

•  Call service for checking any possible damage or fault if the appliance is dropped or bumped.

•  The end of drain hose should not contact the discharge water in any way as this might cause 

siphoning of water.

•  Always leave the property after checking that the wash cycle is completed and the washer is 

turned off.

Summary of Contents for WTE7604XLW0

Page 1: ...STAR partner BEKO has determined that this product meets the ENERGY STAR guidelines for energy efficiency To prevent accidents and machine damage read these instructions before installation or use Use the washer only as instructed in this owner s guide and installation instructions included with your washer Keep this guide for future reference ...

Page 2: ...ied with this washer Please note that this owner s guide installation instructions may be applicable for several other models Differences between models will be identified in the guide Explanation of symbols Throughout this guide the following symbols are used C CAUTION Important information or useful hints about usage A WARNING Warning for hazardous situations with regard to life and property B W...

Page 3: ...ances for Closet Installation 11 Stacked Installation 11 Removing packaging reinforcement 11 Removing shipping bolts 12 Levelling the washer 12 Electrical Connection 13 Power supply and circuit 14 Water Supply Connection 14 Drainage 15 Installation Checklist 16 Transportation 16 Disposal Information 17 Appliance Disposal 17 4 Operating Instructions 18 First Use 18 Laundry Tips 18 Preparing the lau...

Page 4: ...he selections after the program has started 33 Switching the washer to standby mode 33 Child proof lock 34 Ending the program through canceling 35 End of program 35 6 Preparation 36 Starting 36 Canceling a program 36 Adding more laundry 37 Re spinning the laundry 38 After the program is finished 38 7 User maintenance instructions 39 Cleaning detergent dispenser 39 Cleaning the door seal 39 Cleanin...

Page 5: ... Guide Installation Instructions 5 English Overview 1 Your Washer 7 3 4 6 5 2 1 8 1 Power Cord 2 Top Lid 3 Control Panel 4 Filter Cap 5 Height adjustable Feet 6 Loading Door 7 Detergent Dispenser 8 Drain Hose ...

Page 6: ...is guide are schematic and may not match your product exactly Values stated on the washer labels or in the documentation accompanying it are obtained in laboratory in accordance with the relevant standards Depending on operational and environmental conditions of the appliance these values may vary Models Height in cm Width in cm Depth in cm Net Weight lbs kg Electricity V Hz Total Current A Total ...

Page 7: ...ppliance is removed from service or discarded remove the door and the power cord main plug to prevent accidents Do not reach into the appliance if the drum is moving Wait until the drum has completely stopped before opening the door Do not install or store this appliance where it will be exposed to the weather and direct sunlight Do not tamper with controls Do not repair or replace any part of the...

Page 8: ...appliance and water faucets and call service Do not machine wash items having large or heavy metal parts such as buttons or buckles These items could severely damage the appliance Always be sure to empty all foreign materials from the pockets of your clothing as small items such as coins pins etc could severely damage the appliance Do not install and operate the appliance in places exposed to temp...

Page 9: ...to remove coins buttons and such small objects Always drain off the water completely before cleaning the pump filter before transporting the washer when there is a danger of frost and when there is a power failure For emergency draining See User maintenance instructions Always be sure that the washer has been properly installed by licensed personnel water and electrical connections and grounding c...

Page 10: ...uch as lint paper curtains gasoline coal and liquid or vapor chemicals near the appliance Install and operate the washer on a strong solid concrete floor to prevent vibration noise or movement in case of load unbalance The floor must have sufficient load carrying capacity and the washer must be leveled properly before the operation It is not recommended to install and operate the washer on a woode...

Page 11: ...nt A louver having minimum 23 in2 148 cm2 air opening located at 3 in 7 62 cm from the bottom of closet door Stacked Installation You can stack your Blomberg washer and dryer model no DV 16540 NBL00 by using a special stacking kit Part No 2967100100 If necessary consult your dealer or technical service for supplying the stack kit In stacked closet installation following configuration is necessary ...

Page 12: ...h a special lock mechanism To fit the cover first insert it into the hole and then rotate it counterclockwise with a screwdriver until it is locked To unlock apply the procedure in reverse C CAUTION Keep the shipping bolts in a safe place to reuse when the clothes washer needs to be moved again in the future Never move the appliance without shipping bolts properly fixed in place Levelling the wash...

Page 13: ...ways accessible by the user after the appliance is installed Never use an extension cord or adapter to connect the appliance to the electrical power due to the risk of electric shock and or fire It is the personal responsibility and obligation of the appliance owner to provide a proper and grounded outlet installed by a qualified electrician Never use a damaged power cord since there is a risk of ...

Page 14: ...re is the risk of electric shock 15 Amp Fuse or circuit breaker 208 240 volt 60 Hz grounded alternating current Properly grounded 3 prong receptacle and junction box to be located so the power supply cords are accessible when the washer is in installed position Water Supply Connection Your washer comes with both cold and hot water connections Connect the blue marked cold water supply hose to the c...

Page 15: ...orn out hoses must not be reused It is not advised to extend inlet or drain hoses if necessary consult your dealer or technical service about hose extensions Hot and cold water faucets must always be easily accessible to the user At the end of a washing day turn off water faucets to prevent any leakage or water damage that may occur due to a faulty condition of the appliance Check the appliance an...

Page 16: ...o a properly grounded live mains outlet Be sure that power outlet water faucets and drain outlet must be always accessible to the user Transportation Before you transport the washer you should carry out the following 1 Turn off both water faucets 2 Before you disconnect the water inlet hoses decrease the pressure inside hoses by turning on the washer choosing any wash program As soon as the Start ...

Page 17: ... of biodegradable and recyclable substances You should consult your local authority or dealer about the environmental friendly disposal of the packaging of your appliance Appliance Disposal A WARNING Be sure to unplug the power cable cut off the plug and disable the door lock before you dispose your old appliance Otherwise there is a risk of injury for children and pets C CAUTION Old appliances co...

Page 18: ...l supply voltage junction box must be used for connecting the washer to the mains and plumbing system needed for the operation of the appliance Turn on both water faucets and be sure that there are no leaks on hose faucet connection points or on hoses themselves Check that the wash drum is empty Turn on the washer choose sanitary cycle on the program selector knob and start the washer as empty and...

Page 19: ...hable or hand washable Hand knits They should be placed inside out in the washer C CAUTION Do not wash dark colors with light colors and whites Color items may bleed and white and light colored items may be discolored Avoid extended contact of damp clothes before or after washing to prevent dye transfer Wash heavily and lightly soiled items separately Lint producers towels linen etc and lint colle...

Page 20: ...ndry items loosely in the drum Mix small and large items for an even load distribution Large items should be loaded first Large items should not be more than half of the total wash load If you put a wash bag or net which is filled with small items in the drum put an additional wash bag to prevent load unbalance Both wash bags should have the same amount of items to provide an even load distributio...

Page 21: ...y detergent manufacturers when using these products A WARNING Store laundry detergents and additives in a cool dry place out of children s reach due to danger of chemical poisoning and skin irritation Detergent Quantity The amount of washing detergent to use depends on the amount of laundry the degree of soiling and water hardness For small amounts of laundry or only slight soiling use accordingly...

Page 22: ...id main wash detergent at the beginning of main wash water intake Dispenser compartments are as follows left compartment numbered as II main wash compartment middle compartment marked as liquid fabric softener compartment right compartment numbered as I liquid chlorine bleach compartment II Main Wash Detergent Compartment Add HE High efficiency powder detergent to this compartment numbered as II b...

Page 23: ...ener is automatically dispensed during the final rinse of wash program Using liquid detergents If the product contains a liquid detergent cup Make sure that you have placed the liquid detergent cup in compartment nr 2 If the liquid detergent has lost its fluidity dilute it with water before putting in the detergent cup If the product does not contain a liquid detergent cup Do not use liquid deterg...

Page 24: ...rom laundry properly otherwise it may cause skin irritation Bleach is automatically dispensed and diluted during the first rinse of wash program A WARNING Bleach may only be used in Regular Cotton and Permanent Press cycles Don t use bleach with delicates hand washables or wools it will lead to clothes damage The liquid bleach cup insert must be removed if not using liquid bleach to avoid water le...

Page 25: ...anel 5 Selecting a Program and Operating Your Washer 1 Spin Speed Adjustment Button 2 Display 3 Temperature Adjustment Button 4 Program Selection Knob 5 On Off Button 6 Time Delaying Button 7 Auxiliary Function Buttons 8 Start Pause Cancel Button 1 6 7 8 2 3 4 5 ...

Page 26: ...e Indicator k Spin Speed Indicator Turning the washer on Plug in your washer Turn the tap on completely Check if the hoses are connected tightly Place the laundry in the washer Add detergent and softener Press the On Off button Program cycle selection Select the appropriate program from the program table according to type amount and degree of soiling of the laundry and washing temperatures Turn th...

Page 27: ... cycle It is recommended for your cotton or linen items that need extra hygiene such as baby clothes kitchen towels and garments Permanent Press You can wash your easy care items on this cycle Washes with gentler tumbling movementsand in shorter washing cycles It is recommended for your cotton synthetic or blended items such as shirts pants wrinkle free items etc You can select wash temperature ac...

Page 28: ...arge the water and spin dry the load with selected spin speed Spin Drain may be selected as one program in this model C CAUTION You should select a lower spin speed for delicate wash items Temperature selection Whenever a new program is selected the temperature anticipated for that program appears on the temperature indicator To change the temperature press the temperature button There are four te...

Page 29: ... C Permanent Press Hot Easy care items made of cotton linen synthetics or blends dress shirts pants wrinkle free items poly cotton blends Normal Heavy Hot 126F 52 C 1000 1 2 SW S R A Warm Light Hot cold 95F 35 C Cold Light Cold 60F 15 C Fitness Wear Warm Normally or lightly soiled daily cotton synthetics or blended clothes e g sportswear Normal Cold 95F 35 C 1000 1 2 x SW S R Cold Light Cold 60F 1...

Page 30: ...sults if the laundry is heavily soiled Half loading would also minimize wrinkling of the load 4 Bleach may only be used in Regular Cotton and Permanent Press cycles Don t use bleach with delicates handwashables wools jeans and sports this will lead to clothes damage C CAUTION The auxiliary functions in the table vary according to the model of your washer Water and power consumption and program dur...

Page 31: ...ater for Regular Cotton cycle Soak This function b is used for heavily soiled items when you want to pre treat them before washing Laundry is soaked in a relatively high amount of warm water for an hour and a half approximately You can use full load and HE High efficiency detergent for soaking Use 1 3 1 2 of the recommended detergent dosage for the load amount to be soaked Extra Rinse When this fu...

Page 32: ... period At the end of the time delay countdown process time delaying symbol fades and the washing starts as the program duration is displayed Changing the delay time If you want to change the time during the countdown 1 Press Start Pause Cancel button in the middle of the screen will stop flashing The Standby symbol will light up The Time delaying symbol will flash The Start Symbol will fade 2 Pre...

Page 33: ...ights up at the beginning of softener step Spin Spin symbol will light up at the beginning of the final spin during Drain Spin special programs If the washer is not spinning the program may be in rinse hold mode or the automatic spin correction system has been activated due to an excessive unbalanced distribution of laundry in the washer Changing the selections after the program has started The se...

Page 34: ...oor is not locked door expression will appeare on the screen In that case door should be opened and closed again firmly Child proof lock Protect the appliance from being tampered by children by means of the child proof lock In this case no change can be made in the running program C CAUTION Your washer can be turned on and off with On Off button while the child proof lock is activated In this case...

Page 35: ...art Pause Cancel button is pressed for 3 seconds to cancel the program Start symbol will flash during cancellation After cancellation the symbol of the corresponding step at which the cancellation was made will remain lit and End will appear on the screen End of program When the program is finished the symbols of the relevant steps will remain lit up and the auxiliary function spin and temperature...

Page 36: ... Press Start Pause Cancel button The display shows the time remaining for the program to complete if time delay is not set The display shows the time remaining for the program to start if the time delay is set 6 Check if the Door Locked Symbol lights up on the screen The Door Locked Symbol will light up if time delay is not set The Door Locked Symbol will fade if time delay is set Canceling a prog...

Page 37: ...step only if the water level is low enough to open the loading door or if the temperature in the washer is low In order to add laundry after the start up of the program 1 Press Start Pause Cancel button Wait for the safety lock to open 2 Open the loading door and put in more laundry 3 Close the loading door 4 Press Start Pause Cancel button If you want to discharge the water without spinning 1 Pre...

Page 38: ...sly placed clothes in the drum 2 Select the spin program 3 Adjust the spin speed After the program is finished Program indicator symbols on the screen will light up after the program is finished End will appear on the screen 1 Open the loading door and remove the laundry when the door locked symbol on the display fades out 2 Press the On Off button 3 Turn off the faucets 4 Check the rubber door se...

Page 39: ...etc Wear protective gloves or use an appropriate brush or sponge to avoid touching the detergent residues in the drawer when cleaning 3 Replace the drawer into its housing after cleaning Check if the siphon and container are in their original locations Cleaning the door seal Be sure to check the rubber door seal after unloading your washer Pull the seal back to search for any foreign objects Resid...

Page 40: ...panels of your washer with soapy water or mild detergent Dry it with a soft cloth Use only a soft and damp cloth to clean the control panel C CAUTION Never use a sponge or scrubbing material These will damage the painted and plastic parts Cleaning the water inlet strainers There is a strainer at the end of each water inlet valve at the back side of the washer and also at the end of each water inle...

Page 41: ...filter In addition water may have to be drained off completely in the following cases before transporting the appliance e g when moving when there is a danger of frost In order to clean the dirty filter and discharge the water 1 Disconnect or unplug the washer from the power supply A WARNING There may be water at 158F 70 C in the drum Therefore the filter must be cleaned only after the inside wate...

Page 42: ... into its housing otherwise water may leak from the filter cap 4 Close the filter cap Close the two piece filter cap of your product by pushing the tab on it Close the one piece filter cap of your product by fitting the tabs on the bottom into their positions and pushing the upper part of it Descaling the washer Hard water can cause scale build up inside the drum and other parts of your washer in ...

Page 43: ...necessary Washer may be in handwash wools or soak cycle Wait for a short time and tumbling will start Drain pump filter or drain itself may be clogged Clean the drain pump filter See User maintenance instructions If the house drain pipes are clogged call a plumber for assistance Door may not be closed properly Close the loading door Washer does not drain water Washer drains water slowly Drain hose...

Page 44: ...sher fills with water when a process is cancelled There may be hot water inside washer For safety reasons water should be cycled in and out a couple times Time delay function does not work Door may not be closed properly Close the loading door The door will not open Water level might be above the lower level of the door Run Drain Spin or Drain Spin program Washer might be heating up the water or i...

Page 45: ...ount of detergent next time you operate the washer It continuously washes Remaining time does not count down In the case of a paused countdown while taking in water Timer will not countdown until the washer is filled with the correct amount of water Time will not count down until the selected temperature for the program is reached The washer will wait until there is a sufficient amount of water to...

Page 46: ...tergent for lace items Washer is completely full of suds Suds coming out of dispenser during operation Not using HE detergent Using excessive amount of detergent Push Start Pause Cancel button Mix 2 cups of water with 1 2 tablespoon of fabric softener and pour it into detergent dispenser Push Start Pause Cancel button again Use proper amount of HE detergent next time you operate the washer Load is...

Page 47: ... filter See User maintenance instructions If the house drain pipes are clogged call a plumber for assistance Washing performance is poor Laundry turns gray yellow Using insufficient amount of detergent Use the recommended amount of HE detergent appropriate for water hardness and soil level of laundry Washing at low temperatures for a long time Select the proper temperature for the laundry to be wa...

Page 48: ...enser See Detergent Dispenser Do not mix detergent with bleaching agent or fabric softener Excessive laundry may be loaded into washer Do not load the washer in excess Washing performance is poor Oily stains appear on laundry Oily accumulations of prior wash cycles on the drum may have stuck to the laundry Washer must be operated empty at sanitary cycle with detergent The detergent may have been p...

Page 49: ...e might be problems with the water inlet valves The detergent may have been placed into the wrong compartment the detergent may be mixed with the softener Softener should not come into contact with detergent bleach when being added Color of the clothes faded A higher temperature might have been selected Select the proper program and temperature according to the type and soiling degree of the laund...

Page 50: ...ergent Drain hose may be folded Check the drain hose and straighten if necessary Drain pump filter or drain itself may be clogged Clean the drain pump filter See User maintenance instructions If the house drain pipes are clogged call a plumber for assistance Detergent or softener residue in the dispenser Too much water remains in the softener compartment Detergent powder may have been put in wet d...

Page 51: ...e Ensure that nothing touches the washer Strange noise in the drain pump This is not a problem Lapping sound is normal at the end of the drain operation It is not harmful to your washer Clanking noise in the drum Metal objects such as coins pins may be in the drum Stop the program cycle See Cancelling a Program check the drum for any foreign objects Water fill temperature is incorrect Water inlet ...

Page 52: ...d up too much in the drum when washing Excessive laundry might have been loaded in Do not load the washer in excess Washing many items of the same type or size of clothes together Load the wash drum with items of different sizes Load is wrinkled Delay in unloading the washer Unload the washer as soon as the wash cycle ends Wrong program cycle might have been selected Select the proper program cycl...

Page 53: ...rical and plumbing problems or educational instruction on the use of the washer The warranty also does not cover defects or damage caused by an act of god such as storms floods fires mudslides etc damage cause by use of the washer for purposes other than those for which it was designed misuse abuse accident alteration improper installation maintenance travel fees service calls outside normal servi...

Page 54: ...4 English Front Loading Automatic Washer 10 HOW TO GET SERVICE Please contact your authorized Beko dealer or visit www beko us to locate and get information for the closest authorized Beko service center ...

Page 55: ...Owner s Guide Installation Instructions 55 English ...

Page 56: ...www beko com ...

Reviews: