background image

EN / 13

Washing Machine / User’s Manual
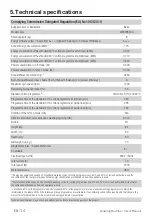
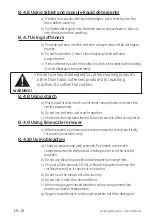
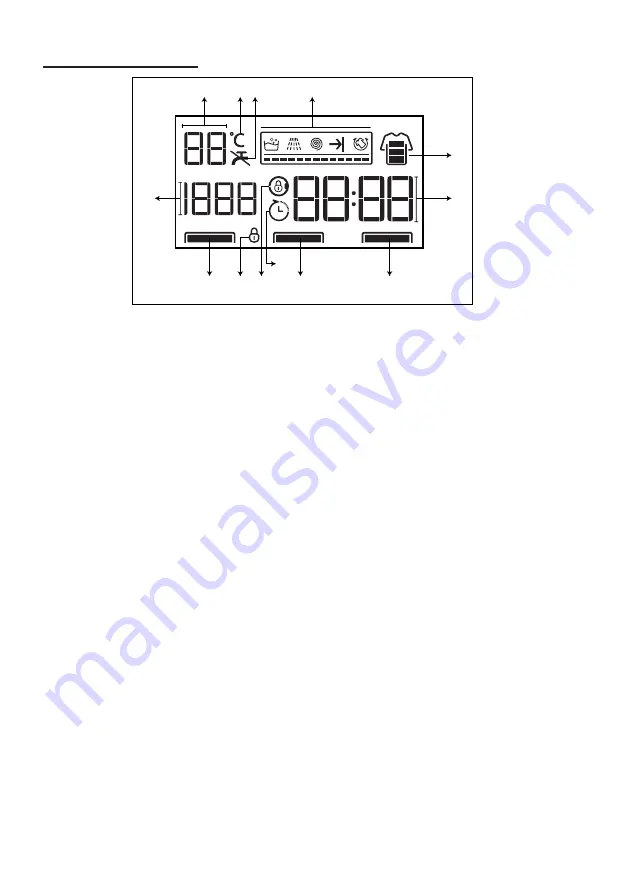
4.4 Screenshot 

1

2 3

4

5

6

7

8

10

11

12

13

9

1   - Temperature indicator
2   - Temperature symbol
3   - No water symbol
4   - Programme follow-up indicator
5   - Quick wash indicator
6   - Duration information
7   -

Auxiliary functions light 1

8   -

Auxiliary functions light 2

9   - Delayed start enabled symbol
10 - Door lock is engaged symbol
11 - Child lock enabled symbol
12 -

Auxiliary functions light 3

13 - Spin speed selection indicator

Summary of Contents for WY84PB44G

Page 1: ...2820526289_EN 30 10 17 9 02 Washing Machine User Manual WY84PB44G EN Document Number ...

Page 2: ...someone else give the user manual as well Follow all warnings and information in the user manual You can see the user s manual at www beko com Explanation of symbols DANGER A hazard with a high level of risk which if not avoided will result in death or serious injury WARNING A hazard with a medium level of risk which if not avoided will result in death or serious injury CAUTION A hazard with a low...

Page 3: ...allation 15 6 1 Appropriate installation location 15 6 2 Removing packaging reinforcement 16 6 3 Removing transportation safety bolts 16 6 4 Connecting water supply 17 6 5 Connecting the water draining hose to the drain 18 6 6 Adjusting the feet 19 6 7 Electrical connection 20 6 8 Electrical requirements 21 6 9 Fitting a different plug 22 6 10 Transportation of the product 22 7 Initial use 23 7 1 ...

Page 4: ... selection 41 10 3 Quick Wash Setting Fast 42 10 4 Starting the programme 43 10 5 Programme steps 43 10 6 End of programme 44 11 Programme options 45 11 1 Setting the end time 45 11 1 1 Cancelling the end time setting 46 11 2 Switching the machine to standby mode and adding laundry 46 11 3 Cancelling the programme 47 12 Additional features 48 12 1 Activating and deactivating the audio warning 48 1...

Page 5: ...d that they are supervised or trained on the safe usage of the product and the risks it brings out Childrenundertheageof8shouldbeprevented from accessing and tinkering with the product Cleaning and user maintenance works should not be performed by children unless they are supervised by someone Electrical products are dangerous for the children Use child lock to prevent children from intervening wi...

Page 6: ...the loading door to open the door and the lock mechanism may get damaged Never open the loading door or remove the filter while there is still water in the drum Otherwise risk of flooding and injury from hot water will occur The water supply and draining hoses must be securely fastened and remain undamaged WARNING DANGER 1 3 Electrical safety Do not operate faulty products until repaired by an Aut...

Page 7: ...micals for product cleaning or other purposes Do not step or stand on the product Do not place heavy objects on the product If you will place a dryer on to the washing machine secureitwiththesuitableconnection apparatus that you can obtain from the Authorised Service Agent Unplug the product turn the tap off and contactyourAuthorisedServiceAgentwithout tampering with the product if the product has...

Page 8: ...lectrical and electronic equipment Please consult your local authorities to learn the nearest collection point Help protect the environment and natural resources by recycling used products For children s safety cut the power cable and break the locking mechanism of the loading door so that it will be non functional before disposing of the product Compliance with RoHS Directive The product you have...

Page 9: ...mall quantities of lightly soiled laundry e Do not use prewash and high temperatures for laundry that is not heavily soiled or stained f If you plan to dry your laundry in a dryer select the highest spin speed recommended during washing process g Do not use detergent in excess of the amount recommended on the detergent package 3 Intended use a This product has been designed for domestic use b It i...

Page 10: ...0 Washing Machine User s Manual 4 Your product 4 1 Overview 1 2 3 4 5 6 7 8 1 Power cable 2 Top panel 3 Control panel 4 Water discharge hose 5 Loading door 6 Filter cap 7 Adjustable feet 8 Detergent drawer ...

Page 11: ...2 Package contents Power cable Water discharge hose Transportation safety bolts Mains water inlet hose Liquid detergent container User manual Plastic plug group NOTE Figures in this manual are schematic and may not match the product exactly ...

Page 12: ...se button 9 Auxiliary function button 3 10 Auxiliary function button 2 11 Auxiliary function button 1 12 Programme selection lights Start Pause Temperature Spin Prewash Time Delay Fast Extra Rinse Night Mode WY84PB44G Cottons Synthetics Mixed Fabrics Spin Drain StainExpert Cottons Eco Shirts Anti Allergy Lingerie Sports Down Wear Rinse On Woollens Delicates Dark Care Daily Quick Super Short Child ...

Page 13: ... symbol 3 No water symbol 4 Programme follow up indicator 5 Quick wash indicator 6 Duration information 7 Auxiliary functions light 1 8 Auxiliary functions light 2 9 Delayed start enabled symbol 10 Door lock is engaged symbol 11 Child lock enabled symbol 12 Auxiliary functions light 3 13 Spin speed selection indicator ...

Page 14: ...time of the standard 40 C cotton programme at partial load min 230 Duration of the left on mode min N A Airborne acoustical noise emissions washing spinning dB 51 74 Built in No Height cm 84 Width cm 60 Depth cm 59 Net weight 4 kg 70 Single Water inlet Double Water inlet Available Electrical input V Hz 230 V 50Hz Total current A 10 Total power W 2200 Main model code 9811 1 Energy Consumption based...

Page 15: ...d and your house will be under risk of flood NOTE Preparation of the location and electrical tap water and waste water installations at the place of installation is under customer s responsibility Make sure that the installation and electrical connections of the product are performed by competent persons Make sure that the water inlet and drain hoses as well as the power cable are not folded pinch...

Page 16: ...t the product backwards b Remove the packaging reinforcement by pulling the ribbon 6 3 Removing transportation safety bolts CAUTION Remove the transportation safety bolts before operating the product Otherwise the product will be damaged a Loosen all transportation safety bolts with an appropriate wrench until they turn freely b Remove transportation safety bolts by turning them gently ...

Page 17: ...ly procedure 6 4 Connecting water supply CAUTION The water supply pressure required to run the product is between 1 to 10 bars 0 1 1 MPa It is necessary to have 10 80 litres of water flowing from the fully open tap per minute Attach a pressure reducing valve if water pressure is higher Do not use old or used water inlet hoses on the new product It may cause stains on your laundry Do not plug the p...

Page 18: ... d Keep the taps closed when the product is not in use 6 5 Connecting the water draining hose to the drain CAUTION Attach the end of the drain hose directly to waste water drain washbasin or bathtub Do not contact the discharged water Risk of being burnt as the water may be hot Fix the water drain hose end completely to prevent risk of dislocation a Connect the water drain hose to a minimum height...

Page 19: ...uct f If the length of the hose is too short use it by adding an original extension hose Total length of the hose may not be longer than 3 2 m Otherwise the product may fail as it would take water in and out continuously 6 6 Adjusting the feet CAUTION Adjust feet so that the product will be balanced on the location it will be used Balance the machine by adjusting the feet Check for any play by pre...

Page 20: ...t is used without grounding in accordance with the local regulations If the current value of the fuse or breaker in the house is less than 16 Amps have a qualified electrician install a 16 Amp fuse Do not make connections via extension cables or multi plugs b Connection must comply with national regulations c The wiring for the electrical outlet circuit must be sufficient to meet the appliance req...

Page 21: ...ur socket then the plug should be cut off and an appropriate plug fitted Balance the machine by adjusting the feet Check for any play by pressing the product from upper diagonal edges Otherwise the product may move from its place and cause crushing and vibration problems Destroy the old plug a cut off plug with a bare cord could cause a shock hazard if inserted into a socket elsewhere in the house...

Page 22: ...wire to the terminal in the plug marked L or coloured red With the alternative plugs a 13A fuse must be fitted either in the plug or adaptor or in the main fuse box If in doubt contact a qualified electrician 6 10 Transportation of the product a Unplug the product before transporting it b Remove water drain and water supply connections c Drain all water that has remained in the product d Install t...

Page 23: ...ised Service Agents c Before starting the programme put 1 pouch of special drum cleaning agent if the special agent could not be supplied put max 1 teaspoon of max 100 g of powder anti limescale into the main wash detergent compartment If the anti limescale is in tablet form put only one tablet into the main wash compartment d Start the programme e Dry the inside of the bellow with a clean piece o...

Page 24: ... 700 C 600 C 500 C 400 C 300 C Symbol s lll lll lll ll ll ll lll ll l Drying symbols Suitable for dryer No ironing Sensitive delicate dry Do not dry with dryer Do not dry Do not dry clean DRYING Drying settings At any temperature At high temperature At medium temperature At low temperature Without heating Hang to dry Lay to dry Hang wet to dry Lay in shadow to dry Dry cleanable Iron IRON Dry or st...

Page 25: ...stains must be treated properly before washing g Wash trousers and delicate laundry turned inside out h Laundry that are subjected to materials such as flour lime dust milk powder etc intensely must be shaken off before placing into the product 8 3 Loading and removing the laundry a Open the loading door b Do not pack laundry inside the product tightly c Push the loading door to close until you he...

Page 26: ...gent softener and other cleaning agents a Add detergent and softener before starting the washing programme b When using a programme without prewash do not put any detergent into the prewash compartment c Do not select a programme with prewash if you are using a detergent bag or dispensing ball Place the detergent bag or the dispensing ball directly among the laundry in the product d Never leave th...

Page 27: ... special detergent manufactured specifically for woolens 8 4 4 Adjusting detergent amount a The amount of washing detergent to be used depends on the amount of laundry the degree of soiling and water hardness b Do not use amounts exceeding the dosage quantities recommended on the detergent package to avoid excessive foam and poor rinsing c Use lesser detergent for small amounts or lightly soiled c...

Page 28: ... 8 Using starch a Place liquid or dust starch on softener compartment and start the rinsing programme b Do not use softener and starch together c Use drum cleaning described in Initial use section after using starch 8 4 9 Using limescale remover a When required use limescale removers manufactured specifically for washing machines only 8 4 10 Using bleaches a Choose a programme with prewash Put ble...

Page 29: ...and permissible water temperature Always select the relevant lowest required temperature Higher temperature means higher electricity consumption a Select the desired programme with the Programme Selection knob NOTE If no programme is started or no key is pressed within 10 minute during programme selection process the product will turn off automatically Display and all indicators will turn off If y...

Page 30: ...rom the stated wash temperature Cottons You can wash your durable cotton laundry sheets bedlinen towels bathrobes underwear etc in this programme When Quick Wash button is pressed efficient washing performance will be delivered thanks to the intense washing movement even though the programme duration will be significantly shorter When Quick Wash button is not pressed superior washing and rinsing p...

Page 31: ...iene is ensured thanks to long heating duration and additional rinsing step Programme was tested by the VDE institute with the 20 C temperature option selected and it was certified in terms of its efficacy in eliminating bacteria and mould Programme was tested by The British Allergy Foundation Allergy UK with the 60 C temperature option selected and it was certified in terms of its efficacy in eli...

Page 32: ...tting button is pressed the Pre treatment algorithm is executed Apply the pre treatment chemical on your garments directly or add it together with detergent when the machine starts to take water from the main washing compartment Thus you can obtain the same performance as you obtain with normal washing in a much shorter period of time Usage life of your shirts increases Mixed Fabrics Use to wash y...

Page 33: ...or cotton shirts trousers shorts t shirts baby clothes pyjamas aprons table clothes bed sheets duvet covers pillowcases bath beach towels towels socks cotton underwear that are suitable for washing at high temperature and long time You can perform washing for 24 types of stain divided into 3 different groups that can be selected with the Quick Wash setting button Below you can see the stain groups...

Page 34: ...pressed twice Tea Coffee Fruit juice Ketchup Red wine Starch Jam Coal Select the stain programme Select the stain you want to clean by locating it in the groups above and using the Quick Wash setting button For detailed information see the Programme settings section Read the garment tag carefully and ensure that correct temperature and spin speed are selected ...

Page 35: ... them Thanks to special spinning profiles it is ensured that the water reaches the air gaps amongst the feathers Lingerie You can use this programme to wash delicate garments that are suitable for hand wash and delicate women s underwear Small amount of garments must be washed in a washing net Hooks buttons etc must be done up and zips must be zipped up ...

Page 36: ...5 1400 Cold 90 20 8 92 0 55 1400 Cold 90 Cottons Eco 60 8 44 0 915 1400 Cold 60 60 4 40 5 0 710 1400 Cold 60 40 4 40 5 0 630 1400 Cold 60 Synthetics 60 3 65 1 20 1200 Cold 60 40 3 63 0 78 1200 Cold 60 Daily Quick Super Short 90 8 69 2 10 1400 Cold 90 60 8 69 1 05 1400 Cold 90 30 8 66 0 15 1400 Cold 90 Daily Quick Super Short Fast 30 2 36 0 15 1400 Cold 90 Mixed Fabrics 40 3 5 71 0 80 800 Cold 40 W...

Page 37: ...e changed by the manufacturing company Existing selection modes can be removed or new selection modes can be added The manufacturer reserves the right to make modifications in the programmes and auxiliary functions given in the table While these modifications will not change the product performance programme steps and durations can change Indicative values for Synthetics programmes EN Load kg Wate...

Page 38: ...ection will remain active An auxiliary function that is not compatible with the programme cannot be selected See Programme and consumption table Some programmes have auxiliary functions that must be operated simultaneously Those functions cannot be cancelled The frame of the auxiliary function will not be illuminated only inner area will be illuminated a Select the desired auxiliary functions befo...

Page 39: ...etion of the programme run Spin cycle to spin the laundry 9 4 2 Functions Programmes Selected by Pressing the Function Buttons for 3 Seconds Drum Clean 3 CAUTION This is not a Laundry washing programme It is a maintenance programme Do not run this programme when there are any objects in the machine If you try to do so the machine detects that there is a load inside and aborts the programme Press a...

Page 40: ...l be active in the subsequent washing cycles as well Child lock Use Child Lock function to prevent children from tampering with the product Thus you can avoid any changes in a running programme NOTE You can switch on and off the product with On Off button when the Child Lock is active When you switch on the product again programme will resume from where it has stopped To activate the Child Lock a ...

Page 41: ...k to the beginning after Cold option and arrives at the highest temperature selectable according to the programme 60 800 2 30 10 2 Spin speed selection a Whenever a new programme is selected the recommended spin speed of the selected programme is displayed on the spin speed indicator b To decrease the spin speed press the Spin Speed Adjustment button Spin speed decreases gradually c Maximum speed ...

Page 42: ...nd the programme is completed No Spin Use this function if you do not want your clothes be spun at the end of the programme 10 3 Quick Wash Setting Fast 60 800 2 45 After selecting a programme you can press the Quick Wash setting key to shorten the programme duration For some programmes the duration can shorten by over 50 Despite this the washing performance is good thanks to the changed algorithm...

Page 43: ...The symbols below appear on programme follow up indicator after the programme starts Wash Rinse Spin End Anti creasing Once the relevant function has been selected this symbol becomes on and remains on until it is cancelled See Functions Programmes Selected by Pressing the Function Buttons for 3 Seconds 60 800 2 45 60 800 2 45 NOTE No Water symbol appears if water is not supplied to the product Pr...

Page 44: ...ou do not press any button for 10 minutes the product will turn off automatically Display and all indicators are turned off Completed programme steps will be displayed if you press On Off button b Remove your laundry c Switch off the product by pressing and holding the On Off button for 3 seconds d Close the tap connected to the product e Unplug the product ...

Page 45: ...s displayed If the End Time is adjusted End Time indicator is illuminated 60 800 9 30 60 800 9 30 b Open the loading door place the laundry and put detergent etc c Select the washing programme temperature spin speed and if required the auxiliary functions d Set the end time of your choice by pressing the End Time button End Time indicator illuminates e Close the loading door f Press the Start Paus...

Page 46: ... Start Pause button 60 800 9 30 11 1 1 Cancelling the end time setting a If you want to cancel End Time function press On Off button for 3 sec to turn off and on the product 60 800 9 30 11 2 Switching the machine to standby mode and adding laundry 60 800 2 45 a Press the Start Pause button to switch the machine to pause mode while a programme is running b Start Pause light and the programme step l...

Page 47: ...e the machine is above 50 C you cannot deactivate the door lock for safety reasons even if the water level is suitable 11 3 Cancelling the programme a Press and hold On Off button for 3 seconds NOTE If you press On Off button when the Child Lock is enabled the programme will not be cancelled You should cancel the child lock first See To deactivate the child lock If you want to open the loading doo...

Page 48: ... selection display on the panel will count down as 3 2 1 c If the audio warning is active it will be deactivated and vice versa 60 800 3 bib 60 800 3 bib 12 2 Loading door lock a Press Start Pause button to lock the loading door for safety purposes after starting any process b The door will not unlock if the product contains enough water to spill out when the door is opened c Door Locked symbol ap...

Page 49: ...id any water overflow before opening the loading door make sure there is no water left inside the machine a Open the pump filter cap b Release the loading door emergency handle located at the rear side of the filter cap c Pull down the loading door emergency handle once and open the loading door After opening the loading door re insert the loading door emergency handle d If the loading door does n...

Page 50: ...der to prevent the residues to contact your skin clean it with an appropriate brush by wearing a pair of gloves d Place the siphon back into its seat securely after cleaning and insert the drawer back 13 2 Cleaning the loading door a After every washing check that no foreign substance is left in the drum b If the holes on the bellow shown in the figure are blocked open the holes using a toothpick ...

Page 51: ...running water d Replace the gaskets and filters carefully in their places and tighten the hose nuts by hand 13 5 Cleaning the pump filter CAUTION Foreign substances left in the pump filter may damage your product or may cause noise problem In regions where freezing is possible the tap must be closed system hose must be removed and the water inside the product must be drained when the product is no...

Page 52: ...seat Place a large container at the end of the hose Drain the water into the container by pulling out the plug at the end of the hose When the container is full block the inlet of the hose by replacing the plug After the container is emptied repeat the above procedure to drain the water in the product completely When draining of water is finished close the end by the plug again and fix the hose in...

Page 53: ...ct does not drain water Water drain hose is clogged or twisted Clean or flatten the hose Pump filter is clogged Clean the pump filter Product vibrates or makes noise Product is standing unbalanced Stable the product by adjusting the feet A hard substance has entered into the pump filter Clean the pump filter Transportation safety bolts are not removed Remove the transportation safety bolts Laundry...

Page 54: ...e the washing time extends Voltage is low Washing time is prolonged to avoid poor washing results when the supply voltage is low Input temperature of water is low Required time to heat up the water extends in cold seasons Also washing time can be lengthened to avoid poor washing results Number of rinses and or amount of rinse water have increased Product increases the amount of rinse water when go...

Page 55: ...nt of detergent is used with hard water Using insufficient amount of detergent with hard water causes the soil to stick on the cloth and this turns the cloth into gray in time It is difficult to eliminate graying once it happens Use the recommended amount of detergent appropriate for water hardness and the laundry Excessive amount of detergent is used Use the recommended amount of detergent approp...

Page 56: ...nt is put in the prewash compartment although prewash cycle is not selected the product can take this detergent during rinsing or softener step Put the detergent in the correct compartment Pump filter is clogged Check the filter Drain hose is folded Check the drain hose Laundry became stiff after washing Insufficient amount of detergent is used Using insufficient amount of detergent for the water ...

Page 57: ...Excessive amount of detergent is used Use only sufficient amount of detergent Detergent was stored under improper conditions Store detergent in a closed and dry location Do not store in excessively hot places Some meshed laundry such as tulle may foam too much because of their texture Use smaller amounts of detergent for this type of item Detergent was put in the wrong compartment Put the detergen...

Page 58: ...ing environment Laundry should be rearranged and re spun Regular drum cleaning is not applied Clean the drum regularly CAUTION If you cannot eliminate the problem although you follow the instructions in this section consult the dealer or the Authorised Service Agent Never try to repair a nonfunctional product yourself This product was manufactured using the latest technology in environmentally fri...

Page 59: ... Gas Dual Fuel Cookers 0345 600 4905 or 0845 600 4905 Washing Machines Tumble Dryers 0345 600 4906 or 0845 600 4906 Republic of Ireland All Refrigeration 01 862 3411 All Cookers Washing Machines Dishwashers Before requesting service please check the trouble shooting guide in the Operating Instructions as a charge may be levied where no fault is found even though your product may still be under gua...

Page 60: ... often included within your household contents insurance policy or may be available separately from your retailer Important notes Your Beko product is designed and built for domestic household use only The guarantee will be void if the product is installed or used in commercial or non residential domestic household premises The product must be correctly installed located and operated in accordance...

Reviews: