background image

BelAir20E Quick Install Guide

Installing the BelAir20E

March 23, 2012

Confidential

Page 6 of 8

Document Number BDTQ02201-A04 Standard

Step 2

Mount on 

a Flat Surface

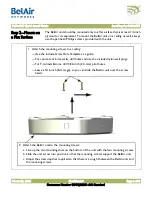
The BelAir unit should be mounted only to a flat surface that is at least 1/2-inch 
plywood or its equivalent. To mount the BelAir unit on a ceiling or wall, always 
use the pan head Phillips screws provided with the unit.

1 Attach the mounting screws to a ceiling:

—Use the include Screw Hole Template as a guide.

—For concrete or brick walls, drill holes and use the included nylon wall plugs.

—For T-rail installations, drill 3/32-inch (2.4-mm) pilot holes.

—Leave a 5/16-inch (8-mm) gap so you can slide the BelAir unit over the screw 

heads.

2 Attach the BelAir unit to the mounting screws:

a Line up the two mounting slots on the bottom of the unit with the two mounting screws.
b Slide the unit across into position so that the mounting screws support the BelAir unit.
c Adjust the screw depth as required so that there is a snug fit between the BelAir unit and 

the mounting screws.

Summary of Contents for BelAir20E

Page 1: ... may be subject to change All trademarks are the property of their respective owners Protected by U S Patents 7 171 223 7 164 667 7 154 356 7 030 712 and D501 195 Patents pending in the U S and other countries BelAir Networks the BelAir Logo BelAir200 BelAir200D BelAir100 BelAir100S BelAir100C BelAir100T BelAir20 BelAir20M BelAir20E BelAir20EO BelAir100M BelAir100i BelAir100SN BelAir100SNE BelAir1...

Page 2: ...ide Getting Started March 23 2012 Confidential Page 2 of 8 Document Number BDTQ02201 A04 Standard Getting Started Package Contents BelAir20E Power Adapter Ethernet Cable Fastening Hardware Quick Install Guide Screw Hole Template ...

Page 3: ...ry requirements Power Connector The BelAir unit does not have a power switch It is powered on when connected to a power source The power adapter automatically adjusts to any voltage between 100 240 volts at 50 or 60 Hz The BelAir unit draws up to 0 35 A at 48 V DC 16 8 W Reset Button This button is used to restore the factory default configuration using a paperclip or pen tip If you hold down the ...

Page 4: ...o seek the information you want 1 Refer to the Troubleshooting Guide of the unit to see if it describes your situation If it does do the provided corrective actions 2 If the troubleshooting guide does not cover your situation contact your BelAir Networks product representative 3 If you still need assistance use the BelAir Networks online support center at http support belairnetworks com 4 Finally ...

Page 5: ...structures such as those containing metal The BelAir unit can be mounted on any horizontal surface on a wall or from a hanging ceiling The BelAir unit is UL2043 Certified for Plenum mounting Installers must use Plenum rated Ethernet cable for installations in a building s environmental air space such as above suspended ceilings Installers must follow local and national codes for above ceiling inst...

Page 6: ... a ceiling Use the include Screw Hole Template as a guide For concrete or brick walls drill holes and use the included nylon wall plugs For T rail installations drill 3 32 inch 2 4 mm pilot holes Leave a 5 16 inch 8 mm gap so you can slide the BelAir unit over the screw heads 2 Attach the BelAir unit to the mounting screws a Line up the two mounting slots on the bottom of the unit with the two mou...

Page 7: ...urce device and an AC power source AC will be disabled Figure 1 Wall Outlet Power Figure 2 Power over Ethernet Warning Use ONLY the power adapter supplied with this BelAir20E Otherwise the product may be damaged Warning If PoE is used the BelAir20E must be connected to a power source that complies to IEEE 802 3af or 802 2at or to an IEC EN 60950 1 compliant power limited source BelAir20E Outlet Ex...

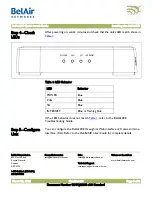
Page 8: ...belairnetworks com Visit us on the web at www belairnetworks com 8 Step 4 Check LEDs After powering on wait 2 minutes and check that the unit s LED match those in Table 1 If the LED behavior does not match Table 1 refer to the BelAir20E Troubleshooting Guide Step 5 Configure Unit You can configure the BelAir20E through its Web interface or Command Line Interface CLI Refer to the BelAir20E User Gui...

Reviews: