INSTALLATION AND STARTUP
1MANUL220
Belanger, Inc.® * PO BOX 5470. * Northville, MI 48167-5470 * Ph (248) 349-7010 * Fax (248) 380-9681
10-3
Chapter 10 Booster Pump Assembly Option
Booster Pump
Before You Get Started
Turn off the main power to the machine.
Turn off the main water supply to the machine.
Before initial startup, the pump must be filled with 1.2 to 1.5 gallons of water to enable it to self-prime. The pump
can be primed by removing the 1/2” plug that is on the top of th
e pump and opening the inlet water valve until the
pump is full.
When mounting the pump to the wall, be sure to keep the gauges at a level that will be easily visible.
Make sure that there will be enough room between the spot where the pump will mount
and the main 1” copper
water line. This will keep enough slack in the 1” black water ho
se and not cause any unusual bends.
There is 15’
-
0” of 1” black water hose supplied. Try not to place the pump any more than 6’
-
0” from where your 1”
main copper line will be cut. If you need to go further than 6-
0”’, it will be necessary to purchase addit
ional hose.
Installation
1)
Locate the main copper water line that feeds the fresh water to the 3/4” blue water hose
running through the boom and to the FreeStyler® utility plate. This copper line will need to
have a section cut out to install the Booster Pump Kit.
Note:
If the Wheel Cleaner option was selected, the pump can also be installed before the tee that
feeds the FreeStyler® machine and the optional Wheel Cleaner. Refer to Example 2 on the
previous page.
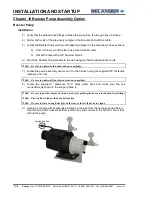
2) Measure the overall length of the Booster Pump Kit manifold assembly which goes from
the top male copper fitting to the bottom male copper fitting, as shown below.
Take the dimension measured above and subtract 1-
3/4”.
Note:
This final dimension is how much of the main 1” copper pipe that you will need to cut out.
Refer to Examples 1 and 2 on the previous page.
Note:
When you make your cut to the copper pipe, try to keep the cuts as straight as possible. This
precision will allow the pipe to seat into the male copper fittings properly.
Booster Pump Kit
Manifold Assembly
Barbed Hose Fitting
Line Connection
Line Connection
Summary of Contents for FreeStyler
Page 1: ...FreeStyler Installation Startup FreeStyler Installation Startup 1MANUAL220 Rev14 ...
Page 2: ......
Page 4: ......
Page 12: ......
Page 13: ... Chapter 1 Introduction Chapter 1 Introduction ...
Page 14: ......
Page 26: ......
Page 28: ......
Page 31: ... Chapter 3 Getting Started Chapter 3 Getting Started ...
Page 32: ......
Page 52: ......
Page 53: ... Chapter 4 Frame and Carriage Assembly Chapter 4 Frame and Carriage Assembly ...
Page 54: ......
Page 123: ... Chapter 5 Entrance and Exit Photo Eyes Chapter 5 Entrance and Exit Photo Eyes ...
Page 124: ......
Page 135: ... Chapter 6 Treadle Assembly Chapter 6 Treadle Assembly ...
Page 136: ......
Page 142: ......
Page 144: ......
Page 151: ... Chapter 8 MixStir Options Chapter 8 MixStir Options Triple Foam and High Pressure Wax ...
Page 152: ......
Page 163: ... Chapter 9 Reclaim Water Adapter Kit Option Chapter 9 Reclaim Water Adapter Kit Option ...
Page 164: ......
Page 167: ... Chapter 10 Booster Pump Assembly Option Chapter 10 Booster Pump Assembly Option ...
Page 168: ......
Page 174: ......
Page 175: ... Chapter 11 Bug Spray Applicator Option Chapter 11 Bug Spray Applicator Option ...
Page 176: ......
Page 183: ... Chapter 12 Undercarriage Options Chapter 12 Undercarriage Options ...
Page 184: ......
Page 191: ... Chapter 13 Water Softener Option Chapter 13 Water Softener Option ...
Page 192: ......
Page 205: ... Chapter 14 HydroBlade Assembly Option Chapter 14 HydroBlade Assembly Option ...
Page 206: ......
Page 226: ......
Page 249: ... Chapter 16 Signage Options Chapter 16 Signage Options ...
Page 250: ......
Page 253: ... Chapter 17 Onboard Dryer Option Chapter 17 Onboard Dryer Option ...
Page 254: ......
Page 258: ......
Page 259: ... Chapter 18 Spot Free Rinse R O Option Chapter 18 Spot Free Rinse R O Option ...
Page 260: ......
Page 264: ......
Page 265: ... Chapter 19 Trades Chapter 19 Trades ...
Page 266: ......
Page 270: ......
Page 271: ... Chapter 20 Electrical Chapter 20 Electrical ...
Page 272: ......
Page 282: ......
Page 284: ......
Page 293: ... Chapter 22 Initial Startup Chapter 22 Initial Startup ...
Page 294: ......
Page 320: ......
Page 321: ......


