background image

Section G. Maintenance                                                            Belarus– 510/512   Operating manual 


88

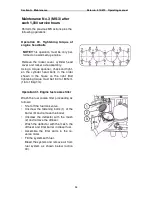
Maintenance  No.  2  (MS-2)  after 
each 500 service hours


Perform the  previous  MS actions  plus as 
follows:


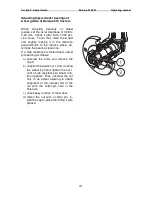
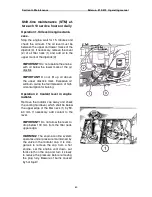
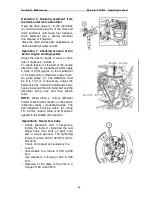
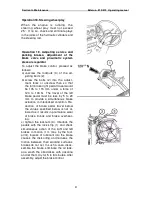
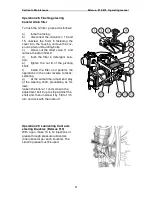
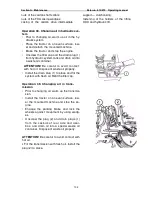
Operation  15.  Centrifugal  oil  filter  of 
engine


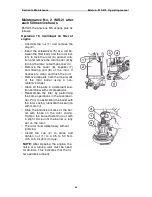
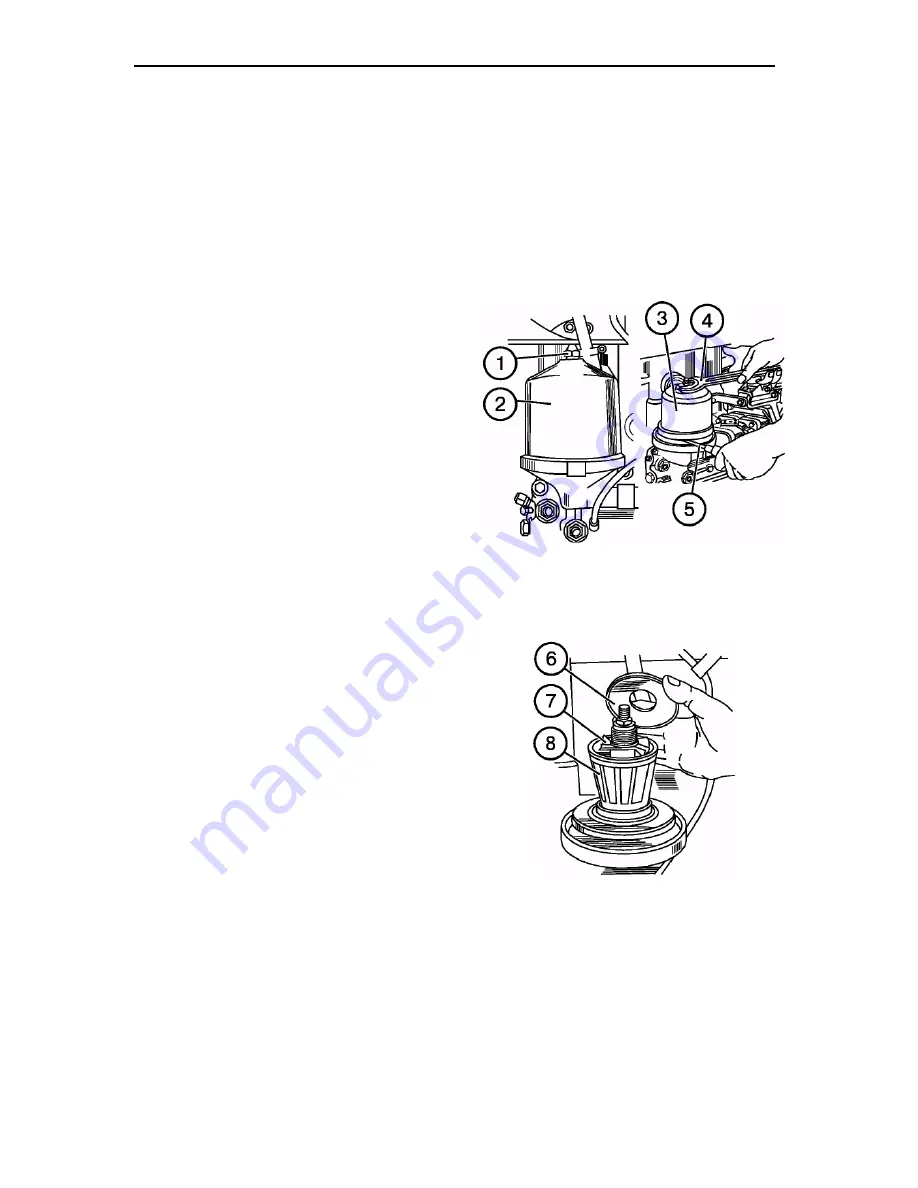
•  Unscrew  the  nut  (1)  and  remove  the 

cap (2). 

•  Insert the screwdriver (5) or a rod be-

tween the filter body and the rotor bot-
tom  to  lock  the  rotor  (3)  against  rota-
tion and remove the rotor barrel (3) by 
turning the rotor nut with spanner (4). 

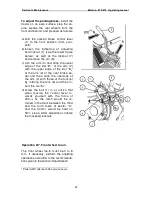
•  Remove  the  cover  (6),  impeller  (7) 

and  filtering  grid  (8)  of  the  rotor.  If 
necessary, clean and flush the grid. 

•  Remove deposits from the inner walls 

of  the  rotor  barrel  using  a  non-
metallic scraper. 

•  Clean all the parts in a detergent solu-

tion and blow with compressed air. 

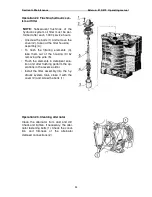
•  Reassemble  the  filter  by  performing 

the same operations in the reverse or-
der. Prior to assembling the barrel with 
the rotor casing, lubricate the seal ring 
with motor oil. 

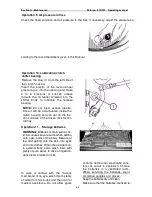
•  Align  the  balancing marks  of  the bar-

rel  with  those  on  the  rotor  casing. 
Tighten the barrel-fastening nut with 
a  slight  force  until  the  barrel  is  fully 
set on the rotor. 

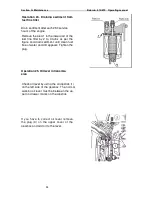
•  The rotor must rotate freely, without 

jamming. 

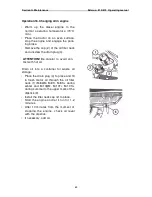
•  Install  the  cap  (2)  to  place  and 

tighten  nut  (1)  to  a  35  to  50  N•m 
(3.5 to 5.0 kgf•m) torque. 

NOTE: 

After  stopping  the  engine,  the 

noise  of  a  turning  rotor  must  be  head 
for 30-60 s. This indicates that the fil-
ter operates properly. 


Summary of Contents for 510

Page 1: ...BELARUS 510 512 510 0000010 РЭ OPERATING MANUAL 2009 ...

Page 2: ...ating Manual is intended for operators tractor drivers operating the Belarus tractors In view of the RUE MTW policy of constant improvement of its products changes in the design of certain assemblies and components of the Belarus tractor may be introduced without notice that are not represented in this edition Some specifications and illustrations found in this Manual may differ from those actuall...

Page 3: ...manufacturer factory some parts of the tractor are put into the SPTA box tool box or cab Install them onto the tractor on your own 9 When commissioning new batteries remove the sealing film from the vent holes or cut off the bosses on the plastic caps 10 Do not operate the tractor when the clutch is not totally disengaged or is engaged 11 When starting movement make sure that the hand operated res...

Page 4: ...nd transporting operations they can be used in forestry municipal servicing construction and industry This Manual contains a description of the design features brief technical data and recommendations for operation and maintenance of the BELARUS 510 512 tractors BELARUS 510 512 4 2 and 4 4 with a Д244 diesel engine 41 9 kW at 1700 rpm a 9F 2R manual gearbox Re equipment or modifications to the tra...

Page 5: ...of engine piston PTO power take off shaft HLL hydraulic list linkage HSU hydrostatic steering unit LOHE liquid oil heat exchanger RHL rear hitch linkage GB gearbox C clutch ОЕСD Organization for Economic Cooperation and Development OECD FDA front driving axle ADCS automatic tilling depth control system MS maintenance service HDC haul and draw coupler SRU speed reducer ...

Page 6: ...see Manual controls manipulations brake forward park brake back horn battery charging fault signaling interior lamp fuel clearance lights coolant turn signal lamp pre heater glow plug upper beam engine speed low beam engine oil pressure working lights engine coolant temperature differential lock off stop power take off shaft on on start front driving axle on gradual change fan lever down windshiel...

Page 7: ...ition of the distributor slide valve rear window wiper drop position of the distributor slide valve tractor trailer turn signal float position of the distributor slide valve HSU oil pressure GB oil pressure air pressure in pneumatic system air filter clogging ...

Page 8: ...st have rigid hitches precluding them from swinging and hitting the tractor during transportation Before starting the diesel engine the parking brake must be engaged the gear box shifter must be shifted to the neutral position the PTO engaging lever to the off position Before you start movement horn to warn other persons and persons working on the towed machines Do not leave the tractor in motion ...

Page 9: ...nd adjust as necessary the brakes for simultaneous action check operation of the parking brake check the condition of light and sound signal equipment transportation trailers must have a solid connection and in addition con nect a safety chain or rope never drive downhill by coasting out of gear drive at the same gear both downhill and uphill do not work with a trailer without in dependent brakes ...

Page 10: ...e and batteries Keep your tractor and its equip ment especially the brakes and steering equipment in good condition to ensure your safety and that of the surrounding people Do not modify the tractor or any of its constituent parts without approval from you dealer and manufacturer Safety requirements for operation and maintenance of electrical equipment To avoid damages to semiconduc tor devices an...

Page 11: ...removed from hot parts of the engine Do not use open fire to heat up oil in the diesel engine pane to burn out contamination of the radiator core If there appears a seat of fire dump sand over it cover with tarpaulin sackcloth or any other dense cloth Use a carbon dioxide fire extinguisher Do not extinguish burning fuel with water When the engine is running keep inflammable materials away from the...

Page 12: ... 4 120 3 930 3 740 В Width mm 1 970 1 970 С Height by cab mm 2 780 2 800 D Wheelbase mm 2 370 2 450 F Rear track mm 1 400 1 600 1 800 2 100 E Front track mm 1 350 1 850 1 400 2 000 G Road clearance mm 465 465 Tire size front wheels rear wheels 9 00 20 9 00R20 15 5R38 11 2 20 11 2R20 15 5R38 Service weight kg 3 460 3 690 Tractor component Nos Manufacturer s nameplate with tractor and diesel engine ...

Page 13: ... of the right half frame side member or on the right plate of the front counterweights Diesel engine serial No duplicated on the manufacturer s nameplate of the engine at tached to the cylinder block on the left hand side Clutch No on the left hand side of the clutch housing Gearbox No on the left hand side of the GB housing ...

Page 14: ...Section B Specifications Belarus 510 512 Operating manual 17 Transmission number on the rear axle housing from behind Front driving axle number on the front part ...

Page 15: ...ke mm 125 4 92 Cylinder displacement l cu in 4 75 290 Operation order 1 3 4 2 Cooling system liquid Rated speed rpm 1 700 Maximum speed rpm 1 850 Minimum speed rpm 600 Rated power kW 41 9 at 1 700 rpm Maximum torque N m 271 at 1 400 rpm Clearance between intake and ex haust valves and rockers at cold en gine mm 0 20 0 35 Advance angle of fuel injection before upper dead center UDC degrees 20 1 Fue...

Page 16: ... Fuel tanks capacity 120 l Air cleaner combined with dry centrifugal and oil bath air cleaning Air cleaner oil bath capacity 1 5 l Steering Booster type hydromechanical Steering mechanism worm helical gear sector and steering booster Pump type gear pump НШ10 3 Л Pump capacity 21 l min Maximum working pressure in system 9 0 0 05 MPa Oil grades 40 С to 5 С M 8ДM M 8Г2 M 8Г2K or M43 8Г2 SAE 20 SAE 10...

Page 17: ...m 18 1346 Motion No of gear No of range Gear ratio V tr km h range GB transmission front 1 I 2 2500 5 9298 241 9512 1 9866 2 II 1 3214 5 9298 142 0983 3 3826 3 I 2 2500 2 0476 83 5488 5 7531 4 2 2500 1 6667 68 0048 7 0681 5 2 2500 1 4074 57 4263 8 3701 6 II 1 3214 2 0476 49 0683 9 7958 7 1 3214 1 6667 39 9393 12 0348 8 1 3214 1 4074 33 7265 14 2518 9 1 0000 1 0000 18 1346 26 5053 reverse 1R I 2 25...

Page 18: ...ft 10 GB lever handle 11 GB control cover 12 restrictive plate 13 adjustment shims 14 body 15 drive pinion of rear axle final drive 16 driven pin ion of IInd stage of range reducer 17 inner shaft 18 seat with bronze bushings 19 impeller 20 body 21 drive pinion of Ist stage of range reducer 22 drive pinion of Ith stage of range reducer 23 intermediate pinion 24 driven pinion of 3rd and 6th gears 25...

Page 19: ...se gears 25 shaft of 1th gear and reverse 26 FDA drive pinion axle 27 reverse in termediate gear 28 FDA drive pinion axle 29 FDA drive pinion Gearbox The gearbox GB is an element of the tractor transmission serving to change the transmission gear ratios and reverse the tractor movement thus achieving the required speed range of the tractor see Table 1 as well as for long term disengagement of the ...

Page 20: ...inion 22 Fig 2 installed on the shaft of 1st gear and reverse gears 24 On the intermediate shaft 29 Fig 1 with the possibility of axial movement the drive pinion 22 of Ist stage of the range reducer is installed The front support of the intermediate shaft 29 is a ball bearing located in the body 30 of the front wall of the GB housing 27 The rear support of the intermediate shaft is a bronze bushin...

Page 21: ...e of the housing 1 and can move along the groove On the upper surfaces of the rails there are transverse holes in which the spring loaded balls of the latches 10 are inserted which provide locking of the forks rails and reducer rail in the desired positions as well as prevent spontaneous disen gagement of the gears under load The rod 13 is connected with the shaft 9 Fig 1 on which the fork 8 is fi...

Page 22: ...king it to the intermediate shaft 29 The pinion 21 is in constant mesh with the driven pinion of the IInd range reducer stage 16 At the IInd range reducer stage rotation from the intermediate shaft 29 is transmit ted to the output shaft 6 with deceleration less than at the Ist stage In the GB range reducer there is no neutral position of the drive pinion of the Ist re ducer stage 22 Fig 1 therefor...

Page 23: ...e GB since the IInd reducer stage has an intermediate shaft speed 29 Fig 1 less than the Ist stage To engage the 4th 7th or 5th 8th gear the operator shifts the GB control lever 7 Fig 1 to the respective positions of those gears Fig 3 Further to engage the 4th or 7th gear the operator shifts the GB control lever 7 Fig 1 to the position of the said gears forward At that the gear shifter lever 7 act...

Page 24: ...of DL 22 DL clutch casing 23 brake casing 24 fork 25 left drive pinion of final drive 26 adjustment shims 7 DL clutch shaft 28 left bearing body 29 bearings of drive pinion of final drive 30 left bearing of differential 7215A 31 crown pinion shaft 32 clutch 33 inner shaft 34 pinion of synchronous PTO 35 control roller 36 PTO lever 37 half axle pinion 38 support washer of half axle pinion 39 differ...

Page 25: ...t one speed and synchro nous Master clutch planetary gear reducer with belt brakes PTO control mechanical PTO end speed Independent drive 540 rpm at 1 630 rpm of engine Synchronous drive 3 4 revolutions per meter when rear tires 15 5 R38 are in stalled Removable PTO end as per SAE with 6 and 8 splines for 540 rpm Direction of rotation clockwise as viewed from the end butt Hydraulic system Type uni...

Page 26: ...B Specifications Belarus 510 512 Operating manual 29 instrument panel number plate illumina tion emergency light 1 000 rpm Wheels Front 9 00 20 9 00R20 with a front axle 11 2 20 11 2R20 with PTO 72 Rear 15 5R38 ...

Page 27: ... blue 16 Engine oil pressure indicator 17 Multifunctional understeering switch turn indicators upper lower beam horn upper beam signaling 18 Steering wheel 19 Tachometer speedometer 20 Steering wheel inclination control 21 22 23 Hydraulic system distributor con trols 24 Starter switch 25 Rear PTO control lever Has two positions lower PTO off upper PTO on 26 Parking brake control lever 27 Transfer ...

Page 28: ...NT Before you start operating the tractor study the controls and instru mentation and their functions Instruments and switches Starter and instrument switch The switch 1 has four positions 0 OFF I Instruments ON II Starter ON unfixed position III Radio ON key turned counterclockwise ...

Page 29: ...harg ing mode 10 0 12 0 V red generator not operating battery dis charged 12 0 13 2 V yellow no SB charging low charging voltage SB has normal charging 15 2 16 0 V red SB recharged 12 7 12 0 yellow SB charging start white hairline in yellow zone SB rated EMF 12 7 V IMPORTANT If the instrument shows no SB charging check the condition and ten sion of the fan driving belt Engine oil pressure indicato...

Page 30: ... left headlight lower beam 7 5 A 4 right headlight lower beam 7 5 A 5 right side clearance lights number plate illumination instrument illumination 15 A 6 left side clearance lights 7 5 A 7 headlight upper beam 25 A 8 horn 15 A 9 backup 25 A 10 backup 15 A 11 emergency stop signaling rear working lights 15 A 12 stop lights portable lamp power 15 A Besides a block with a 60 A fuse is installed on t...

Page 31: ...rtation machine or attached imple ment It is installed on the cab rear sup port To the socket the plug of the wire harness of attached machines is con nected Socket terminal designations 1 Left turn indicator 2 Horn 3 Ground 4 Right turn indicator 5 Right clearance light 6 Stop signal 7 Left clearance light 8 Connection of portable lamp and other consumers with a current load up to 8 A ...

Page 32: ...gearbox is a 9 2 mechanical one The lever 1 shifts the gears as per the shift pattern Before engaging a gear engage the required range stage IMPORTANT Ranges and gears are engaged by the same lever 1 a range is en gaged first Ist or IInd Attention Use of the R gear in traction mode is not allowed ...

Page 33: ...most posi tion Use this mode for a short time when working on loose and wet soils and as necessary during reverse movement FDA automatically ON OFF mid po sition In this mode the FDA is en gaged and disengaged automatical ly by the free running coupling de pending on rear wheel skidding Use this mode for different field works ATTENTION When using the tractor without driveshafts shift the control l...

Page 34: ...nce Control of hydraulic system distributor external cylinder Each of the four levers controls the ex ternal cylinders and has four positions Neutral lower mid position fixed Lifting lower non fixed position When the cylinder rod reaches its ex treme positions the lever automatical ly returns to the Neutral position Forced lowering upper mid non fixed position between the Floating and Neutral posi...

Page 35: ... screwed into the com pressor is intended to take air to in flate tires as well as for other purposes when energy of compressed air is re quired Changing steering wheel position To change the position of the steering wheel by height Remove the cover 2 Unscrew the clamp 1 by 3 5 turns Move the wheel to the desired posi tion Tighten up the clamp 1 by hand and install the cover 2 to place NOTE The ra...

Page 36: ... 60 to 120 kg within 75 mm in the longi tudinal horizontal plane Correct ad justment of the seat by driver s weight greatly reduces vibration from the trac tor A correctly adjusted seat must go down under driver s weight by a half of its travel 60 to 65 mm approximately Attention After adjustments of the seat all handles latches must be re turned to their initial positions 1 handle for seat longit...

Page 37: ...he diesel engine ATTENTION Starting a new engine which is not run in by towing is not al lowed to avoid the intense wear of the engine parts Running in Your new tractor will work reliably and for long time provided that running in is made properly and necessary mainte nance is provided within the recom mended terms When executing the 30 hour running in observe the following rules 1 Constantly moni...

Page 38: ...e fuel feed lever to the middle position 4 Shift the PTO control lever to the OFF position 5 Step on the clutch pedal 6 Shift the gear shifter lever to its neutral position shift and hold it in the left most positions 7 Turn the starter key to the position II Start and hold it until the engine starts but not more than 15 s If the engine fails to start repeat starting af ter at least 30 to 40 s 8 A...

Page 39: ...ommendations in this Manual Keep the batteries fully charged Use clean without water winter grade diesel fuel To avoid failures every day drain sediment from the coarse fuel filter and fuel tanks IMPORTANT Refill the fuel tanks at the end of each working day to pre vent condensation in the tanks Note When starting the engine at low temperatures a circulation pre heater can be used for a cooling sy...

Page 40: ...ever forward or backward return the lever to the neutral position and then set the required speed by moving the lever 1 forward or back ward as per the pattern Release the parking brake and re lease smoothly the clutch pedal while increasing slightly the fuel feed After starting the motion increase the fuel feed Avoid getting moved with a high traction load e g a plough deepened into the soil ATTE...

Page 41: ...he clutch pedal and twinned service brakes pe dal at the same time Shutting down engine IMPORTANT Prior to shutting down the engine lower the implement onto the ground and let the engine operate at 1 000 rpm for 1 to 2 min This will decrease the engine temperature To shut down the engine proceed as fol lows set manual fuel feed lever to minimal feed position back to the stop disengage the PTO and ...

Page 42: ... tach mounted and semi mounted ma chines such as plows seeders cultiva tors spraying machines etc Haul and draw coupler cross piece ТСУ 1Ж to work with trailed ma chines potato harvesters etc except for one axle trailers with a speed of up to 15 km h ATTENTION Use of ТСУ 1Ж for transportation works is strictly forbid den Haul and draw coupler ТСУ 2 hydraulic hook for operation with one axle traile...

Page 43: ...s consist of two parts the front part or the rod itself the back end with a ball joint Rated length of lower rods is 885 mm To increase the suspension length set the rod ends with the bent front joints F70 4605050 01 055 01 To increase the carrying capacity of the suspension replace the rod back ends 400 mm length with rod ends with a dis tance between the joint axle and the front hole of 320 mm N...

Page 44: ... 425 to 520 mm by turning the handle 1 When shipped from the factory the right brace length is set to the standard value of 475 mm The length of the right unadjustable brace is also set to the standard value of 475 mm when the tractor is shipped from the factory During operation the left brace length can be changed from 395 to 510 mm depend ing on the tractor delivery set and kind of attached mach...

Page 45: ...ngth 5 If necessary adjust the transverse tilt of the machine using the right adjust able brace 2 To increase the brace length turn the lever 3 clockwise and vice versa 6 Before you start working make sure that the tractor don t be in dangerous prox imity to the machine elements the upper rod do not touch the PTO guard at the lowermost position of the machine the PTO cardan drive be not too long w...

Page 46: ...ront end is con nected to the bracket in one of the four positions depending on the job Position 1 The rods prevent side oscil lation of the implement in the transporta tion position Position 2 The rods prevent side oscilla tion of the implement both in the trans portation and in working positions IMPORTANT Use the positions 3 and 4 only when installing the lower rods to ad ditional suspension axl...

Page 47: ...NT Install the cotter 5 so that it be in the middle of the groove or slightly closer to the tractor Otherwise the rods may be damaged Before a transportation journey raise the machine to the upper position and check its side oscillation that must not exceed 20 mm to any side If necessary adjust the oscillation magnitude turning the screw 2 Fully locking rods To fully lock machines ex a cultivator ...

Page 48: ...he de sired plowing depth when working with a plow by rotating the braces 2 adjust the length of the limit chains ensuring machine movement in the horizontal plane by 125 mm to each side from the middle position or according to the machine operating manual When installing the machine to the trans portation position screw out the bolts 1 for its partial lock Oscillation of the ma chine to the both ...

Page 49: ...racket length to the desired plowing depth ATTENTION Always maintain the oscil lation of the machine of 125 mm min to avoid break of chains when the machine is lifted to the transportation position When installing the machine to the trans portation position tension the chains with the rods 2 Oscillation of the machine of 20 mm max to the both sides is allowed Full lock To fully lock the machine in...

Page 50: ...the working position II proceed as follows 1 Unsplint and take out the eye 3 re move the cross piece 4 2 Unsplint and take out the finger 2 re move the back ends of the lower rods 5 3 Install the cross piece 4 to the front ends of the lower rods 1 fasten it with the eye 3 of the limit chains fingers 2 and splints see Fig II With outer or inner installation of limit chains ensure a full lock of the...

Page 51: ...ibutor lever to the lift position The stop 10 of the cylinder hydrome chanical valve must be in the rearmost position on the cylinder rod b bring the handle 13 and the lock mechanism with it to the lower posi tion c shift the distributor handle to the float ing position Under action of the at tachment the pivot lever 12 turns and the tooth must engage with the catch 1 To unlock the attachment proc...

Page 52: ...owing and other machines If after completion of a cylinder stroke the distributor lever does not return to the neu tral position automatically bring it there manually And on the contrary in case of an early return of the lever hold it with hand to let the operation be completed Specifics of operating tractor with machines requirind drive from rear PTO General recommendations a before attaching a m...

Page 53: ...ke sure that the elements of the cardan drive telescopic joint do not stop against the tractor in the extreme positions of the machine the minimum overlap of the cardan drive telescopic part must be 110 to 120 mm as in case of a lesser value the drive may disengage f adjust the safety coupling of the agri cultural machine by changing the length of the spring 1 It must be ad justed so that in case ...

Page 54: ...erating the tractor without use of the PTO always shift the PTO control lever to the PTO ON position set the shift clutch of the PTO two speed drive to the position 1 540 rpm and set the shifter lever from the independent to the synchronous PTO drive to the middle neutral position When the PTO synchronous drive is en gaged do not drive faster than 8 km h At a speed higher than specified rota tion ...

Page 55: ...dden Before work make sure that the pins and pivot of the hitch fork are securely splint ed Connect all signaling devices of the trailers stop signal turn indicators plate illumination using the socket installed on the tractor Use of tractor auxiliary equipment As auxiliary equipment on the tractor the drive pulley additional counterweights to the front axle the SA 1 automatic cou pler the spacer ...

Page 56: ...rrect combination of front and rear tires ensures maximum per formance of the tractor increases the service life of the tires and decreases wear of the power gear parts Use of worn and new tires or tires of different diameters or rolling ra dius can result in misobservance of requirements to kinematic compliance and exces sive wear of the tire For normal operation of the tractor set the tire press...

Page 57: ... 14 0 16 0 18 0 2 0 22 0 24 0 26 0 28 9 00 20 112 А6 640 715 780 840 900 960 1 020 1 070 1 120 9 00R20 112 А8 580 640 715 780 840 900 960 1 020 1 070 1 120 15 5R38 134 А8 250 1 420 1 620 1 810 1 975 2 120 11 2 20 114 А6 765 850 930 1000 1080 1145 1180 2 1 For tires with the A6 speed symbol the loads are indicated for the speed of 30 km h For tires with the A8 speed symbol the loads are indicated f...

Page 58: ...ble Speed km h Change in load on tires of drive wheels with speed symbol A6 30 km h A8 40 km h 10 40 50 15 30 34 20 20 23 25 7 11 30 0 7 35 10 3 40 20 0 45 4 50 9 The inner pressure must be increased by 25 A short time increase in load is allowed for 10 of the shift time max Note Changes of loads depending on the speed are used in cases when the tire is not operated for a long time at high torques...

Page 59: ...ng twin tires the pressure in the outer tire must be 1 2 to 1 25 times lower than in the inner tire Allowable loads on front and rear axles Tractor model Allowable load kN On front axle On rear axle 90 17 5 50 0 92 24 0 50 0 Notes 1 Loads on axles must not exceed the total carrying capacity of single tires of the front or rear wheels 2 When setting a wheel track exceeding 1 000 mm the loads on the...

Page 60: ...re is filled with liquid the tire valve must be in the highest point of the wheel The table below specifies volumes of solution filled into the rear tires Tire size Volume of solution filled in l per tire 15 5R38 250 IMPORTANT Radial tires must no be filled with liquid ballast to more than 40 to 50 per cent of the volume If the volume filled in is too large the remaining air volume won t be suffic...

Page 61: ...ng bolts 2 supplied with the spac ers To the bolts 2 install the main wheel and fasten it with the nuts 3 Then install the spacer 4 on the same bolts and fas ten with the nuts 5 After that install the additional wheel on the bolts 6 of the spacer and fasten it with the nuts 7 The tightening torque of the nuts fastening the rear wheels is 300 to 350 N m 30 to 35 kgf m ATTENTION Installing twin whee...

Page 62: ...front of the tractor and lift the tractor until the wheels take off the ground Put a support under the tractor front to provide secure and safe tractor position b loosen the bolts 1 remove the pins 2 fastening retractable knuckles in the front axle tube c move first one then the other re tractable knuckle 6 At the same time change the length of steering rods by ro tating the tube 3 in the tips 5 f...

Page 63: ... to 1 600 mm and 1 750 to 1 950 mm To change the track raise the tractor front or front wheels in turn providing a clear ance between the wheels and soil brake the rear wheels Put a support under the tractor front to provide secure and safe tractor position after that a unscrew the bolts 4 and remove the cover 2 b release the wedges of sleeves 3 un screwing the nuts by an extent ensur ing free mov...

Page 64: ...xle tube respectively d adjust the left and right steering rods lengthening or shortening them to the same value to do that loosen the locknuts 3 5 6 8 and by rotating the left and right tubes 7 4 set the re quired length e determine the wheel toe in by measur ing the distance measurement Г between the inner flanges of wheel rims in front at the wheel center height and chalk marks in the meas urem...

Page 65: ... track width by measuring the dis tance A from the half axle end to the hub face 5 Tighten the four hub fastening bolts to a torque of 280 to 300 N m 6 Mount the wheel and tighten the fas tening nuts to a torque of 210 to 260 N m 7 Repeat these operations on the op posite wheel NOTE A track width of up to 1 600 mm can be obtained without changing the wheel disk position To obtain a track width up ...

Page 66: ...n access to the screws 13 5 Fix the lever 11 in the neutral position in troducing the bolt 10 M10 60 to the hole on the lever 11 and the hole on the rear axle housing corresponding to it 6 Remove the lock bar 26 Fig 2 screw in turn the adjusting screws 21 to a torque of 8 to 10 N m then un screw each screw by two turns at that screw the screws so that the screw heads be parallel to the tractor cen...

Page 67: ...djustment install the lock bar 26 and splints 27 Fig 2 on the adjusting screws 21 the rear axle hatch cover lock the rod 4 and arm 15 Fig 1 as well as the bolt 9 During operation external readjustment is performed when a PTO slips b the control lever 1 stops against the cab floor when shifted c the engagement force on the lever 1 exceeds 12 to 15 kgf d the lever 1 cannot be clearly fixed in its ex...

Page 68: ...adjustment for assembly by manufac turer or PTO repair When adjustment is correct the lever 1 Fig 1 in the ON position must be at least 50 mm away from the cab floor dimension B On tractors of earlier make the PTO ex ternal readjustment mechanism may not be available pos 15 16 17 Fig 2 In such a case adjust as specified above for adjustment of PTO control after repair or in assembly by manufacture...

Page 69: ...he control mechanism proceed as follows 1 Raise the implement levers to the maxi mum possible height and adjust the lifting rod with the screw 1 see Fig 3 screw the screws into the shackles 3 up to stop of the screw heads against the surfaces of the shackles 2 and lock them with locknuts At that the catches 4 must go under the axis of the hook 5 without touching it 2 Lift the handle 6 and install ...

Page 70: ...ing in the intermediate support and check the side play in the cardan bear ings Adjust the safety coupling to transfer of a torque of 40 to 80 kgf m 400 to 800 N m Adjust the coupling by tightening the nut 2 of the rear shaft shank of the intermediate sup port to ensure transfer of the required torque Periodically check the side play in the uni versal joint cross bearings If any play is pre sent d...

Page 71: ... rotation plane de termine the bearing clearance If a high clearance is determined adjust proceeding as follows a unscrew the bolts and remove the cap 2 b unsplint the castle nut 1 and rotating the wheel by hand tighten the nut 1 until a high resistance to wheel rota tion appears Then unscrew the nut only to an extent allowing to obtain alignment of the nearest slot of the nut with the cotter pin ...

Page 72: ...g to operation under spe cial conditions During long time storate MAINTENANCE WHEN PREPARING THE TRACTOR FOR OPERATION Maintenance during the tractor preparation for running in clean the tractor from dust and dirt remove preservative grease if any check oil level and add as necessary engine crankcase air cleaner tray tank of the hydraulic mounted sys tem power train housing steering booster housin...

Page 73: ...ankcase air cleaner tray housings of power train FDA and intermediate support lubricate the clutch shifter bearing clean the centrifugal oil filter replace the filtering element of the hy draulic system flush the screen oil pre filter of the engine check and tighten as necessary exter nal fastenings of the tractor compo nents including the bolts of the engine cylinder head and the bolts fastening ...

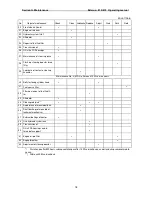
Page 74: ...iment of fuel coarse filter and fuel tanks 7 Fan and alternator belt 8 Hub and wheel fastening 9 Air pressure in tires 10 Clutch shifter bearing 11 Storage batteries 12 Oil level in FDA cardan drive in termediate support 13 Play in steering rod joints 13 а Steering booster 14 Clutch pedal free travel Maintenance No 2 MS 2 after each 500 service hours 15 Rotor of engine centrifugal oil fil ter 16 O...

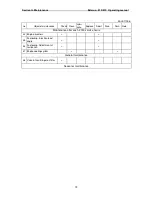
Page 75: ...intenance No 3 MS 3 after each 1000 service hours 30 Bolts fastening cylinder head 31 Fuel coarse filter 32 Filtering element of fuel fine fil ter 33 Alternator 34 Steering rod joints 35 Angle brace of mounted attach ment mechanism 36 Shaft bushings of mounted at tachment mechanism 37 External boltings of tractor 38 Oil in hydraulic system tank 39 Transmission oil 40 Oil in FDA housings and in ter...

Page 76: ...ce Check Clean Lubri catie Replace Adjust Drain Flush Note Maintenance after each 2 000 service hours 44 Engine injectors 45 Fuel pump Injection lead angle 46 Fuel pump Adjustment at test bench 47 Engine cooling system General maintenance 48 Valve of centrifugal oil filter Seasonal maintenance ...

Page 77: ...e upper dipstick mark Excessive oil will burn giving the fail impression of high oil consumption for burning Operation 2 Coolant level in engine radiator Remove the radiator cap away and check the cooling fluid level which shall be below the upper edge of the filler neck 1 by 50 60 mm If necessary add coolant to the level IMPORTANT Do not allow the level to drop below 100 mm from the filler neck u...

Page 78: ...el by the oil dipstick 1 on the left side of the hydraulic system tank The level shall be between the marks О and П Full If necessary add oil to the mark П 5мм removing the threaded plug 2 NOTE When using machines requir ing high amount of oil taking add oil to the level corresponding to the upper mark С When doing this the hydrau lic cylinders must be with plungers re tracted Operation 3a Steerin...

Page 79: ...ll be at the level of the ring collar A Add oil if necessary If oil is contaminated with dirt or in oil change oil ATTENTION Do not overfill the tray with oil above the ring collar A since it can result in oil ingress into the en gine combustion chambers and devel opment of false impression about in creased oil consumption for burning Operation 5 Oil level in housings of upper bevel pairs of FDA w...

Page 80: ...ernator pulley to wa ter pump pulley 1 The deflection must be 6 to 10 mm If necessary adjust the belt tension by rotating the alternator body having loosened the lath fixing bolt and the alternator fixing nuts and then tighten them NOTE When fitting a normal alternator shield check the belt tension on the section alternator pulley crankshaft pulley The belt deflection shall be within the range 15 ...

Page 81: ...ch housing and can get on the fric tion surfaces of the driven disk friction facings Operation 11 Storage batteries WARNING Batteries contain sulfuric ac id that causes severe burns when getting onto open parts of the body Beware of the acid getting onto the skin into eyes and onto clothes When the acid gets on to external body parts wash them with plenty of pure water In case of ingestion drink p...

Page 82: ... Prior to adding distilled water check the electrolyte density in each cell jar If necessary add distilled water Check that terminals 2 under the jackets A and plugs 1 are clean If necessary lubricate the terminals 2 with technical petrolatum Operation 12 Checking oil level in in termediate support of FDA cardan drive Check the oil level in the intermediate support If necessary add oil to the leve...

Page 83: ...rench to eliminate a clearance in the rotary joint c lock the plug with safety wire NOTE If backlashes in in the joints can not be eliminated by tightening the threaded plugs disassemble the joint and replace worn out parts Operation 13а Check oil level in steering booster housing Remove the plug 2 and take the dipstick 1 from the steering booster housing Oil must be at the level of the upper mark...

Page 84: ...move upwards to the stop against the cab floor Turn the lever 1 counterclockwise to the stop i e when the release bearing touches pressing arms By unscrewing the fork 3 align the openings in the fork with those in the lever 1 and then screw the fork into the rod 5 by 5 to 5 5 turns i e make the rod shorter Link the fork 3 with the lever 1 with the pin 2 Assemble the leverage of the clutch pedal in...

Page 85: ... from the inner walls of the rotor barrel using a non metallic scraper Clean all the parts in a detergent solu tion and blow with compressed air Reassemble the filter by performing the same operations in the reverse or der Prior to assembling the barrel with the rotor casing lubricate the seal ring with motor oil Align the balancing marks of the bar rel with those on the rotor casing Tighten the b...

Page 86: ...ain plug 4 ATTENTION Be careful to avoid con tact with hot oil Drain oil into a container for waste oil storage Place the drain plug 4 to place and fill in fresh motor oil through the oil filler neck 1 M 8ДM M 8Г2 M 8Г2K during winter and M 10ДM M 10Г2 M 10Г2K during summer to the upper mark of the dipstick 3 Install the filler neck cap 2 to place Start the engine and let it run for 1 2 minutes Af...

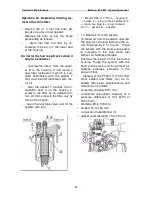
Page 87: ...finishes closing and adjust clearances in the 4th 6th 7th and 8th valves counting from the fan to adjust the clearance loosen the locknut 1 of the screw 2 insert the feeler 5 between the face of valve rod 3 and the rocker head 4 and set the required clearance against the feeler by turning in or out the screw 2 The clearances between the rocker head and the valve rod face on a cold engine for intak...

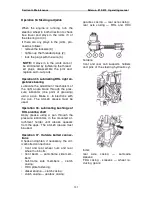
Page 88: ... to 115 mm under a force of 120 to 130 N The travel of the left brake pedal must be less by 5 to 20 mm to provide a simultaneous brake actuation in interlocked condition Re duction of brake pedal travel below the values specified below is not al lowed as it results in premature wear of brake linings and brake overheat ing c tighten the locknuts 3 Interlock the pedals with the lock strip 1 and chec...

Page 89: ...slot B2 of the arm 3 of the right brake pe dal and then align the openings of the arm 4 with those of the fork 6 by rotating the fork 6 and then in sert the pin 5 d screw the bolt 1 in or out so that when moving the control lever to wards yourself with the force of 200 10 N the latch would be re tained in the dent between the third and the forth teeth of sector A and the tractor would be held on 1...

Page 90: ...isassemble the air cleaner having loosened the nuts 7 and removed the tray 6 Clean the inner tray cavity and fill in fresh motor oil Extract three filtering elements rinse them in diesel fuel and blow with compressed air Clean the central pipe Reassemble the air cleaner and install it onto the engine Check air tightness of all joints and if necessary tighten them up An engine operating at a medium...

Page 91: ...ush the filtering elements 4 take them out of the housing 3 by removing the wire 5 Flush the elements in detergent solu tion and after flushing perform the op erations in the reverse order Install the filter assembly into the hy draulic system tank close it with the cover 2 and screw the bolts 1 Operation 23 Cleaning alternator Clean the alternator from dust and dirt Check and tighten if necessary...

Page 92: ...by 2 to 3 turns as per the figure and drain sediment until clean fuel free of water and dirt appears Tighten the plug Operation 25 Oil level in transmis sion Check oil level by using the oil dipstick 1 on the left side of the gearbox The normal working oil level must be between the up per and lower marks on the dipstick If you have to correct oil level remove the plug 3 on the upper cover of the g...

Page 93: ...he level through the check holes Operation 27 Maintenance of steering drive Maintenance of the steering drive con sists of periodical checks of tightening of the threaded connections To ensure minimum vibration of the steering wheel adjust the steering col umn as follows remove the cover 5 unscrew the screw 4 and remove the steering wheel 6 loosen the locknut 3 screw in the nut 2 until it touches ...

Page 94: ...er in detergent solu tion e tighten the nut 8 of the pivoting shaft f install the filter and perform the operations in the order reverse to disas sembling g at the same time adjust end play of the steering shaft proceeding as fol lows loosen the locknut 1 and screw in the adjustment bolt 2 up to stop against the shaft end then unscrew it by 1 8 to 1 10 turn and lock with the locknut 1 Operation 29...

Page 95: ...he cylinder head bolts in the order shown in the figure on the right Bolt tightening torque must be 160 to 180 N m 16 to 18 kgf m Operation 31 Engine fuel coarse filter Wash the fuel coarse filter proceeding as follows Shut off the fuel tank valve Unscrew the fastening bolts 1 of the barrel 3 and remove the barrel Unscrew the deflector with the mesh 2 and remove the diffuser Wash the deflector wit...

Page 96: ...orce of the hands open the fuel tank valve and fill the system with fuel 1 filter ФТО20 1117010 2 housing 3 holder 4 plug to drain sediment 5 return line pipe 6 plug to bleed air 7 gasket 8 adapter To bleed air from the system To bleed air from the system unscrew the plug 6 on the bolt fastening the re turn line pipe by 2 to 3 turns Purge the system with the hand purge pump 3 screwing in the plug ...

Page 97: ...ation 33 Alternator Remove the driving belt 1 from the alternator pulley 2 Check the easy rotation of the alternator rotor and presence of plays in the bear ings If there are any plays or jamming of the rotor remove the alternator and send it to the shop for repair ...

Page 98: ...ator one point of greasing using a gun Make 4 6 injections with the gun The Litol 24 grease must be used Operation 36 Lubricating bushings of RHL pivoting shaft Apply grease using a gun through the pressure lubricators in the mounted at tachment holder until grease appears from the gaps The Litol 24 grease must be used Operation 37 Outside bolted connec tions Check and tighten if necessary the cri...

Page 99: ...d drain oil into a waste oil container ATTENTION Be careful to avoid contact with hot oil Dispose of waste oil properly Install the drain plug 1 to place and fill the system with fresh oil Refit the filler cap Operation 39 Changing oil in trans mission Prior to changing oil warm up the transmis sion Install the tractor on an even surface low er the mounted machine and stop the en gine Engage the p...

Page 100: ...n oil into a special container ATTENTION Be careful to avoid contact with hot oil Dis pose of waste oil properly Install and tighten up the drain plugs Fill the casings with fresh transmission oil Taп 15В Tсп 15K Tsp 10 TAД 17и or their analogues to the level of lower edges of the filler openings To drain oil from upper bevel pair casing using the gun 3 for liquid lubricant pump out some oil throu...

Page 101: ...e paying atten tion to its correct orientation in the oil line Tighten the sleeve clamps Operation 42 Washing the engine breather Unscrew the bolts 1 and remove the breather casing 2 Remove the breather from the casing wash it in diesel fuel and blow it with compressed air Pour some motor oil into the breather filter and letting the oil to flow down fit it back Operation 43 Adjustment of steering ...

Page 102: ...lt heads up to the thickness of the cover flange Fig 117 Tighten the worm nut to a torque of 2 kgf m 20 N m unscrew it by 1 12 to 1 10 turn to align the hole in the worm with the cut for the nut splint and splint the nut Unscrew the two bolts fastening the distrib utor slide valve to the housing install the cover and secure the distributor slide valve To adjust the axial stroke of the pivot ing sh...

Page 103: ...oning is possible NOTE It is convenient to have a spare set of injectors verified and adjusted for quick installation into the engine Take the injectors out and replace them proceeding as follows Prior to disconnection or loosening of any fuel system parts thoroughly clean the adjacent working surfaces Unscrew the nuts 4 and disconnect the high pressure fuel piping 5 from the injectors 3 and fuel ...

Page 104: ...ing system can lead to diesel engine overheating and its fail ure IMPORTANT Adjustment of the fuel equipment by the tractor operator owner is the ground for rendering the manufacturer s warranties void Operation 46 Adjusting the fuel pump on the bench Adjusting the fuel pump shall be per formed made by the dealer in a special ized shop using special equipment Operation 47 Flushing the engine cooli...

Page 105: ...g and summer period at constant mean daily temperature above 5 C Replace the summer oil brands with winter ones see lubrication table in the engine crankcase in the casings of the hydraulic units in the transmission casing in the FDA casing in the steering booster casing in the FDA final drive reducing gear casings in the FDA drive intermediate support Replace grease in front wheel hubs Change lub...

Page 106: ...ug When operating the tractor at low temperatures perform the pre start heating of the engine to 20 30 C At the end of the shift fully refuel the tanks at the temperatures of minus 30 C use arctic fuel and drain condensate from the bottle Fill the cooling system with anti freeze When operating the tractor on rocky soil as well as under mountainous conditions Every shift inspect the running gear an...

Page 107: ... TСп 10 TСп 15K 40 40 1 Backup Transmission oil TAД 17и Transmission oil TAД 17и Standard Upper bevel pair casings of FDA reducing gears TАп 15В TСп 15K 0 25 0 25 2 FDA drive intermediate support TАп 15В TСп 15K 0 15 0 15 1 Backup Transmission oil TAД 17и Transmission oil TAД 17и FDA final drive reducing gear casings 1 8 1 8 2 FDA casing Ditto Ditto 1 6 1 6 1 Upper bevel pair casings of FDA reduci...

Page 108: ... 201 044 05 TНК Hydraulic HLP 32 ТУ 236 915 052 08 17 5 1 Clutch shifter bearing Standard grease Litol 24 Backup grease Bechem LCP GM multi purpose grease 4 6 injections with gun 0 02 1 Adjustable angle brace pinion 0 005 1 Rotary shaft sleeves of rear mounted attachment Ditto Until grease ap pears from the gaps 0 01 2 Refill capacities l Engine cooling system 20 Engine lubrication system 13 3 Tra...

Page 109: ...enness of fuel delivery amond sections at rated speed max 6 Speed corresponding to engine idle running rpm 900 Delivery per stroke at maximum idle speed max mm per stroke 22 5 Unevenness of fuel delivery per stroke between sections at maximum idle speed max 35 Speed corresponding to of maximum torque rpm 700 750 Fuel delivery per stoke at peed corresponding to of maximum torque mm per stroke 82 2 ...

Page 110: ... system Idling springing the fuel pump is not adjusted Fuel pump failure Remove air from fuel system Adjust idling spring for engines with fuel pump 4UTNM or 4UTNI Remove the fuel pump from the engine and send it to the shop for repair The engine fumes at all the operation modes A Black fume is emitted from the exhaust pipe Engine air cleaner clogged Injector atomizer needle sticking Poor quality ...

Page 111: ...evel in the crankcase is below the allowable level Sticking of the drain valve of centrifugal oil filter Maximum wear of crankshaft journal to bearings junction Replace Eliminate the failure or replace the pump Add oil to the upper mark of the oil dipstick Rinse the valve and adjust the pressure Send the engine for repair POWER GEAR CLUTCH Clutch does not transfer full torque No pedal free travel ...

Page 112: ...m are de formed The safety coupling in the intermediate support does not transfer the required torque The driving and driven plates of the safety coupling are worn out The disk springs have lost resilience or got broken Replace the free running coupling Remove the coupling and wash its parts Replace springs Adjust the coupling for transferring the torque of 40 to 80 kgf m 400 to 800 N m by tighten...

Page 113: ...ak tightening of worm nut Increased backlash in tapered bearings of front wheels or steering rod jointns misadjusted front wheel toe in Weak tightening of nuts fastening sector pitman arm or pivot arms Increased axial movement of pivoting shaft Screw in the nut to a torque of 2 kgf m 20 N m unscrew it by 1 12 1 10 turn to align the slot in the nut with the hole in the worm for pin Adjust Tighten u...

Page 114: ...ts rinse and install to place Lifting capacity drops when oil warms up When oil cools down lifting capacity restores Worn or broken oil pump replace pump Hydraulic system oil too hot 1 Insufficient oil in hydraulic system housing add oil to the mark П 2 The distributor arm is in the lifting position return the arm to the neutral position find and eliminate the cause of jamming 3 Pump lost its capa...

Page 115: ...e the alternator voltage regulator Replace Starter fails to turn on and crank engine crankshaft One of wire lugs at the storage battery is dis connected Heavy oxidation of wire lugs and terminals of the storage battery Engine start locking unit triggered or its switch is faulty Low starter starting moment due to storage bat tery discharging Starter failure Tighten firmly the lugs on the battery te...

Page 116: ...s with a lifting capacity of 10 tf min The ropes should be fastened at the beam or eye nut of the front axle 1 and at the eye nut 1 of the rear wheels as shown in the diagram below When fas tening the ropes by the eye nut 1 draw the hoisting device through the eye nut body and fix it with the stopper 2 through the eye of the eye nut To attach a tow rope an eye is provided lug attached to the front...

Page 117: ...aint as per GOST 6572 91 In case of long time storage of the tractors outdoors electric equipment parts of rub ber plastics materials from textile hoses of hydraulic systems etc tools are re moved and put to storage Parts fastening the removed parts of the tractor are in stalled to their places The electric equip ment headlights alternator starter batter ies are cleaned blown with compressed air t...

Page 118: ...e covered with protec tive agent The tire pressure in case of outdoors or indoors storage is decreased to 70 per cent of the normal The outer sur faces of the hydraulic system flexible hos es are cleaned of dirt and oil Hoses can be stored on the machine At that they are covered with protective agent or wrapped into insulating material waxed paper pol yethylene film etc All holes slots cavi ties t...

Page 119: ...em seal ing the inner surfaces preservation of the outer unpainted engine surfaces outer preservation if no hood is available pack ing the engine into a plastic film casing When the fuel tanks have no fuel carry out preservation with use of volatile inhibiting agents Clean and wash the air cleaner pour working preservation oil to the tray Clean and grease the threaded connec tions of the hitch mec...

Page 120: ... of grade A as per TU RB 600125053 020 2004 Preparing tractor to operation after long storage Remove the grease from preserved outer surfaces Remove the mounting protective covers plugs special devices and install the previously removed part to place Be fore installation clean the parts of dirt and dust Drain sediment from all tanks fill them with working fluids and add to the check mark as necess...

Page 121: ...eases and liquids on the hand skin it can be damaged White spirit vapors act as a weak drug in low concentrations and can poison in high concentrations The rust preventive paper contains rust inhibitors that cause irritation and inflam mation of the skin and mucuous coatings of the nose eyes Before you start work ing put on a cotton robe or suit apron prepare personal protection equipment dependin...

Page 122: ...d for storage discharge sediment from the coarse and fine fuel filters discharge electrolyte from the battery of the tractor put it into containers designated for storage and send it to recycling according to the established procedure completely disassemble the tractor to parts sort them out to non metal steel cast iron aluminum non ferrous and precious metal items and send them to recycling accor...

Page 123: ... EL13 EL15 EL16 EL18 Lamp А12 21 1 6 Supplied with HL5 HL8 EL10 EL11 EL20 Lamp А12 5 3 Supplied with HL5 HL6 E4 EL14 EL17 Lamp А12 10 2 Supplied with HL7 HL8 EL19 EL21 Lamp AKG12 55 1 2 Supplied with Е1 Е2 EP2 EP6 Socket with plug 5 Supplied with P2 P6 F1 F3 Fuse blocks 3 G1 Alternator 1 GB1 GB2 Storage battery 2 HA1 Horn 1 HL1 Headlight upper beam pilot lamp 1 HL2 Turn indicator pilot lamp 1 HL3 ...

Page 124: ... clogging sensor 1 SP2 Emergency oil pressure sensor 1 XA9 1 Socket for trailer 1 XP1 1 XP1 3 Single pin terminal block 3 XS1 1 XS1 3 Single pin female receptacle 3 XS2 1 XS2 2 Two pin female receptacle 2 XS3 1 Three pin female receptacle 1 XS4 1 Four pin female receptacle 1 XS5 1 Five pin female receptacle for relay switch 1 XS6 1 Six pin female receptacle 1 XS8 1 Eight pin female receptacle of f...

Page 125: ...Annex L Belarus 510 512 Operating manual 128 ...

Reviews: