background image

Door PC Operating System Upgrade Manual

Configure the Windows 7 Door PC

Issue 1 Rev 3

Page 16

© 2019 Grass Valley

13. Close the Personalization screen.

6.4 Turn off visual effects

To adjust all visual effects for best performance:

1.

Click on the 

Start

 button and open the 

Control Panel

2.

In the control panel search box type 

performance information

 and click on 

Performance Information and Tools

 in the results list.

3.

Click on the 

Adjust visual effects

 option on the top left of the screen. 

4.

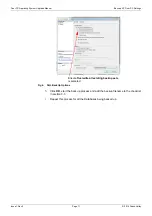
Click on the 

Visual Effects

 tab and select the 

Adjust for best performance 

radio 

button as shown in Fig 12.

5.

Click on the 

OK

 button and close the other windows. 

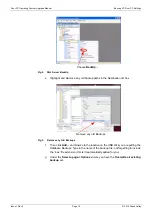
Fig 11. Configure Screen Saver 

10. Click on the 

Screen Saver 

icon 

11. Set the 

Wait

 time 

to 20 minutes

12. Click on the 

OK

 button to save the settings 

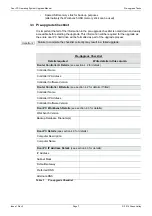
Fig 12. Visual Effects Tab

Select the 

Adjust for best performance


radio button 

Summary of Contents for grass valley SIRIUS 800 Series

Page 1: ...Operating System Upgrade Manual Windows XP to Windows Embedded Standard 7 WES7 Issue 1 Revision 3 2019 March 15 SIRIUS 800 ROUTER DOOR PC FOR USE WITH SIRIUS 830 840 AND 850 ROUTERS ...

Page 2: ...rius 800 Router documentation you agree to the following terms and conditions Grass Valley hereby grants permission and license to owners of Sirius 800 Router to use their product manuals for their own internal business use Manuals for GrassValley products may not be reproduced or transmitted in any form or by any means electronic or mechanical including photocopying and recording for any purpose ...

Page 3: ...and Database Back up 8 4 3 Door PC settings 12 5 Windows Embedded Standard 7 WES 7 Installation 13 6 Configure the Windows 7 Door PC 14 6 1 Flipping the Display Orientation 14 6 2 Calibrate the Touchscreen 14 6 3 Configure the Screen Saver 15 6 4 Turn off visual effects 16 6 5 Switch off the Firewall 17 6 6 Switch off the Auto updates Optional 17 6 7 Enable Remote Access 18 6 8 Set the IP Address ...

Page 4: ...atutory or judicial law or hereinafter granted including without limitation material generated from the software programs which are displayed on the screen such as icons screen display looks etc Information in this manual and software are subject to change without notice and does not represent a commitment on the part of Grass Valley The software described in this manual is furnished under a licen...

Page 5: ...limentado desde un sistema de alimentación con conexión a TIERRA y teniendo una conexión neutra fácilmente identificable La toma de alimentación para la unidad debe ser cercana y fácilmente accesible ESP Advertencias de Seguridad RIESGO DE CHOQUE ELECTRICO NO QUITAR LAS PROTECCIONNES ELEMENTOS NO ACCESIBLES AL USUARIO SERVICIO SOLAMENTE A PERSONAL CUALIFICADO Simboli di sicurezza Questo simbolo in...

Page 6: ... toimenpiteitä kuin mitä käyttöohjeissa on neuvottu ellet ole asiantuntija Voit saada sähköiskun Jätä kaikki huoltotoimet ammattilaiselle Sähköiskujen välttämiseksi suojaa laite sateelta ja kosteudelta Varmistu että laite on asianmukaisesti maadoitettu ja että sähkökytkennät on tehty oikein Laitteelle tehoa syöttävässä järjestelmässä tulee olla SUOJAMAALIITÄNTÄ ja nollaliitännän on oltava luotetta...

Page 7: ...symbol refers the user to important information contained in the accompanying literature This symbol indicates that hazardous voltages are present inside No user serviceable parts inside This system should only be serviced by trained personnel To reduce the risk of electric shock do not expose this appliance to rain or moisture CAUTION RISK OF ELECTRIC SHOCK DO NOT REMOVE COVERS NO USER SERVICABLE...

Page 8: ...ssional use Part 2 Immunity Federal Communications Commission Rules 47 CFR Part 15 Subpart B Class A EMC Performance of Cables and Connectors Grass Valley products are designed to meet or exceed the requirements of the appropriate European EMC standards In order to achieve this performance in real installations it is essential to use cables and connectors with good EMC characteristics All signal c...

Page 9: ...tant that all of the information in the pre upgrade checklist is noted down and easily accessible before starting the upgrade see section 3 3 Check the contents of the FGAEY S800 W7UG upgrade kit WES 7 Runtime installation USB memory stick WES 7 license label Workbench installation USB memory stick A printed copy of this upgrade manual 3 2 Equipment Required To perform the upgrade from Windows XP ...

Page 10: ...complete the checklist correctly may result in a failed upgrade Pre Upgrade Checklist Details required Write details in this column Router Controller A Details see section 4 2 for details Controller Name Controller IP Address Controller Software Version Router Controller B Details see section 4 2 for details if fitted Controller Name Controller IP Address Controller Software Version Door PC Workbe...

Page 11: ... one of the Door PC USB sockets shown in Fig 2 2 Connect a USB keyboard and mouse to the USB hub and they will be recognized by the Door PC and the drivers will be installed automatically 4 2 Workbench and Database Back up 1 Close down the LiveRunner Screen by clicking on the Exit button but do not shutdown the Door PC 2 Click on the Close button when prompted Fig 1 Door PC Ports Viewed From Below...

Page 12: ...t the Back up USB memory stick and create a Back up folder for the Door PC 6 Open up SQL Server 2008 R2 Server Management Studio from the Start menu 7 Click on the Connect button to log in and then browse the Database objects in the Object Explorer 8 Back up the Database s primarily this will be just the Workbench one but there could be others that also need backing up a Highlight the database to ...

Page 13: ...ick Add and browse to the location on the USB stick you are putting the Database Backups Type in the name of the back up file not forgetting to include the bak file extension this isn t automatically added for you g Under the Select a page Options ensure you have the Overwrite all existing backup set Fig 4 SQL Server BackUp Fig 5 Remove any Old Backups Choose BackUp Remove any old Backups ...

Page 14: ...ue 1 Rev 3 Page 11 2019 Grass Valley h Click OK start the back up process and add the backup filename to the checklist in section 3 3 i Repeat this process for all the Databases being backed up Fig 6 SQL BackUp Options Ensure Overwrite all existing backup sets is selected ...

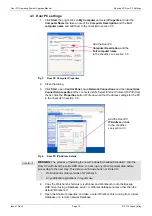
Page 15: ...Workbench shortcuts LiveRunner and Workbench onto the Backup USB drive if using a Database server or different database names other than the default Workbench 5 Open the Shortcut properties and take a note if Workbench is running from a local Database or a remote network Database Fig 7 Door PC Computer Properties Fig 8 Door PC IP Address Details Important WARNING The process of installing the new ...

Page 16: ...7 will now install This will take about 5 minutes 12 When asked to reboot the machine to complete the installation type y followed by the Enter key and the Door PC will power down 13 Remove the WES 7 USB stick and then power the PC back on using the power button on the rear of the door 14 After rebooting WES 7 will continue to install extracting files and changing system settings This will take so...

Page 17: ... or revert dialog is displayed click on the Keep Changes button 6 2 Calibrate the Touchscreen The Touchscreen driver now needs calibrating 1 Click the Start button 2 Select All Programs and then select the DMC Touch screen panel configuration option from the DMC program group 3 With the Calibration button highlighted on the left hand side click the Calibrate button on the right hand side 4 Using y...

Page 18: ...tall with all default settings 5 When the installation is complete click on the Done button 6 Run Snell3dscreensaver New exe and click on the Continue button to install the screen saver 7 Click the Finish button when prompted 8 Safely remove the WES 7 USB stick 9 Right click on the desktop and select Personalize from the menu 10 Click on the Screen Saver icon in the bottom right of the personaliza...

Page 19: ...formation and click on Performance Information and Tools in the results list 3 Click on the Adjust visual effects option on the top left of the screen 4 Click on the Visual Effects tab and select the Adjust for best performance radio button as shown in Fig 12 5 Click on the OK button and close the other windows Fig 11 Configure Screen Saver 10 Click on the Screen Saver icon 11 Set the Wait time to...

Page 20: ...rewall screen 4 Select both of the Turn off Windows Firewall not recommended radio buttons 5 Click on the OK button to accept the changes 6 6 Switch off the Auto updates Optional 1 Type windows update in the control panel search box and click on Windows Update in the results list 2 Select the Change Settings option from the top left of the Windows Update screen 3 Select the Never check for updates...

Page 21: ... Remote tab of the System Properties dialog select the Allow connections from computers running any version of Remote Desktop less secure radio button as shown in Fig 15 3 Click on the OK button of the confirmation dialog 4 Click the OK button to save the changes close the window Fig 14 Windows Update Screen Select the Never check for updates not recommended option Fig 15 System Properties Remote ...

Page 22: ... Internet Protocol Version 4 TCP IPv4 Properties dialog select the Use the following IP address radio button so that the IP address details and DNS details can be added 6 Enter the Door PC IP address and DNS details as noted down in the checklist in section 3 3 7 Click on the OK button to save the settings 8 You be asked for a Network location type set this to Work 9 Close the dialog boxes Fig 16 ...

Page 23: ...ter Configuration Windows Settings Security Settings Account Policies and then click on Password Policy see Fig 17 4 Double click on the Maximum password age option and set the value in the Maximum password age properties dialog to 0 see Fig 18 5 Click the OK button to set the value and then close down the local group policy editor Fig 17 Local Group Policy Editor set Maximum Password Age Fig 18 S...

Page 24: ...e button 4 In the Computer Name Domain Changes dialog enter the computer name from the checklist see section 3 3 and click the OK button to save the changes and close the dialog 5 A dialog is displayed requesting a restart to complete the name change select the Restart now option 6 The computer will now be restarted this will take sometime as it is the first reboot since installation Fig 19 System...

Page 25: ... see Fig 20 3 Click on the Next button to start the installation and follow the prompts to install to the default location 4 The installation will take some time and the Door PC will reboot a couple of times Once complete the Configuration Helper is displayed as shown in Fig 21 Fig 20 Workbench Installation Components Screen Fig 21 Configuration Help Screen Select both SQL install options as shown...

Page 26: ...n the Workbench Database component and then click on the click here to create database and permissions button to create a local Workbench database This step will take some time and various DOS boxes are displayed during the process When this process is complete the Workbench component will change to green 7 Click on the Centra Configuration Helper OK button to complete the installation 8 From the ...

Page 27: ...shown in Fig 23 4 From the Restore Database screen select the From device radio button and click on the Browse button as shown in Fig 24 Now browse to the Database backup folder created earlier and select the backup file 5 On the General page of the Restore Database screen select the Restore check box as shown in Fig 25 Fig 23 Right Click on the Workbench Database Fig 24 Restore Database Select Da...

Page 28: ...lect the Overwrite the existing database WITH REPLACE check box as shown in Fig 26 7 Click on the OK button to start the restore process Fig 25 Restore Database Screen General Page Fig 26 Restore Database Screen Options Page On the General page of the Restore Database screen check the Restore check box Select the Overwrite the existing database WITH REPLACE check box ...

Page 29: ...he LiveRunner Shortcut to the Windows Startup folder so that LiveRunner starts automatically when Windows starts 4 Open Workbench from the Desktop shortcut and click on the OK button when asked to update the database 5 Once Workbench has opened check that the Controller Settings are still displayed correctly 6 Copy back reinstall any other programs that were backed up prior to the upgrade 7 Restar...

Page 30: ...r for the support center nearest you please consult the Contact Us section of Grass Valley s website www grassvalley com An on line form for e mail contact is also available from the website https www grassvalley com contact support Corporate Head Office Grass Valley 3499 Douglas B Floreani St Laurent Quebec H4S 2C6 Canada Telephone 1 514 333 1772 Fax 1 514 333 9828 www grassvalley com ...

Reviews: