background image

40

Installation GRS1020/1120/1030/1130

Release 04 01/2020

1.8

Management interfaces

1.8.1

V.24 interface (external management)

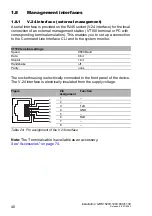
A serial interface is provided on the RJ45 socket (V.24 interface) for the local 
connection of an external management station (VT100 terminal or PC with 
corresponding terminal emulation). This enables you to set up a connection 
to the Command Line Interface CLI and to the system monitor.

The socket housing is electrically connected to the front panel of the device. 
The V.24 interface is electrically insulated from the supply voltage.

Note: 

The Terminal cable is available as an accessory.

See “Accessories” on page 74.

VT100 terminal settings

Speed

9600 Baud

Data

8 bit

Stopbit

1 bit

Handshake

off

Parity

none

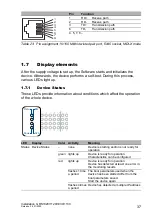
Figure 

Pin 
assignment

Function

1

2

3

TxD

4

GND

5

6

RxD

7

8

Table 24: Pin assignment of the V.24 interface

1
2
3
4
5
6
7
8

Summary of Contents for HIRSCHMANN GREYHOUND GRM Series

Page 1: ...stallation GRS1020 1120 1030 1130 Release 04 01 2020 Technical support https hirschmann support belden com User Manual Installation GREYHOUND Switch Hirschmann Switch GREYHOUND GRS1020 1120 1030 1130 GRM ...

Page 2: ...n use The performance features described here are binding only if they have been expressly agreed when the contract was made This document was produced by Hirschmann Automation and Control GmbH according to the best of the company s knowledge Hirschmann reserves the right to change the contents of this document without prior notice Hirschmann can give no guarantee in respect of the correctness or ...

Page 3: ...ews 28 1 4 1 Basic device 28 1 4 2 Port assingment 30 1 4 3 Media modules 31 1 5 Power supply 33 1 5 1 Supply voltage with characteristic value C 33 1 5 2 Supply voltage with characteristic value M 33 1 6 Ethernet ports 34 1 6 1 Basic device 34 1 6 2 Media modules 36 1 7 Display elements 37 1 7 1 Device Status 37 1 7 2 Port status 38 1 7 3 Media module status 39 1 8 Management interfaces 40 1 8 1 ...

Page 4: ...8 Filling out the inscription label 53 3 Making basic settings 54 3 1 Default settings 54 3 2 First login Password change 55 4 Monitoring the ambient air temperature 56 5 Maintenance and service 57 6 Disassembly 58 6 1 Removing a media module optional 58 6 2 Removing an SFP transceiver optional 59 6 3 Removing the device 59 7 Technical data 60 7 1 General technical data 60 7 2 Supply voltage 61 7 ...

Page 5: ...sic device 73 8 2 Media modules 73 9 Accessories 74 9 1 General accessories 74 9 2 Order numbers 74 9 3 Fast Ethernet SFP transceiver 75 9 4 Gigabit Ethernet SFP transceiver 75 9 5 Bidirectional Gigabit Ethernet SFP transceiver 77 10 Underlying technical standards 78 A Further support 79 ...

Page 6: ...ersonnel to work on the device Qualified personnel have the following characteristics Qualified personnel are properly trained Training as well as practical knowledge and experience make up their qualifications This is the prerequisite for grounding and labeling circuits devices and systems in accordance with current standards in safety technology Qualified personnel are aware of the dangers that ...

Page 7: ...necting the signal contact Before connecting the signal contact always verify that the requirements listed are complied with The following requirements apply without restrictions The electrical wires are voltage free The cables used are permitted for the temperature range of the application case Relevant for North America Exclusively use 60 75 C 140 167 F or 75 C 167 F copper Cu wire The voltage c...

Page 8: ...rth America The power supply complies with the requirements according to NEC Class 2 Alternative 3 All of the following requirements are complied with The power supply complies with the requirements for a safety extra low voltage SELV as per IEC EN 60950 1 Supply with DC voltage The wire diameter of the power supply cable is at least 1 mm North America AWG16 on the supply voltage input A fuse suit...

Page 9: ...ies with the requirements for a safety extra low voltage SELV as per IEC EN 60950 1 Supply with DC voltage The wire diameter of the power supply cable is at least 1 mm North America AWG16 on the supply voltage input A fuse suitable for DC voltage is located at both voltage inputs in the plus conductor of the power supply The minus conductor is on ground potential at both voltage inputs Otherwise a...

Page 10: ...nding air temperature and stacking devices When installing the device make sure there is at least one free rack space approx 5 cm above the device because heat is discharged via the housing of the device If you are operating the device in a 19 switch cabinet install sliding mounting rails for supporting the weight of the device Only switch on the device when the housing is closed Installation site...

Page 11: ...ty parameters as per Control Drawing 000192283DNR Details see the next two pages Avertissement Risque d explosion Ne pas débrancher tant que le circuit est sous tension à moins que l emplacement soit connu pour ne contenir aucune concentration de gaz inflammable Avertissement Risque d explosion La substitution de tout composant peut rendre ce matériel incompatible pour une utilisation en classe I ...

Page 12: ...e supply conductors Any GREYHOUND GRS1xxx device Class I Division 2 Groups A B C D Hazardous Location 1RQLQFHQGLYH HOG ZLULQJ SDUDPHWHUV THE USB POWER SUPPLY CONTACTS DEPEND ON THE FOLLOWING PARAMETERS Front view Back view Ordinary location non hazardous area non explosive atmosphere VOC ISC Ca La 9 10 μF 10 μH Vmax Imax Ca La 9 90 mA 3 nF 1 μH 1RQLQFHQGLYH HOG ZLULQJ SDUDPHWHUV THE RELAY TERMINAL...

Page 13: ...KH QRQLQFHQGLYH HOG ZLULQJ FLUFXLW FRQFHSW DOORZV LQWHUFRQQHFWLRQ RI QRQLQFHQGLYH HOG ZLULQJ DSSDUDWXV DQG DVVRFLDWHG QRQLQFHQGLYH HOG ZLULQJ DSSDUDWXV XVLQJ DQ RI WKH ZLULQJ PHWKRGV SHUPLWWHG IRU XQFODVVL HG ORFDWLRQV ZKHQ FHUWDLQ SDUDPHWULF FRQGLWLRQV DUH PHW Capacity Ca i C DEOH Inductivity La i L DEOH The PD LPXP FDEOH OHQJWK has to be determined as follows D PD FDEOH OHQJWK 0 Li DEOH C RU PD ...

Page 14: ...ostatically sensitive components These can be destroyed or their life cycles reduced by the effects of an electrical field or by a charge equalization if the connections are touched You will find information about electrostatically endangered assemblies in DIN EN 61340 5 1 2007 08 and DIN EN 61340 5 2 2007 08 ...

Page 15: ...to take appropriate measures Note The assembly guidelines provided in these instructions must be strictly adhered to in order to observe the EMC threshold values Device variant Directive All variants 2011 65 EU and 2015 863 EU RoHS Directive of the European Parliament and of the Council on the restriction of the use of certain hazardous substances in electrical and electronic equipment All variant...

Page 16: ...y cause undesired operation Appropriate testing has established that this device fulfills the requirements of a class A digital device in line with part 15 of the FCC regulations These requirements are designed to provide sufficient protection against interference when the device is being used in a business environment The device creates and uses high frequencies and can also radiate these frequen...

Page 17: ...e description safety instructions a description of the display and the other information that you need to install the device Documentation mentioned in the User Manual Installation that is not supplied with your device as a printout can be found as PDF files for downloading on the Internet at https www doc hirschmann com ...

Page 18: ...18 Installation GRS1020 1120 1030 1130 Release 04 01 2020 Legend The symbols used in this manual have the following meanings Listing Work step Subheading ...

Page 19: ... to set up switched Industrial Ethernet networks according to standard IEEE 802 3 The device works without a fan The following installation options are available 19 switch cabinet Flat surface mounting You have the option of choosing various media to connect to the end devices and other network components Twisted pair cable Multimode F O Singlemode F O The ring redundancy concept allows the networ...

Page 20: ... the Internet at the Hirschmann product pages http www hirschmann com en QR INET Industrial HiVision The device provides you with a large range of functions which the manuals for the operating software inform you about You find these manuals as PDF files on the Internet at http www doc hirschmann com The Hirschmann network components help you ensure continuous communication across all levels of th...

Page 21: ...0 100 Mbit s with 100 1000 Mbit s uplink ports 7 PoE support 0 none 8 hyphen 9 12 Configuration of the ports 16T9 16 RJ45 socket for 10 100 Mbit s Twisted pair connections 8T8Z 8 RJ45 socket for 10 100 Mbit s Twisted pair connections 8 SFP slot for 100 Mbit s F O connections 13 Temperature range S Standard 32 F 140 F 0 C 60 C C Standard with Conformal Coating 32 F 140 F 0 C 60 C T Extended 40 F 15...

Page 22: ...arate overview See table 3 on page 23 18 19 Customer specific version HH Hirschmann standard 20 Hardware configuration S Standard 21 Software configuration E Entry Hirschmann Standard 22 23 Software level 2S HiOS Layer 2 Standard 24 28 Software version 07 1 Software version 07 1 XX X Current software version Item Characteristic Characte ristic value Description Table 2 Device name and product code...

Page 23: ... CE X X X X X X X X X X X X X EN 60950 1 X X X X X X X X X X X X X EN 61131 2 X X X X X X X X X X X X X FCC X X X X X X X X X X X X X ISA 12 12 01 Class I Div 2 X X cUL 60950 1 X X X X X X X X X Substation applications IEC 61850 3 X X X X IEEE 1613 X X X X Navy applications DNV GL X X X X X Railway applications trackside EN 50121 4 X X X X Table 3 Assignment application cases certificates and decl...

Page 24: ...e socket for 100 Mbit s F O connections 9 10 Configuration Port 5 and port 7 See configuration of port 1 and port 3 11 12 Configuration Port 2 and port 4 See configuration of port 1 and port 3 13 14 Configuration Port 6 and port 8 See configuration of port 1 and port 3 15 Temperature range S Standard 32 F 140 F 0 C 60 C C Standard with Conformal Coating 32 F 140 F 0 C 60 C T Extended 40 F 158 F 40...

Page 25: ... the ports and power supply inputs Data rate PoE supp ort hyphen Config uration of the ports Temp eratur e range Supply voltage 1 Supply voltage 2 Approvals self declaratio ns Custome r specific version Hardwa re configu ration Softwar e configur ation Softwar e level Softwar e version Attrib ute value s GRS 1 0 1 2 3 none 16T9 8T8Z S C T E C M C 9 C M 9 Z9 Y9 X9 V9 VY VU VT T9 TY U9 UY UX UT HH S...

Page 26: ...ort 4 Port 6 and port 8 Temperatur e range Certificates and declarations Customer specific version Hardware configuration Attribute values GRM 2 0 ZZ ZZ ZZ ZZ S C T E Z9 Y9 X9 V9 VY VU VT T9 TY U9 UY UX UT HH S ZZ ZZ TT TT TT TT TT TT VV VV VV VV UU MM NN VV VV UU UU MM NN VV VV MM MM NN VV VV NN NN VV VV TT TT VV UU UU UU MM NN VV UU MM MM NN VV UU NN NN VV UU TT TT VV MM MM MM NN VV MM NN NN VV ...

Page 27: ...UU MM NN NN UU MM TT TT UU NN NN NN UU NN TT TT MM MM MM MM NN MM MM NN NN MM MM TT TT MM NN NN NN MM NN TT TT NN NN NN NN NN NN TT TT Item 1 3 4 5 6 7 8 9 10 11 12 13 14 15 16 17 18 19 20 Charact eristic Device Data rate PoE support hyphen Port 1 and port 3 Port 5 and port 7 Port 2 andport 4 Port 6 and port 8 Temperatur e range Certificates and declarations Customer specific version Hardware conf...

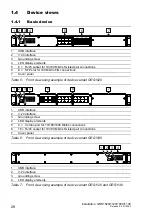
Page 28: ... 5 Front view using example of device variant GRS1020 1 USB interface 2 V 24 interface 3 Grounding screw 4 LED display elements 5 4 Combo port for 10 100 1000 Mbit s connections 6 16 RJ45 socket for 10 100 Mbit s Twisted pair connections 7 Cover panel Table 6 Front view using example of device variant GRS1030 1 USB interface 2 V 24 interface 3 Grounding screw 4 LED display elements Table 7 Front v...

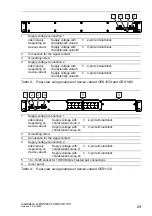
Page 29: ...pin terminal block Table 8 Rear view using example of device variant GRS1030 and GRS1030 1 Supply voltage connection 1 alternatively depending on device variant Supply voltage with characteristic value C 2 pin terminal block Supply voltage with characteristic value M 3 pin terminal block 2 Grounding screw 3 Connection for the signal contact 4 Supply voltage connection 2 alternatively depending on ...

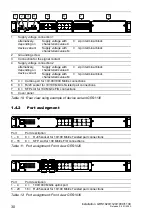
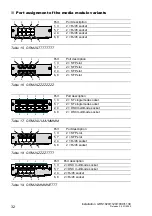
Page 30: ...4 Combo port for 10 100 1000 Mbit s connections 6 8 RJ45 socket for 10 100 Mbit s Twisted pair connections 7 8 SFP slot for 100 Mbit s F O connections 8 Cover panel Table 10 Rear view using example of device variant GRS1130 Port Port description 1 8 8 RJ45 socket for 10 100 Mbit s Twisted pair connections 9 16 8 SFP slot for 100 Mbit s F O connections Table 11 Port assignment Front view GRS1020 Po...

Page 31: ...over or an un crossed cable Autonegotiation selecting the operating mode speed duplex Link Control Specific functions of the F O interface Link Down monitoring Port Port description 1 16 16 RJ45 socket for 10 100 Mbit s Twisted pair connections Table 13 Port assignment Rear view GRS1120 Port Port description 1 4 4 100 1000 Mbit s uplink port 5 12 8 RJ45 socket for 10 100 Mbit s Twisted pair connec...

Page 32: ...Table 16 GRM20 ZZZZZZZZ Port Port description 1 3 2 ST singlemode socket 5 7 2 ST singlemode socket 2 4 2 DSC multimode socket 6 8 2 DSC multimode socket Table 17 GRM20 UUUUMMMM Port Port description 1 3 2 SFP slot 5 7 2 SFP slot 2 4 2 RJ45 socket 6 8 2 RJ45 socket Table 18 GRM20 ZZZZTTTT Port Port description 1 3 2 DSC multimode socket 5 7 2 DSC multimode socket 2 4 2 RJ45 socket 6 8 2 RJ45 socke...

Page 33: ...asic Configuration user manual 1 5 Power supply You will find information on the characteristic values here Device name and product code on page 21 1 5 1 Supply voltage with characteristic value C A 2 pin terminal block is available to supply the device with power Further information See Supply voltage with characteristic value C on page 50 1 5 2 Supply voltage with characteristic value M The foll...

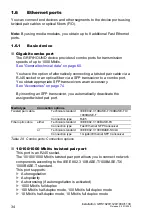
Page 34: ...ceiver you automatically deactivate the assigned twisted pair port 10 100 1000 Mbit s twisted pair port This port is an RJ45 socket The 10 100 1000 Mbit s twisted pair port allows you to connect network components according to the IEEE 802 3 10BASE T 100BASE TX 1000BASE T standard This port supports Autonegotiation Autopolarity Autocrossing if autonegotiation is activated 1000 Mbit s full duplex 1...

Page 35: ...sing if autonegotiation is activated 100 Mbit s half duplex mode 100 Mbit s full duplex mode 10 Mbit s half duplex mode 10 Mbit s full duplex mode Delivery state Autonegotiation activated The port casing is electrically connected to the front panel Pin Function 1 BI_DB 2 BI_DB 3 BI_DA 4 BI_DD 5 BI_DD 6 BI_DA 7 BI_DC 8 BI_DC Table 21 Pin assignments of the 10 100 1000 Mbit s twisted pair port in 10...

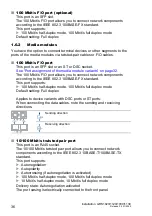
Page 36: ...ou to connect network components according to the IEEE 802 3 100BASE FX standard This port supports 100 Mbit s half duplex mode 100 Mbit s full duplex mode Default setting Full duplex Applies to device variants with DSC ports or ST ports When connecting the data cables note the sending and receiving directions 10 100 Mbit s twisted pair port This port is an RJ45 socket The 10 100 Mbit s twisted pa...

Page 37: ...7 8 Table 23 Pin assignment 10 100 Mbit s twisted pair port RJ45 socket MDI X mode LED Display Color Activity Meaning Status Device Status none Device is starting and or is not ready for operation green lights up Device is ready for operation Characteristics can be configured red lights up Device is ready for operation Device has detected at least one error in the monitoring results flashes 1 time...

Page 38: ...Maintain the power supply green lights up Device variants with redundant power supply Supply voltage 1 and 2 is on Device variants with single power supply Supply voltage is on ACA Storage medium ACA31 none ACA storage medium not connected green lights up ACA storage medium connected flashes3 times a period Device writes to reads from the storage medium yellow lights up ACA storage medium inoperat...

Page 39: ...e CLI 1 7 3 Media module status 1 LED is located on the media module at the bottom left This LED provides information on the supply voltage status of the media module enable Change to the privileged EXEC mode configure Change to the configuration mode system port led mode portpanel Change LED display from service panel to port panel enable Change to the privileged EXEC mode configure Change to the...

Page 40: ...ou to set up a connection to the Command Line Interface CLI and to the system monitor The socket housing is electrically connected to the front panel of the device The V 24 interface is electrically insulated from the supply voltage Note The Terminal cable is available as an accessory See Accessories on page 74 VT100 terminal settings Speed 9600 Baud Data 8 bit Stopbit 1 bit Handshake off Parity n...

Page 41: ...software For information about the position on the device see Device views on page 28 On the front of the device there is an LED display that informs you about the status of the interface The USB interface has the following properties Supplies current of max 500 mA Voltage not potential separated Connectors type A Supports the USB master mode Supports USB 2 0 Figure Pin Function 1 VCC VBus 2 Data ...

Page 42: ...is not connected to a power supply The signal contact allows you to control external devices or monitor device functions In the configuration you specify how the device uses the signal contact You will find detailed information on possible applications and the configuration of the signal contact in the software user documentation You will find the software user documentation as PDF files on the In...

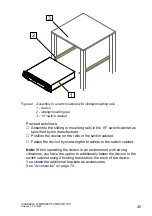
Page 43: ...tional Connecting the terminal blocks Operating the device Connecting data cables Filling out the inscription label 2 1 Checking the package contents Check whether the package includes all items named in the section Scope of delivery on page 73 Check the individual parts for transport damage 2 2 Installing and grounding the device WARNING ELECTRIC SHOCK Exclusively install this device in a switch ...

Page 44: ...esigned to be mounted in a 19 switch cabinet In the delivery state there are 2 pre mounted mounting brackets on the sides of the device Ensure adequate ventilation If necessary install an additional fan in the switch cabinet to prevent the device from overheating Measure the depth of the 19 cabinet so that all the lines to be connected can be fed in easily CAUTION OVERHEATING OF THE DEVICE Verify ...

Page 45: ...witch cabinet as specified by the manufacturer Position the device on the rails in the switch cabinet Fasten the device by screwing the brackets to the switch cabinet Note When operating the device in an environment with strong vibrations you have the option to additionally fasten the device to the switch cabinet using 2 holding brackets on the back of the device You obtain the additional brackets...

Page 46: ...ice You obtain the additional brackets as accessories See Accessories on page 74 Fasten the device by screwing the brackets to the wall Figure 3 Mounting on a vertical flat surface WARNING FIRE HAZARD Install the device in a fire enclosure according to EN 60950 1 if you install the device vertically Failure to follow these instructions can result in death serious injury or equipment damage ...

Page 47: ...unding Ground the device via the ground screw You find the prescribed tightening torque in chapter General technical data on page 60 Note This applies to the following device variants only Supply voltage with characteristic value M The device is grounded via the ground screw and also via the power supply socket See figure 7 on page 51 ...

Page 48: ...Figure 4 Mounting a media module Proceed as follows Remove the cover panel from the media module slot on the basic device Open the locking mechanism of the media module by pressing the locking levers outwards 1 Insert the media module straight into the media module slot 2 Lock the media module in place by pressing the locking levers inwards 3 Fasten the media module with the screws in the front pa...

Page 49: ...se Hirschmann SFP transceivers See Accessories on page 74 Figure 5 Installing SFP transceivers Installation sequence Proceed as follows Take the SFP transceiver out of the transport packaging 1 Remove the protection cap from the SFP transceiver 2 Push the SFP transceiver with the lock closed into the slot until it latches in 3 3 ...

Page 50: ...stribution Both supply voltage inputs are uncoupled Figure 6 Supply voltage with characteristic value C 2 pin terminal block with screw lock WARNING ELECTRIC SHOCK Connect only a supply voltage that corresponds to the type plate of your device Failure to follow these instructions can result in death serious injury or equipment damage WARNING ELECTRIC SHOCK Never insert pointed objects narrow screw...

Page 51: ...n the characteristic values here Device name and product code on page 21 You have the option of supplying the supply voltage redundantly without load distribution Both supply voltage inputs are uncoupled Figure 7 Supply voltage with characteristic value M 3 pin terminal block with screw lock Type of the voltages that can be connected Specification of the supply voltage Pin assignment DC voltage Ra...

Page 52: ...lock by tightening the terminal screws You find the prescribed tightening torque in chapter General technical data on page 60 Type of the voltages that can be connected Specification of the supply voltage Pin assignment DC voltage Rated voltage range 110 V DC 250 V DC Voltage range incl maximum tolerances 88 V DC 288 V DC L N Plus terminal of the supply voltage Minus terminal of the supply voltage...

Page 53: ...ent separation between the power supply cables and the data cables Ideally install the cables in separate cable channels Verify that power supply cables and data cables do not run parallel over longer distances If reducing the inductive coupling is necessary verify that the power supply cables and data cables cross at a 90 angle Use shielded data cables for gigabit transmission via copper cables O...

Page 54: ...ustrial HiVision application Configuration via BOOTP Configuration via DHCP Configuration via DHCP Option 82 AutoConfiguration Adapter Further information on the basic settings of the device can be found in the Basic Configuration user manual 3 1 Default settings IP address The device looks for the IP address using DHCP Management password Login user password public read only Login admin password ...

Page 55: ...t password private The device prompts you to type in a new password Type in your new password To help increase security choose a password that contains at least 8 characters which includes upper case characters lower case characters numerical digits and special characters When you log on to the device with the Command Line Interface then the device prompts you to confirm you new password Log on to...

Page 56: ... maximum ambient air temperature exclusively See General technical data on page 60 The ambient air temperature is the temperature of the air at a distance of 2 in 5 cm from the device It depends on the installation conditions of the device for example the distance from other devices or other objects and the output of neighboring devices ...

Page 57: ...mann is continually working on improving and developing their software Check regularly whether there is an updated version of the software that provides you with additional benefits You find information and software downloads on the Hirschmann product pages on the Internet http www hirschmann com Internal fuses are triggered only in the case of a detected error in the device In case of damage or m...

Page 58: ...anel of the media module Open the locking mechanism of the media module by pressing the locking levers outwards 1 2 Pull the media module out of the slot 3 Close the media module slot on the basic device using a cover panel Fasten the cover panel using the 2 screws on the basic device You find the prescribed tightening torque in chapter General technical data on page 60 1 3 2 ...

Page 59: ...FP transceiver out of the slot via the open locking mechanism 2 Close the SFP transceiver with the protection cap 3 6 3 Removing the device Proceed as follows To detach the device from the switch cabinet or the wall remove the screws from the brackets on the device WARNING ELECTRIC SHOCK Disconnect the grounding only after disconnecting all other cables Failure to follow these instructions can res...

Page 60: ...30 8T8Z 8 16 lb 3 7 kg GRS1130 8T8Z Optional second power unit Additional 12 22 oz 380 g Weight Supply voltage with characteristic value C GRS1020 16T9 8 38 lb 3 8 kg GRS1120 16T9 GRS1030 16T9 8 38 lb 3 8 kg GRS1130 16T9 GRS1020 8T8Z 7 94 lb 3 6 kg GRS1120 8T8Z GRS1030 8T8Z 8 16 lb 3 7 kg GRS1130 8T8Z Optional second power unit Additional 13 83 oz 430 g Pollution degree 2 Protection classes Laser ...

Page 61: ...ree 2 Protection classes Laser protection Class 1 in compliance with IEC 60825 1 Degree of protection IP20 Supply voltage with characteristic value M Rated voltage 110 V AC 240 V AC 50 Hz 60 Hz 110 V DC 250 V DC Voltage range including maximum tolerances 88 V AC 276 V AC 88 V DC 288 V DC Connection type 3 pin terminal block Tightening torque 4 4 lb in 0 5 Nm min conductor diameter Supply with AC v...

Page 62: ...e Maximum power consumption power output Basic devicesa a with redundant power supply with characteristic value M 4 Btu IT h with redundant power supply with characteristic value C 10 Btu IT h GRS1020 16T9 M 7 5 W 26 Btu IT h GRS1120 16T9 7 5 W 26 Btu IT h GRS1030 16T9 10 5 W 36 Btu IT h GRS1130 16T9 10 5 W 36 Btu IT h GRS1020 8T8Z 12 W 41 Btu IT h GRS1120 8T8Z 12 W 41 Btu IT h GRS1030 8T8Z 16 W 5...

Page 63: ...Conformal Coating up to 6562 ft ASL 2000 m ASL above 6562 ft ASL 2000 m ASL 32 F 140 F 0 C 60 C 32 F 122 F 0 C 50 C Extendedb c up to 6562 ft ASL 2000 m ASL above 6562 ft ASL 2000 m ASL b If you are using SFP modules without the EEC extension an operating temperature range of 32 F to 140 F 0 C to 60 C applies for your device See Accessories on page 74 c Applies to device variants 8T8Z with extende...

Page 64: ...ts with extended temperature range If more than 4 SFP transceivers are used the maximum operating temperature is reduced by 2 K per additional SFP transceiver Climatic conditions during storage Ambient temperature 40 F 185 F 40 C 85 C up to 3 months 40 F 158 F 40 C 70 C up to 1 year 40 F 122 F 40 C 50 C up to 2 years 32 F 86 F 0 C 30 C up to 10 years Humidity 5 95 non condensing Air pressure min 6...

Page 65: ...tion GRS1020 1120 1030 1130 Release 04 01 2020 65 7 7 Dimension drawings Basic device Figure 10 Dimension drawings basic device 44 1 75 444 17 5 10 3 0 4 465 9 18 3 482 6 19 6 9 0 27 31 75 1 25 308 12 1 mm inch ...

Page 66: ...66 Installation GRS1020 1120 1030 1130 Release 04 01 2020 Media modules Figure 11 Dimension drawings media modules 113 3 4 46 136 57 140 5 51 128 4 5 05 38 2 1 50 22 7 0 89 42 5 1 67 5 37 mm inch ...

Page 67: ...ation codes VT T9 TY Substation applications d d EN 61850 3 IEEE 1613 applies to devices with the certification codes V9 VY VU VT Radiated emission EN 55032 Class A Class A Class A Class A DNV GL Guidelines EMC 1 FCC 47 CFR Part 15 Class A Class A Class A Class A EN 61000 6 4 Fulfilled Fulfilled Fulfilled Fulfilled Conducted emission EN 55032 DC supply connection Class A Class A Class A Class A DN...

Page 68: ...eld EN 61000 4 3 80 MHz 3000 MHz max 10 V m max 10 V m max 20 V m max 10 V m IEEE 1613 80 MHz 1000 MHz max 35 V m Fast transients burst EN 61000 4 4 IEEE C37 90 1 DC supply connection 2 kV 2 kV 2 kV 4 kV EN 61000 4 4 IEEE C37 90 1 Data line 4 kV 4 kV 2 kV 4 kV Voltage surges DC supply connection EN 61000 4 5 line ground 2 kV 2 kV 2 kV 2 kV IEEE 1613 line ground 5 kV EN 61000 4 5 line line 1 kV 1 k...

Page 69: ... Immunity Standard applicationsa a EN 61131 2 CE FCC applies to all devices Merchant Navy b b Merchant Navy applies to devices with the approval codes U9 UT UX UY VU Railway applications trackside c c EN 50121 4 applies to devices with the certification codes VT T9 TY Substation applications d d EN 61850 3 IEEE 1613 applies to devices with the certification codes V9 VY VU VT IEC 60068 2 6 test Fc ...

Page 70: ...0 nm 50 125 µm 0 dB 12 dB 0 mi 0 93 mi 0 km 1 5 km 1 0 dB km 800 MHz km MX LC MM 1310 nm 62 5 125 µm 0 dB 12 dB 0 mi 31 06 mi 0 km 50 km 1 0 dB km 500 MHz km LX LC MM 1310 nmd 50 125 µm 0 dB 10 5 dB 0 mi 0 34 mi 0 km 0 55 km 1 0 dB km 800 MHz km LX LC MM 1310 nme 62 5 125 µm 0 dB 10 5 dB 0 mi 0 34 mi 0 km 0 55 km 1 0 dB km 500 MHz km LX LC SM 1310 nm 9 125 µm 0 dB 10 5 dB 0 mi 12 43 mi 0 km 20 km ...

Page 71: ...dB 11 dB 0 km 12 43 mi 0 km 20 km 0 4 dB km 3 5 ps nm km Type B LX LC EEC SM 1550 nm 1310 nm 9 125 µm 0 dB 11 dB 0 mi 12 43 mi 0 km 20 km 0 25 dB km 19 ps nm km Type A LH LC EEC LH 1490 nm 1590 nm 9 125 µm 5 dB 24 dB 14 29 mi 49 71 mi 23 km 80 km 0 25 dB km 19 ps nm km Type B LH LC EEC LH 1590 nm 1490 nm 9 125 µm 5 dB 24 dB 14 29 mi 49 71 mi 23 km 80 km 0 25 dB km 19 ps nm km Table 34 F O port bid...

Page 72: ...onghaul b Including 3 dB system reserve when compliance with the fiber data is observed c With ultra low loss optical fiber 10 100 1000 Mbit s twisted pair port Length of a twisted pair segment max 328 ft 100 m for Cat5e cable Table 36 Network range 10 100 1000 Mbit s twisted pair port Product code M FAST SFP Modea Wave length Fiber System attenuation Example for F O cable lengthb Fiber attenuatio...

Page 73: ...M9 2 3 pin terminal block for the supply voltage exclusively for device variants featuring supply voltage with characteristic value MM 1 2 pin terminal block for the supply voltage exclusively for device variants featuring supply voltage with characteristic value C9 2 2 pin terminal block for the supply voltage exclusively for device variants featuring supply voltage with characteristic value CC 2...

Page 74: ...r according to CEE 7 4 to 3 pin terminal block 4 9 ft 1 5 m 942 067 001 Power Cord supply voltage cable with EURO connector according to CEE 7 4 to 3 pin terminal block 8 2 ft 2 5 m 942 067 101 Terminal cable RJ45 on USB 942 096 001 Terminal cable RJ45 on Sub D 9 pin 942 097 001 AutoConfiguration Adapter ACA22 USB EEC 942 124 001 3 pin High Voltage Interlock terminal block 50 pcs 943 845 008 2 pin...

Page 75: ...ir ports provided by the device directly Not applicable for combo ports Not applicable for ports which support only Gigabit Ethernet It is currently not possible to set autocrossing manually M FAST SFP MM LC 943 865 001 M FAST SFP MM LC EEC 943 945 001 M FAST SFP SM LC 943 866 001 M FAST SFP SM LC EEC 943 946 001 M FAST SFP SM LC 943 867 001 M FAST SFP SM LC EEC 943 947 001 M FAST SFP LH LC 943 86...

Page 76: ...8 001 M SFP LX LC 943 015 001 M SFP LX LC EEC 943 897 001 M SFP LX LC 942 023 001 M SFP LX LC EEC 942 024 001 M SFP LH LC 943 042 001 M SFP LH LC EEC 943 898 001 M SFP LH LC 943 049 001 M SFP LH LC EEC 942 119 001 SFP GIG LX LCa 942 196 001 SFP GIG LX LC EECa 942 196 002 a You will find further information on certifications on the Internet on the Hirschmann product pages www hirschmann com Bidirec...

Page 77: ...ransceiver Order number M SFP BIDI Type A LX LC EEC 943 974 001 M SFP BIDI Type B LX LC EEC 943 974 002 M SFP BIDI Type A LH LC EEC 943 975 001 M SFP BIDI Type B LH LC EEC 943 975 002 M SFP BIDI Bundle LX LC EEC Type A B 943 974 101 M SFP BIDI Bundle LH LC EEC Type A B 943 975 101 Table 41 Accessory Bidirectional Gigabit Ethernet SFP transceiver ...

Page 78: ...uipment Emission Requirements EN 60950 1 Information technology equipment Safety Part 1 General requirements EN 61000 3 2 Electromagnetic compatibility EMC Part 3 2 Limits Limits for harmonic current emissions EN 61000 3 3 Electromagnetic compatibility EMC Part 3 3 Limits Limitation of voltage changes voltage fluctuations and flicker EN 61000 6 2 Electromagnetic compatibility EMC Part 6 2 Generic ...

Page 79: ...schmann Competence Center is ahead of its competitors on three counts with its complete range of innovative services Consulting incorporates comprehensive technical advice from system evaluation through network planning to project planning Training offers you an introduction to the basics product briefing and user training with certification You find the training courses on technology and products...

Page 80: ......

Reviews: