background image

18

Installation SPIDER-SL

Release 06 01/2020

1.6

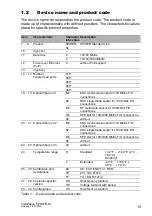
Pin assignments

1.7

Display elements

After the supply voltage is switched on, the device performs a self-test. 
During this process, various LEDs light up.

1.7.1

Device state

This LED provides information on the status of the power supply.

RJ45

Pin

10/100 Mbit/s

1000 Mbit/s

MDI mode

1

TX+

BI_DA+

2

TX

BI_DA

3

RX+

BI_DB+

4

BI_DC+

5

BI_DC

6

RX

BI_DB

7

BI_DD+

8

BI_DD

MDI-X mode

1

RX+

BI_DB+

2

RX

BI_DB

3

TX+

BI_DA+

4

BI_DD+

5

BI_DD

6

TX

BI_DA

7

BI_DC+

8

BI_DC

1

2

3

4

5

6

7

8

Summary of Contents for Hirschmann SPIDER SL Series

Page 1: ...Installation SPIDER SL Release 06 01 2020 Technical support https hirschmann support belden com User Manual Installation Industrial Ethernet Rail Switch SPIDER Standard Line ...

Page 2: ...he performance features described here are binding only if they have been expressly agreed when the contract was made This document was produced by Hirschmann Automation and Control GmbH according to the best of the company s knowledge Hirschmann reserves the right to change the contents of this document without prior notice Hirschmann can give no guarantee in respect of the correctness or accurac...

Page 3: ...00 Mbit s twisted pair port 16 1 5 2 10 100 Mbit s twisted pair port 17 1 5 3 100 1000 Mbit s F O port 17 1 5 4 100 Mbit s F O port 17 1 6 Pin assignments 18 1 7 Display elements 18 1 7 1 Device state 18 1 7 2 Port status 19 2 Installation 20 2 1 Checking the package contents 20 2 2 Mounting the device 21 2 2 1 Installing the device onto the DIN rail 21 2 2 2 Mounting on a flat surface 22 2 3 Inst...

Page 4: ...e variants with the characteristic value HK 26 2 5 Operating the device 27 2 6 Connecting data cables 27 3 Monitoring the ambient air temperature 28 4 Maintenance and service 29 5 Disassembly 30 5 1 Removing an SFP transceiver optional 30 5 2 Removing the device 31 6 Technical data 32 A Further support 38 ...

Page 5: ...urn the device to Hirschmann for inspection Certified usage Use the product only for the application cases described in the Hirschmann product information including this manual Operate the product only according to the technical specifications See Technical data on page 32 Connect to the product only components suitable for the requirements of the specific application case Installation site requir...

Page 6: ...miliar with appropriate measures against these hazards in order to reduce the risk for themselves and others Qualified personnel receive training on a regular basis National and international safety regulations Verify that the electrical installation meets local or nationally applicable safety regulations Grounding the device The device is grounded by a 3 pin terminal block Use a wire diameter for...

Page 7: ...n easily accessible disconnecting device for example a switch or a plug This disconnecting device is clearly identified So in the case of an emergency it is clear which disconnecting device belongs to which power supply cable The power supply cable is suitable for the voltage the current and the physical load Hirschmann recommends a wire diameter of 0 5 mm AWG20 The cross section of the ground con...

Page 8: ... will be available to the relevant authorities at the following address Hirschmann Automation and Control GmbH Stuttgarter Str 45 51 72654 Neckartenzlingen Germany www hirschmann com The device can be used in the industrial sector Interference immunity EN 61000 6 2 Emitted interference EN 55032 You find more information on technical standards here Technical data on page 32 Warning This is a class ...

Page 9: ...vice fulfills the requirements of a class A digital device in line with part 15 of the FCC regulations These requirements are designed to provide sufficient protection against interference when the device is being used in a business environment The device creates and uses high frequencies and can also radiate these frequencies If it is not installed and used in accordance with this operating manua...

Page 10: ...ription safety instructions a description of the display and the other information that you need to install the device Documentation mentioned in the User Manual Installation that is not supplied with your device as a printout can be found as PDF files for downloading on the Internet at https www doc hirschmann com ...

Page 11: ...Installation SPIDER SL Release 06 01 2020 11 Legend The symbols used in this manual have the following meanings Listing Work step Subheading ...

Page 12: ...he relevant industry standards provides very high operational reliability even under extreme conditions and also long term reliability and flexibility You have numerous options of combining the device characteristics You can determine the possible combinations using the configurator which is available in the Belden Online Catalog https catalog belden com on the web page of the device ...

Page 13: ...for 100 Mbit s F O connections S2 DSC singlemode socket for 100 Mbit s F O connections M4 ST multimode socket for 100 Mbit s F O connections O6 SFP slot for 100 1000 Mbit s F O connections 99 without 20 21 Optical fiber port 2 M2 DSC multimode socket for 100 Mbit s F O connections S2 DSC singlemode socket for 100 Mbit s F O connections O6 SFP slot for 100 1000 Mbit s F O connections 99 without 22 ...

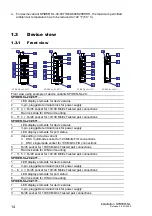
Page 14: ...t status 4 depending on device variant DSC multimode socket for 100 Mbit s F O connections DSC singlemode socket for 100 Mbit s F O connections 5 RJ45 socket for 10 100 Mbit s Twisted pair connections 6 Rail lock slide for DIN rail mounting 7 11 5 RJ45 socket for 10 100 Mbit s Twisted pair connections SPIDER SL 20 04T1 1 LED display elements for device status 2 3 pin pluggable terminal block for p...

Page 15: ...s Twisted Pair connections 8 Rail lock slide for DIN rail mounting 9 12 4 RJ45 socket for 10 100 1000 Mbit s Twisted Pair connections SPIDER SL 40 06T1 1 LED display elements for device status 2 3 pin pluggable terminal block for power supply 3 LED display elements for port status 4 SFP slot for 100 1000 Mbit s F O connections 5 6 2 RJ45 socket for 10 100 1000 Mbit s Twisted Pair connections 7 Rai...

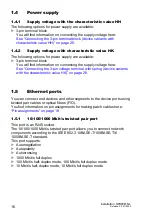
Page 16: ...ting the 3 pin voltage terminal with spring device variants with the characteristic value HK on page 26 1 5 Ethernet ports You can connect end devices and other segments to the device ports using twisted pair cables or optical fibers F O You find information on pin assignments for making patch cables here Pin assignments on page 18 1 5 1 10 100 1000 Mbit s twisted pair port This port is an RJ45 so...

Page 17: ... half duplex mode 10 Mbit s full duplex mode 1 5 3 100 1000 Mbit s F O port This port is an SFP slot The 100 1000 Mbit s F O port allows you to connect network components according to the IEEE 802 3 100BASE FX 1000BASE SX 1000BASE LX standard This port supports 100 Mbit s full duplex when using a Fast Ethernet SFP transceiver 1000 Mbit s full duplex when using a Gigabit Ethernet SFP transceiver 1 ...

Page 18: ... test During this process various LEDs light up 1 7 1 Device state This LED provides information on the status of the power supply RJ45 Pin 10 100 Mbit s 1000 Mbit s MDI mode 1 TX BI_DA 2 TX BI_DA 3 RX BI_DB 4 BI_DC 5 BI_DC 6 RX BI_DB 7 BI_DD 8 BI_DD MDI X mode 1 RX BI_DB 2 RX BI_DB 3 TX BI_DA 4 BI_DD 5 BI_DD 6 TX BI_DA 7 BI_DC 8 BI_DC 1 2 3 4 5 6 7 8 ...

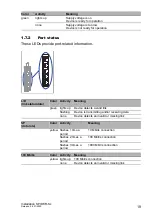
Page 19: ...a Color Activity Meaning green lights up Device detects a valid link flashing Device is transmitting and or receiving data none Device detects an invalid or missing link SP data rate Color Activity Meaning yellow flashes 1 time a period 10 Mbit s connection flashes 2 times a period 100 Mbit s connection flashes 3 times a period 1000 Mbit s connection 100 Mbit s Color Activity Meaning yellow lights...

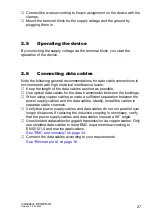
Page 20: ...ollowing steps to install the device Checking the package contents Mounting the device Installing an SFP transceiver optional Wiring the terminal block for the supply voltage and the grounding Operating the device Connecting data cables 2 1 Checking the package contents Check whether the package includes all items named in the section Scope of delivery on page 35 Check the individual parts for tra...

Page 21: ...rail Mounting on a flat surface 2 2 1 Installing the device onto the DIN rail Prerequisite The device is for mounting on a 35 mm DIN rail in accordance with DIN EN 60715 Proceed as follows Slide the upper snap in guide of the device into the DIN rail Use a screwdriver to pull the rail lock slide downwards Snap in the device by releasing the rail lock slide 2 1 ...

Page 22: ...ount the device on the wall mounting plate Insert the upper snap in guide of the device into the rail and press it down against the rail until it snaps into place Two models of wall mounting plates are available See Accessories on page 36 20 0 8 25 1 52 7 2 07 35 1 38 O 6 5 0 26 42 1 65 57 5 2 26 35 75 1 41 24 25 0 95 O 6 5 0 2 6 35 1 38 mm inch 20 0 8 25 1 52 7 2 07 35 1 38 O 6 5 0 26 72 2 83 87 ...

Page 23: ...chmann SFP transceivers See Accessories on page 36 Figure 1 Installing SFP transceivers Installation sequence Proceed as follows Take the SFP transceiver out of the transport packaging 1 Remove the protection cap from the SFP transceiver 2 Push the SFP transceiver with the lock closed into the slot until it latches in 3 3 ...

Page 24: ...protective elements The shielding ground of the connectable twisted pair cables is connected to the ground connection as a conductor WARNING ELECTRIC SHOCK Exclusively connect a supply voltage that corresponds to the type plate of your device Never insert sharp objects small screwdrivers wires etc into the connection terminals for the supply voltage and do not touch the terminals Failure to follow...

Page 25: ...he pin assignment on the device with the clamps Fasten the wires in the terminal block by tightening the terminal screws Mount the terminal block for the supply voltage and the ground by plugging them in Type of the voltages that can be connected Specification of the supply voltage Pin assignment DC voltage Rated voltage range 12 V DC 24 V DC Voltage range incl maximum tolerances 9 6 V DC 32 V DC ...

Page 26: ... wires on page 7 Remove the terminal connector from the device Open the terminal lock by pressing the corresponding lever with a screwdriver Type of the voltages that can be connected Specification of the supply voltage Pin assignment DC voltage Rated voltage range 12 V DC 24 V DC Voltage range incl maximum tolerances 9 6 V DC 32 V DC 24 V DC Plus terminal of the supply voltage 0 V Minus terminal ...

Page 27: ...le Use optical data cables for the data transmission between the buildings When using copper cables provide a sufficient separation between the power supply cables and the data cables Ideally install the cables in separate cable channels Verify that power supply cables and data cables do not run parallel over longer distances If reducing the inductive coupling is necessary verify that the power su...

Page 28: ...um ambient air temperature exclusively See General technical data on page 32 The ambient air temperature is the temperature of the air at a distance of 2 in 5 cm from the device It depends on the installation conditions of the device for example the distance from other devices or other objects and the output of neighboring devices ...

Page 29: ...e this device according to the specifications Depending on the degree of pollution in the operating environment check at regular intervals that the ventilation slots in the device are not obstructed Note You find information on settling complaints on the Internet at http www beldensolutions com en Service Repairs index phtml CAUTION RISK OF TRANSIENTS OR ELECTROSTATIC DISCHARGES Do not open the ho...

Page 30: ...ransceiver optional Figure 4 De installing SFP transceivers De installation sequence Proceed as follows Open the locking mechanism of the SFP transceiver 1 Pull the SFP transceiver out of the slot via the open locking mechanism 2 Close the SFP transceiver with the protection cap 3 ...

Page 31: ... Removing the device Proceed as follows Disconnect the data cables Disable the supply voltage Remove the terminal connector from the device Use a screwdriver to pull the rail lock slide downwards Pull the device downwards from the DIN rail module 1 2 ...

Page 32: ...tential difference from incoming voltage 24 V DC 32 V DC Potential difference from incoming voltage ground 32 V DC Climatic conditions during operation Ambient air temperaturea a Temperature of the ambient air at a distance of 2 in 5 cm from the device 32 F 140 F 0 C 60 C Deratingb b For device variant SPIDER SL 40 06T1O6O699SZ9HHHH the maximum permitted ambient air temperature has to be reduced t...

Page 33: ...PIDER SL 20 01T1 SPIDER SL 20 04T1 25 5 1 14 3 0 6 110 4 3 82 3 2 0 2 0 2 6 102 4 73 2 9 6 SPIDER SL 20 06T1 45 1 8 13 8 0 5 14 3 0 6 37 8 1 5 SPIDER SL 20 08T1 25 5 1 14 3 0 6 mm inch SPIDER SL 40 06T1 13 8 0 5 45 1 8 SPIDER SL 40 06T1 13 8 0 5 45 1 8 SPIDER SL 40 05T1 14 3 0 6 25 5 1 110 4 3 82 3 2 0 2 6 0 2 102 4 73 2 9 6 mm inch 14 3 0 6 37 8 1 5 SPIDER SL 40 08T1 ...

Page 34: ...ctrostatic discharge EN 61000 4 2 IEEE C37 90 3 Contact discharge 4 kV EN 61000 4 2 IEEE C37 90 3 Air discharge 8 kV Electromagnetic field EN 61000 4 3 80 MHz 1000 MHz max 10 V m Fast transients burst EN 61000 4 4 IEEE C37 90 1 DC supply connection 2 kV EN 61000 4 4 IEEE C37 90 1 Data line 4 kV Voltage surges DC supply connection EN 61000 4 5 line ground 2 kV EN 61000 4 5 line line 1 kV Voltage su...

Page 35: ...IDER SL 40 06T1 99 8 7 W 29 6 Btu IT h SPIDER SL 40 06T1 O6 13 3 W 45 4 Btu IT h SPIDER SL 40 08T1 5 0 W 17 1 Btu IT h Number Article 1 Device 1 3 pin pluggable terminal block for power supply 1 Safety and general information sheet Device Order number SPIDER SL 20 01T1M29999SZ9HHHH 942 132 005 SPIDER SL 20 01T1S29999SZ9HHHH 942 132 006 SPIDER SL 20 04T1M29999SZ9HHHH 942 132 007 SPIDER SL 20 04T1M4...

Page 36: ...7 002 Fast Ethernet SFP Transceiver Order number M FAST SFP TX RJ45 942 098 001 M FAST SFP TX RJ45 EEC 942 098 002 M FAST SFP MM LC 943 865 001 M FAST SFP MM LC EEC 943 945 001 M FAST SFP SM LC 943 866 001 M FAST SFP SM LC EEC 943 946 001 M FAST SFP SM LC 943 867 001 M FAST SFP SM LC EEC 943 947 001 M FAST SFP LH LC 943 868 001 M FAST SFP LH LC EEC 943 948 001 SFP FAST MM LCa a You find further in...

Page 37: ...her information on certifications on the Internet at the Hirschmann product pages www hirschmann com 942 196 001 SFP GIG LX LC EECa 942 196 002 Name CSA C22 2 No 142 Canadian National Standard s Process Control Equipment Industrial Products EN 50121 4 Railway applications EMC Emission and immunity of the signaling and telecommunications apparatus Rail Trackside EN 55032 Electromagnetic compatibili...

Page 38: ...n Competence Center is ahead of its competitors on three counts with its complete range of innovative services Consulting incorporates comprehensive technical advice from system evaluation through network planning to project planning Training offers you an introduction to the basics product briefing and user training with certification You find the training courses on technology and products curre...

Page 39: ...Installation SPIDER SL Release 06 01 2020 39 ...

Page 40: ......

Reviews: