Product Number: QG0007-02 Revision: A0; Date: 4/25/13
3
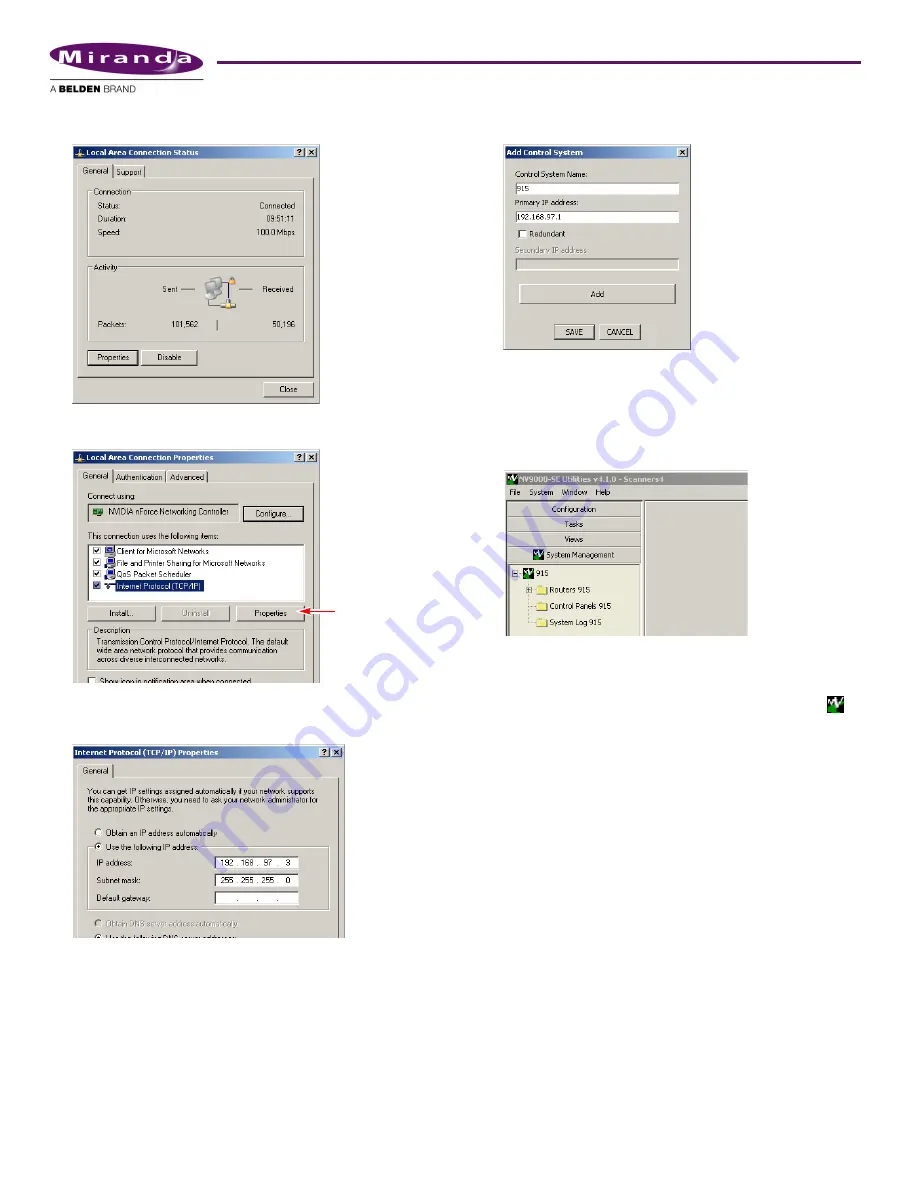
2) Double-click ‘Local Area Connection’. Then, choose the
General tab and click ‘Properties’.
3) Select Internet Protocol (TCP/IP). Click ‘Properties’ again
here:
4) Select ‘Use the following IP address’ and enter an IP
address on the NV915’s Config network. Use the default
subnet mask.
The default IP address of the NV915 on the Config network
is
192.168.97.1
. Therefore, choose
192.168.97.3
or a simi-
lar address that is not the same as the NV915’s.
5) Click OK and it is done.
Network Port
To make the NV915 known to NV9000-SE Utilities, follow
these steps:
1) Launch NV9000-SE Utilities. Choose ‘Add Control System’
from the
System
menu.
Give your NV915 control system a name. Enter the
NV915’s config port address. Click ‘Add’ and then ‘Save’.
2) The result is a named control system to which you can add
routers and control panels.
Click the ‘System Management’ pane on the left side of
the SE window to see the control system you created:
(It is from the System Management pane that you will
upload configurations to the NV915 and start, stop, and
restart the NV915.)
S
If the NV915 icon remains red and does not turn green [
]
then either you have not specified the network IP address
correctly, the Ethernet connection (through the Ethernet
switch) is faulty, or you have extra firewall protection installed
and active. See
Notices
, following, for more detail.
3) Exit NV9000-SE Utilities.
Before you continue with NV9000-SE Utilities, read (or at
least browse) all the available documentation.
S
The CD contain an NV9000-SE Utilities User’s Guide.
NV9000-SE Utilities itself provides online help.
Beyond those basic steps, configuration of your NV9000 sys-
tem depends almost entirely on the characteristics of your
system.
We recommend that you follow the order of entries in the
Configuration pane when you are making a configuration:
Network Address
Routers
Level Sets
Devices
Categories
Control Panels
etc.


