THE
SCIENCE
BEHIND HEAT
STEP 5:
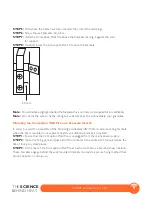
Drill where the holes have been marked, then insert the wall plugs.
STEP 6:
Screw the wall brackets into place.
STEP 7:
Hold the Conception Wall Fire above the brackets, leaning it against the wall
for support.
STEP 8:
Carefully lower the Conception Wall Fire onto the brackets.
Note:
You will notice a slight gap behind the fireplace, this is normal as it is required for air ventilation.
Note:
Do not cut the wire to fix the wiring to a wall socket, as this will invalidate your guarantee.
Mounting the Conception Wall Fire on a Separate Hearth
In order to avoid the possibility of the fire being accidentally lifted from its side mounting brackets
when the fire is mounted on a separate hearth, an additional bracket is provided.
STEP 1:
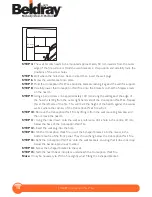
Ensure that the Conception Wall Fire is unplugged from the mains power supply.
STEP 2:
Open the fixing pack and place all of the contents into a container. This will reduce the
risk of losing any small pieces.
STEP 3:
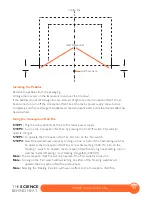
At the rear of the Conception Wall Fire at each side, there is a bracket (shown below).
These brackets engage behind the wall mounted brackets to provide a secure fixing method that
cannot be seen in normal use.
EH0089 Conception Wall Fire
9
30 mm


