background image


17


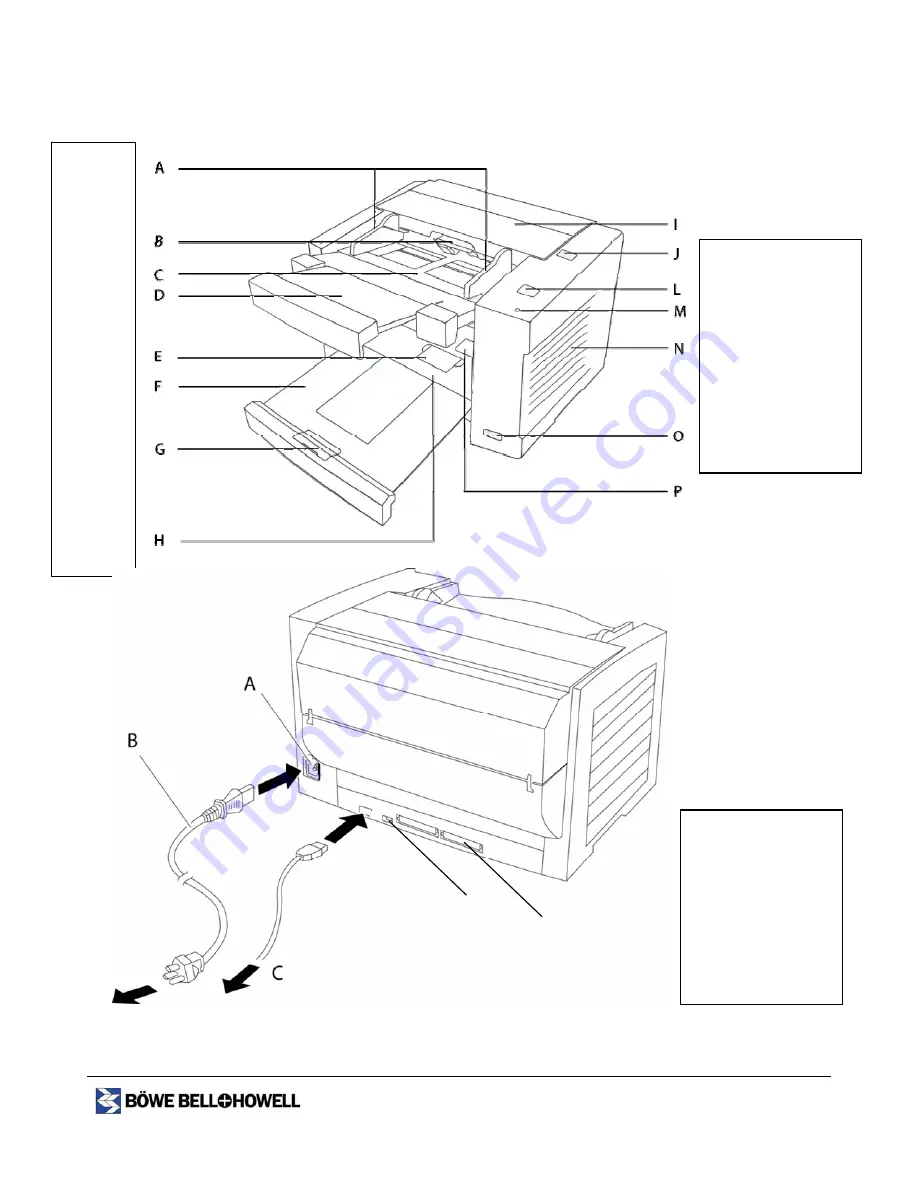
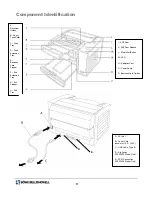
I – ADF Door 

J – ADF Door Release 

L – Stop / Start Button 

M – LED 

N – Radiation Vent 

O – Power Switch 

P – Business Card Guides 

A - 
Document 
Guides 

B - Paper 
Feed Roller 

C – Feed 
Tray 

D – Feed 
Extension 
Tray 

E – 
Business 
Card 
Stopper 

F – Exit 
Extension 
Tray 

G – Exit 
Stopper 

H – Exit 
Tray 

A – AC Inlet 
 
B – Power Cord  
(shown for 100 – 120V) 
 
C – USB Cable Type B 
 
D – Dip Switch  
(1200/1400 Model Only) 
 
E – SCSI Connection 
(1200/1400 Model Only) 
  

D

E


 Component Identification 


Summary of Contents for Sidekick 1200

Page 1: ...Sidekick Operator Manual Color Scanner Part Number S005545 E Model 1200 1400 1400u ...

Page 2: ...ansmitted stored in a retrieval system or translated into any human or computer language in any form or by any means electronic mechanical magnetic optical chemical manual or otherwise without the prior written permission of the copyright owner Böwe Bell Howell Scanners L L C 760 South Wolf Road Wheeling IL 60090 6232 USA Böwe Bell Howell Scanners L L C 760 South Wolf Road Wheeling IL 60090 6232 U...

Page 3: ...MENTS 26 CLEARING PAPER JAMS 28 STOP START BUTTON OPERATION 30 FEED MODES 32 DETECT DOUBLE FEED 34 OPERATOR MAINTENANCE 35 CLEANING OUTSIDE OF THE SCANNER 35 CLEANING INSIDE THE SCANNER 35 CLEANING THE ROLLERS AND SENSORS 36 CLEANING THE CIS GLASS AND SENSOR ROLLERS 39 REPLACING CONSUMABLES 41 REPLACING THE PAPER FEED ROLLER MODULE 41 REPLACING THE RETARD ROLLER MODULE 44 REPLACING THE FRONT AND B...

Page 4: ...HE IMPRINTER UNIT 73 INSTALLING THE IMPRINTER UNIT 74 APPENDIX 4 IMPRINTER 0123085 81 COMPONENT IDENTIFICATION 82 INSTALLING THE IMPRINTER UNIT 84 APPENDIX 5 INK CARTRIDGE S005506 91 CORRECTING FAULTY PRINTING 92 INSTALLING THE INK CARTRIDGE 93 REMOVING THE INK CARTRIDGE 94 PRINTING ERROR BOOKMARK NOT DEFINED CLEANING THE INK CARTRIDGE 95 SPECIFICATIONS INK CARTRIDGE 96 APPENDIX 6 WHITE ROLLER KIT...

Page 5: ...interference in which case the user will be required to correct the interference at his own expense FCC Warning To assure continued FCC compliance the user must use only shielded interface cable and the provided power supply cord Also any unauthorized changes or modifications to this equipment would void the user s authority to operate this device For Canada THIS CLASS A DIGITAL APPARATUS COMPLIES...

Page 6: ...ins the detailed information you need to get the most out of your Sidekick scanner About Sidekick Your Sidekick scanner offers the following features Simplex and Duplex scanning Black and White Grayscale and Color scanning Automatic document feeder that holds up to 120 pages Ultrasonic multi feed detection 1400u model only VRS technology for exceptional image quality USB 2 0 cable for immediate pl...

Page 7: ...e documents Types of documents to avoid Overhead projector sheets other plastic films cloths or metallic sheets Paper with irregularities such as tabs staples paste etc Documents with wet ink Thick or irregular documents such as envelopes documents that are glued together etc Copying paper such as carbon paper Damaged or wrinkled documents Irregularly shaped documents Photographs Heat sensitive pa...

Page 8: ...n Duplex Approx 16 images min Simplex Approx 18 pages min Duplex Approx 32 images min Multi feed Detection Length Ultrasonic Resolution Binary or Grayscale 100 600 dpi Color with VRS 100 400 dpi Optical 600 dpi Output Options Binary Grayscale 8 bit and Color 24 bit Image Enhancement VRS Cropping Deskew Brightness and Contrast Control Size Onion Skin paper to Card Stock 2 0 x 2 8 in 50 8 x 70 mm to...

Page 9: ...1A 8W 200 240V 0 1A 3 5W 100 120V 0 1A 6W 200 240V Operating temperature and humidity Temperature 59 F to 86 F 15 C to 30 C Humidity 30 to 80 RH Storage temperature and humidity Temperature 32 F to 95 F 0 C to 35 C Humidity 10 to 80 RH Accessories Power cord USB 2 0 cable Roller cleaning paper CD ROM s Additional Features End User Replaceable Feeder and Sensor Rollers Electronic Color Dropout Red ...

Page 10: ...move all staples and paper clips from pages Do not disassemble the scanner This will void your warranty Do not place any liquids near the scanner Accidental spillage of liquid into the scanner may cause severe damage If this occurs turn the scanner off unplug the power cord and call for service Do not place books paper or other items on the scanner ...

Page 11: ...ged into the AC outlet if the scanner is not used for an extended period Do not place the scanner on an uneven or unstable surface Do not use the extended tray as a table When carrying the scanner do not use the trays as handles When carrying the scanner hold both side grips Do not insert your finger into the back slot of the scanner ...

Page 12: ...cal position Do not place the scanner near a heating appliance or an air conditioning vent Do not place the scanner in a room with extremely high or low humidity Do not place the scanner near other appliances generating large electro magnetic noise Do not place the scanner on carpet Static electricity can cause the scanner to malfunction ...

Page 13: ...aper may be harmful to your skin Please use protective gloves Do not use the roller cleaning paper near a heater or open flame This may cause a fire Do not store the roller cleaning paper in direct sunlight or in a location over 104o F 40o C Only use the roller cleaning paper to clean the rollers and scanning area If you need more information about the roller cleaning paper please refer to the Mat...

Page 14: ...e manufacturer Use a voltage level that does not vary more than 10 from the voltage level marked on the nameplate located on the back side of the scanner Do not use an extension cord The scanner must be connected to a grounded outlet Do not use a line conditioner transient suppressor or surge protector ...

Page 15: ...urface of the disc Do not leave the disc out of the protective case Do not leave the disc in direct sunlight or near heat sources Do not place heavy objects on the disc case or drop the case To clean the disc hold the disc by its edges and wipe it from the center to the edges with a dry soft cloth ...

Page 16: ...ded before installing the scanner Î NOTE It is highly recommended that you keep the original carton and all packing materials in case you need them later Please refer to the Repacking Instructions See page 60 Reference documents Roller cleaning paper Power and USB cables CDs ...

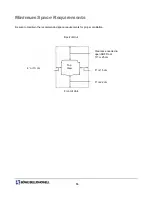
Page 17: ... Space Requirements Be sure to maintain the recommended space requirements for proper ventilation Top View Clearance needed to open ADF Door 10 or 25 cm 6 or 15 cm 9 or 22 cm 4 or 10 cm Back of Unit Front of Unit ...

Page 18: ...des A Document Guides B Paper Feed Roller C Feed Tray D Feed Extension Tray E Business Card Stopper F Exit Extension Tray G Exit Stopper H Exit Tray A AC Inlet B Power Cord shown for 100 120V C USB Cable Type B D Dip Switch 1200 1400 Model Only E SCSI Connection 1200 1400 Model Only D E Component Identification ...

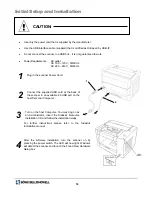
Page 19: ... scanner Power Cord Connect the supplied USB cord at the back of the scanner to an available 2 0 USB port on the host Personal Computer Turn on the host Computer You must log on as an Administrator insert the Sidekick Resource Installation CD and follow the installation steps For further instructions please refer to the Sidekick Installation manual After the software installation turn the scanner ...

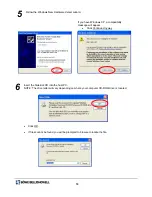
Page 20: ...a compatibility message will appear Click Continue Anyway Insert the Sidekick CD into the host PC NOTE The drive letter will vary depending on where your computer CD ROM drive is located Click OK If files cannot be found you will be prompted to browse to locate the file 5 6 ...

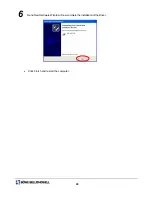
Page 21: ...20 Found New Hardware Wizard will now complete the installation of the Driver Click Finish and restart the computer 6 ...

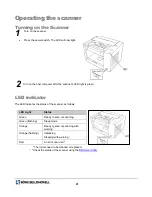
Page 22: ...LED indicator The LED indicates the status of the scanner as follows 1 The rollers need to be cleaned or replaced 1 2 Check the status of the scanner using the BBH User Utility 1 2 LED Light Status Green Ready to scan or scanning Green flashing Sleep mode Orange Ready to scan or scanning with warning 1 Orange flashing Initializing Sleeping with warning 1 Red An error occurred 2 ...

Page 23: ...be separated 1Fan the stack of documents to separate all the edges 2Hold both ends and bend the documents as shown in the illustration 3To flatten the documents hold firmly then pull apart as shown in the illustration Repeat these steps as necessary Carefully align the documents Adjust the document guides wider than the actual size of the documents 1 2 3 Document Guides ...

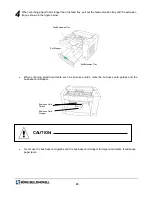
Page 24: ...below When scanning small documents such as business cards raise the business card guides and the business card stopper CAUTION Do not use the business card guides and the business card stopper for larger documents It will cause paper jams 4 Feed Extension Tray Exit Stopper Exit Extension Tray Business Card Guides Business Card Stopper ...

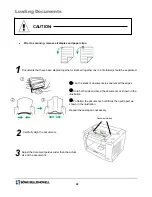
Page 25: ...to place the documents on the feed tray as shown in the figure below The quantity of documents should not exceed the limit mark on the document guide This may cause a paper jam or skew Adjust the document guides to the size of the documents 5 6 Feed Tray Paper Feed Roller Document Guides ...

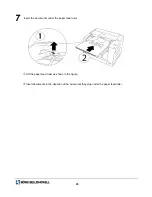
Page 26: ...25 Insert the documents under the paper feed roller c Lift the paper feed roller as shown in the figure d Insert documents in the direction of the arrow until they stop under the paper feed roller 7 ...

Page 27: ... feed 2 36 to 5 9 mils 0 06 to 0 15 mm Paper weight Single paper feed 10 7 to 33 9 lbs 40 to 127 g m2 Continuous paper feed 13 3 to 33 9 lbs 50 to 127 g m2 English WARNING Your warranty will be voided if you scan documents with staples paper clips or thick plastic documents like credit cards Feeding these items may cause scratches on the CIS glasses resulting in permanent vertical streaks in the i...

Page 28: ...llers dirty and chemicals can cause rollers to swell The quantity of documents in the feeder should not exceed the limit mark on the document guide This may cause a paper jam or skew Be sure to remove the documents from the exit tray after they are scanned When you scan an irregular or fragile document you should make a copy and then scan the copy When scanning a curled or folded document flatten ...

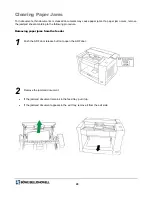
Page 29: ... remove the jammed sheet according to the following procedure Removing paper jams from the feeder Push the ADF door release button to open the ADF door Remove the jammed document If the jammed document remains in the feed tray pull it up If the jammed document appears in the exit tray remove it from the exit side 1 2 ...

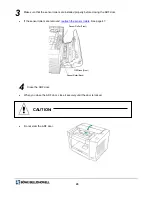
Page 30: ...the ADF door If the sensor rollers are removed reattach the sensor rollers See page 47 Close the ADF door When you close the ADF door close it securely until the door is locked English CAUTION Do not slam the ADF door 3 4 Sensor Roller Front CIS Glass Front Sensor Roller Back ...

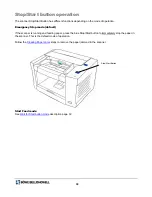
Page 31: ...mode default If the scanner is running and feeding paper press the blue Stop Start button to immediately stop the paper in the scanner This is the default mode of operation Follow the Clearing Paper Jams steps to remove the paper jammed in the scanner Start Feed mode See Wait for Start button mode description page 32 Stop Start Button ...

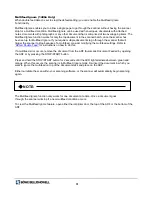
Page 32: ...er modifying the multifeed settings Refer to Detect Double Feed for instructions on how to do this If a multifeed error occurs remove the document from the ADF Automatic Document Feeder by opening the ADF or by pressing the STOP START button Press and hold the STOP START button for 2 seconds until the LED light alternates between green and orange When this occurs the scanner is in Multifeed Ignore...

Page 33: ...and stop to feed the documents in the scanner This is the standard mode of operation Manual Feed Set Manual feed Mode selection to On Click the Start Batch button or button with similar name in the Scan Application and start feeding manually the batch of documents one by one in the feed rollers As the lead edge of a document comes close to the feed rollers the paper feed rollers will automatically...

Page 34: ...ing and will continue till the feeder is empty or till the operator presses the Start Stop key to STOP the batch 4 During the Scan operation press the Stop Start button to STOP scanning This is not an emergency stop as the scanner will first complete scanning the document then stop prior feeding the next document The operator now manually controls the scanner START and STOP document feed operation...

Page 35: ...ted The default for Detect Double Feed is ON 1 Navigate to your scanning application and select Settings 2 Click the More button in the Settings dialog box 3 Select the Detect Double Feed button in the Feeding Features section of the Advanced Settings dialog box 4 If the Detect Double Feed function operates incorrectly adjust the sensitivity level by selecting one of the levels in the Sensitivity ...

Page 36: ...e the scanner Clean the scanner at least once a week or every 20 000 scans whichever comes first Clean the rollers and sensors if paper jamming marking or multiple sheet feeding occurs frequently See page 36 Clean the CIS front and back glass and sensor rollers if vertical lines appear on the scanned images See page 39 To maintain proper scanning clean the scanner components frequently and use cle...

Page 37: ...r cleaning paper bag is left opened for a long period of time the alcohol will evaporate Please use the roller cleaning paper immediately after opening the bag For supplies and accessories visit our Böwe Bell Howell Scanners store at www bbhscanners com Turn the power off Push the ADF door release to open the ADF door 1 2 ...

Page 38: ...or and reflector sheets with a cotton swab When wiping off dust or dirt from the roller surfaces hold the rollers to prevent them from rotating and wipe the rollers all the way around proceeding from one end to the other in the direction of the arrows shown below 3 A Waiting Sensor B Paper Feed Roller C Separation Roller D Free Rollers E Starting Position Sensor F Free Rollers Drive Rollers Drive ...

Page 39: ...lled properly before closing the ADF door Close the ADF door When you close the ADF door close it securely until the door is locked Do not slam the ADF door Clear the roller cleaning counter with the BBH User Utility After cleaning the rollers click Clear Counter button for After Clean Roller in the BBH User Utility See page Error Bookmark not defined 4 5 6 7 A Reflector Sheet for Ending Sensor B ...

Page 40: ...o open the ADF door Clean the CIS front and back glasses and the sensor rollers using the roller cleaning paper If the sensor rollers are removed while cleaning re attach them after cleaning 1 2 3 A Sensor Roller Front B CIS Glass Front C Sensor Roller Back CIS Glass Back Sensor Roller Front ...

Page 41: ...40 Close the ADF door When you close the ADF door close it securely until the door is locked Do not slam the ADF door 4 ...

Page 42: ...ns or sooner if cleaning inside the scanner no longer improves paper jamming slipping multi feeding marking and similar feeding problems Replacing the Paper Feed Roller Module Turn the power off Push the ADF door release to open the ADF door Push the two green levers down at both ends of the paper feed roller module to unlock the paper feed rollers When moving the green levers do not apply pressur...

Page 43: ... roller module with its gear on the right Hang both ends of the paper feed roller module While slightly lifting the paper feed roller module pass the claw along the groove of the feed cover Attach the bearings at both ends of the paper feed roller module into the guide grooves of the chassis 4 5 A Claw B Groove C Paper Feed Case A Chassis B Bearings C Green Levers ...

Page 44: ...s until they click into place After installing the paper feed roller module confirm that the feed rollers can be moved lightly in the vertical direction Close the ADF door When you close the ADF door close it securely until the door is locked Do not slam the ADF door 6 7 ...

Page 45: ...d Roller Module Turn the power off Push the ADF door release to open the ADF door Remove the retard roller cover Remove the retard roller module in the direction of the arrow 1 2 3 4 Retard Roller Module Retard Roller Cover ...

Page 46: ...haft with the metal holder groove Make sure that both ends of the shaft reach the holder springs Close the retard roller cover Close the ADF door When you close the ADF door close it securely until the door is locked Do not slam the ADF door 5 6 7 Metal Holder Wider Groove ...

Page 47: ...o open the ADF door Remove the current Front and Back Sensor Rollers Using your finger roll up the right side of the Sensor Roller Front and remove it While pushing the wire springs of both sides lift the Sensor Roller Back and remove it 1 2 3 Sensor Roller Front Sensor Roller Back Wire spring ...

Page 48: ... door side Placing the non gear side close to the ADF door release attach the shorter Sensor Roller Back to the ADF door by matching the grooves to the guides Push the Sensor Roller Back and confirm that it is locked by the springs on both sides 4 Sensor Roller Back Back View ADF Door ...

Page 49: ... release first and then attach the other side Confirm both Sensor Rollers rotate lightly Rotate the Sensor Rollers pushing them lightly with finger Close the ADF door securely until the door is locked Do not slam the ADF door Clear the counter Clear the Replace Roller counter in the BBH User Utility Click Clear Counter button for After Replace Roller in the BBH User Utility 5 6 7 Back View Sensor ...

Page 50: ...Firmware version Interface and the status of terminator and imprinter Scanner Counter Displays System counter After Clean Roller counter and After Replace Roller counter Clear Counter Clears After Clean Roller counter or After Replace Roller counter Sleep Mode Enables or Disables Sleep Mode Set the time out before entering Sleep Mode For 1400u only enabling and disabling the sleep mode is not avai...

Page 51: ...these instructions for installation Start up 1 Click the Start button in the taskbar and select Programs BBH Scanner Tools 2 Select the BBH User Utility Î NOTE When starting up the BBH User Utility the Select Scanner dialog box may appear If the dialog box appears select a scanner Refer to the Select Scanner Dialog box for more information See page 53 Functions and Settings Main Dialog Box ...

Page 52: ...are their descriptions System Displays the total number of documents scanned After Clean Roller Displays how many documents have been scanned since the last time the rollers have been cleaned Warning indicates how many documents can be scanned between the times the rollers need to be cleaned When the After Clean Roller count is greater than Warning count rollers need to be cleaned After Replace Ro...

Page 53: ...le Sleep Mode Sleep Mode This dialog box specifies whether Sleep Mode is enabled or not If this check box is selected Sleep Mode is enabled For 1400u only enabling and disabling the sleep mode is not available Waiting Time Specifies the Sleep Mode enable time after the last scanned document Range is 1 min 60 min 1 min step Default is set to 15 min OK button Sets the Sleep Mode time in the scanner ...

Page 54: ...53 Select Scanner Select Scanner dialog box This selects your scanner OK button Enter the scanner model selection Cancel button Cancels the settings ...

Page 55: ... checked the User Utility error message will pop up to notify you of errors that have occurred Error Pop Up When checked the User Utility will pop up to notify you of errors that have occurred Audible Error Alert When checked there will be an audible error alert notifying you of errors that have occurred Warning sound file To change the warning sound file click on the Reference button next to the ...

Page 56: ...k on the User Utility icon on the task tray and select Display User Utility Dialog Box to display the User Utility window Operation Setup Right click on the User Utility icon on the task tray and select Operation Setup to display the User Utility Operation Setup window Exit To quit the User Utility right click on the User Utility icon on the task tray and select Exit ...

Page 57: ...per Place the documents back in the document feed tray Document remains in the scanner Document sensors are dirty Open the door and remove the paper Clean the Sensors See page 37 U23 Multifeed occurred Please open the door and remove the paper Place the documents back in the document feed tray Double feed occurred Rollers are dirty Open the door and remove the jammed paper Clean the rollers See pa...

Page 58: ... the computer is not installed correctly Check your computer USB interface and see if it is configured via Device Manager s properties The scanner is connected via USB hub Do not connect via USB hub USB connection The USB cable does not have a High Speed logo Use the cable provided with the Sidekick scanner The computer cannot recognize the SCSI card Check your computer whether the SCSI card is in...

Page 59: ...cur frequently or the scanner stops loading while scanning The document has a length of less than 70 mm 2 75 in Make a copy of the document on paper of the specified size and scan the copy The scanned document is blank The document to be scanned was loaded face down upside down Load the document correctly See page 22 The CIS glasses are dirty Clean the CIS glasses See page 39 Vertical lines appear...

Page 60: ...ing Disable OFF Not last device in the SCSI chain Recommended SCSI Interface Boards Adaptec SCSI 2940U or Kofax Adrenaline 450 or Adrenaline 650i or contact your local reseller Switch ID No 2 1 0 Remarks 0 OFF OFF OFF 1 OFF OFF ON 2 OFF ON OFF 3 OFF ON ON 4 ON OFF OFF 5 ON OFF ON 6 ON ON OFF Default setting 7 ON ON ON ...

Page 61: ... of the original packing materials Improper repacking of the scanner may result in a service charge to repair the scanner The scanner should be handled in the normal horizontal position Materials Required Original Scanner Carton Original Packing Materials Shipping Tape and Scissors Turn the power switch off and disconnect your scanner from the electrical outlet and interface cable Return the feed ...

Page 62: ...ollers Kit S005503 includes Black Sensor Rollers standard configuration Kit S005511 includes White Sensor Rollers to be used with White Roller configuration typically after replacing rollers with White Roller Kit S005505 Back Sensor Roller short Front Sensor Roller long Please read all instructions carefully before installation ...

Page 63: ...to open the ADF door 1 2 3 Push the two green levers down at both ends of the paper feed roller module to unlock the paper feed rollers When moving the green levers do not apply pressure in any other direction other than in the direction shown by the arrows otherwise the levers may break ...

Page 64: ...tall the new paper feed roller module reversing instructions from step 4 with its gear on the right While slightly lifting the paper feed roller module pass the claw along the groove of the feed cover Afterwards attach the bearings at both ends of the paper feed roller module into the guide grooves of the chassis in the scanner 4 5 A Claw B Groove C Paper Feed Case ...

Page 65: ...ws until they click into place After installing the paper feed roller module confirm that the feed rollers can be moved lightly in a vertical direction Close the ADF door When you close the ADF door close it securely until the door is locked Do not slam the ADF door 6 7 ...

Page 66: ...d Roller Module Turn the power off Push the ADF door release to open the ADF door Remove the retard roller cover Remove the retard roller module in the direction of the arrow 1 2 3 4 Retard Roller Cover Retard Roller Module ...

Page 67: ...tching the shaft groove with the metal holder groove Make sure that both ends of the shaft reach the springs of the holder Close the retard roller cover Close the ADF door When you close the ADF door close it securely until the door is locked Do not slam the ADF door 5 6 7 ...

Page 68: ...he ADF door Remove the current Front and Back Sensor Rollers Using your fingers roll up the right side of the Sensor Roller Front and remove it While pushing the wire springs of both sides lift the Sensor Roller Back and remove it 1 2 3 Sensor Roller Front Sensor Roller Back Wire spring ...

Page 69: ...ng the non gear side close to the ADF door release attach the shorter Sensor Roller Back to the ADF door by matching the grooves to the guides Push the Sensor Roller Back and confirm that it is locked by the springs on both sides 4 Sensor Roller Back Back View ADF Door ...

Page 70: ...e guides Attach the side close to the ADF door release first and then attach the other side Confirm both Sensor Rollers rotate freely Rotate the Sensor Rollers pushing them lightly with fingers Close the ADF door securely until the door is locked Clear the counter Clear the Replace Roller counter in the BBH User Utility Click Clear Counter button for After Replace Roller in the BBH User Utility 5 ...

Page 71: ...tive gloves Do not use the roller cleaning paper near a heater or open flame This may cause a fire Do not store the roller cleaning paper in direct sunlight or in a location over 104o F 40o C Only use the roller cleaning paper to clean the rollers and scanning area If you need more information about the roller cleaning paper please refer to the Material Safety Data Sheet MSDS available upon reques...

Page 72: ...1 Appendix 3 Imprinter 0123060 Installation Manual For Sidekick 1400 Only Please read all instructions carefully before installing the imprinter scanner Then proceed to the install ink cartridge section ...

Page 73: ...ON Before installing the ink cartridge please note the following precautions and instructions Do not touch the print head with your hands or with a dirty object Do not subject the ink cartridge to shock If the date marked on the ink cartridge box has expired the print quality may be affected If the ink cartridge is used six months after unpacking the unit the print quality may be affected Be sure ...

Page 74: ...73 Component Identification Clamper Connector Ink cartridge adjusting lever Ink Cartridge Carriage Scale ...
Page 75: ...ling the Imprinter Unit 1400 Only Turn off the power to the scanner Open the imprinter door Remove the cables from the clamper Insert the upper pins to the guides by matching the grooves with the guides 1 2 3 4 ...

Page 76: ...guides until they are locked by the springs Connect the cables Insert the cables in the clamp Close the imprinter door When you close the imprinter door close it securely until the door is locked Do not slam the imprinter door 5 6 7 8 ...

Page 77: ...g the Ink Cartridge Remove the protective sheet Insert the cartridge into the carriage Move the carriage to the cartridge exchange position Lock the cartridge adjusting lever 1 2 3 4 Ink Cartridge Exchange Position ...

Page 78: ...77 Removing the Ink Cartridge Pinch the cartridge adjusting lever c and lift it d You can now remove the ink cartridge 1 ...

Page 79: ... Adjusting the printing position Move the carriage to set desired printing position on the scale S mark indicates the printing position Printing is not available in any other position Printing Position 1400 only 1 ...

Page 80: ...program The ink jets and print quality should be improved Cleaning dirt on the print head Wipe and clean the print head with moistened tissue paper Do not use any material that includes alcohol e g roller cleaning paper Î NOTE Depending upon the type of paper you use ink may leave stain inside the scanner e g rollers In this case clean it by using the Roller Cleaning Kit S005504 ...

Page 81: ...rox 4 million characters standard font Nozzles 12 nozzles Unusable document Plastic film Coated paper Storage environment Temperature 0 C to 40 C Humidity 10 to 80 RH Operating environment Temperature 15 C to 30 C Humidity 30 to 80 RH Ink cartridge S005506 ...

Page 82: ...81 Appendix 4 Imprinter 0123085 Installation Manual For Sidekick 1400u Only ...

Page 83: ...ON Before installing the ink cartridge please note the following precautions and instructions Do not touch the print head with your hands or with a dirty object Do not subject the ink cartridge to shock If the date marked on the ink cartridge box has expired the print quality may be affected If the ink cartridge is used six months after unpacking the unit the print quality may be affected Be sure ...

Page 84: ...83 Component Identification Cartridge ...
Page 85: ...nter Unit Turn off the power to the scanner Open the imprinter door Insert the upper pins to the guides by matching the grooves with the guides Insert the lower pins to the guides until they are locked by the springs 1 2 3 4 ...

Page 86: ...cables in the clamp Paste the ink cartridge exchange label provided inside the imprinter door Close the imprinter door When you close the imprinter door close it securely until the door is locked Do not slam the imprinter door 5 6 7 8 ...

Page 87: ...g the Ink Cartridge Remove the protective sheet Insert the cartridge into the carriage Move the carriage to the cartridge exchange position Lock the cartridge adjusting lever 1 2 3 4 Ink Cartridge Exchange Position ...

Page 88: ...87 Removing the Ink Cartridge Pinch the cartridge adjusting lever c and lift it d You can now remove the ink cartridge 1 ...

Page 89: ...Adjusting the printing position Move the carriage to set desired printing position on the scale S mark indicates the printing position Printing is not available in any other position Printing Position 1400u only 1 ...

Page 90: ...program The ink jets and print quality should be improved Cleaning dirt on the print head Wipe and clean the print head with moistened tissue paper Do not use any material that includes alcohol e g roller cleaning paper Î NOTE Depending upon the type of paper you use ink may leave stain inside the scanner e g rollers In this case clean it by using the Roller Cleaning Kit S005504 ...

Page 91: ...rox 4 million characters standard font Nozzles 12 nozzles Unusable document Plastic film Coated paper Storage environment Temperature 0 C to 40 C Humidity 10 to 80 RH Operating environment Temperature 15 C to 30 C Humidity 30 to 80 RH Ink cartridge S005506 ...

Page 92: ...or dirty object Do not subject the ink cartridge to shock If the date marked on the box has expired the print quality may be affected If the ink cartridge is used six months after unpacking the unit the print quality may be affected Be sure that the storage temperature is between 32 F and 104 F 0 C and 40 C Store the ink cartridge away from direct sunlight Do not clean ink cartridge with alcohol ...

Page 93: ...cartridge is dirty or if the ink cartridge is not used for a long period of time it may not print properly In this case please clean the ink head as follows Clean the nozzles of the ink cartridge with the BBH User Utility software by pressing Clean Imprinter Wipe the head of the ink cartridge using a damp tissue If the ink does not flow even after performing the procedure above the ink cartridge i...

Page 94: ...g the Ink Cartridge Remove the protective sheet Insert the cartridge into the carriage Move the carriage to the cartridge exchange position Lock the cartridge adjusting lever 1 2 3 4 Ink Cartridge Exchange Position ...

Page 95: ...94 Removing the Ink Cartridge Pinch the cartridge adjusting lever c and lift it d You can now remove the ink cartridge 1 ...

Page 96: ...program The ink jets and print quality should be improved Cleaning dirt on the print head Wipe and clean the print head with moistened tissue paper Do not use any material that includes alcohol e g roller cleaning paper Î NOTE Depending upon the type of paper you use ink may leave stain inside the scanner e g rollers In this case clean it by using the Roller Cleaning Kit S005504 ...

Page 97: ...rox 4 million characters standard font Nozzles 12 nozzles Unusable document Plastic film Coated paper Storage environment Temperature 0 C to 40 C Humidity 10 to 80 RH Operating environment Temperature 15 C to 30 C Humidity 30 to 80 RH Ink cartridge S005506 ...

Page 98: ...s carefully before installation Î NOTE VRS image enhancement cropping and deskew are not functional with the white roller kit Please de select VRS cropping and deskew when scanning with the white sensor roller kit After changing default black sensor rollers to optional white sensor rollers run the Shading adjustment utility as described ...

Page 99: ...en the ADF door Remove the current Front and Back Sensor Rollers Using your fingers roll up the right side of the Sensor Roller Front and remove it While pushing the wire springs of both sides lift the Sensor Roller Back and remove it 1 2 3 Sensor Roller Front Sensor Roller Back Wire spring ...

Page 100: ...ng the non gear side close to the ADF door release attach the shorter Sensor Roller Back to the ADF door by matching the grooves to the guides Push the Sensor Roller Back and confirm that it is locked by the springs on both sides 4 Sensor Roller Back Back View ADF Door ...

Page 101: ... longer white Sensor Roller Front by matching the grooves to the guides Attach the side close to the ADF door release first and then attach the other side Confirm both Sensor Rollers rotate freely Rotate the Sensor Rollers pushing them lightly with fingers Close the ADF door securely until the door is locked Do not slam the ADF door 5 6 7 ...

Page 102: ...nner and the host computer Double click and run the program ShadingutilityBH exe in the Sidekick CD enclosed with the scanner Î NOTE The scanner should be turned on before starting the Personal Computer Turn on the power of the host computer when the scanner s LED is green Enter the password GOSHADING 1 2 3 4 ...

Page 103: ...ading button The Shading Dialog box will open and the Shading Utility will start adjusting Î NOTE If the password is wrong the alert Password Error will show and the Shading Utility won t start Do not turn off the power of the scanner and the host computer while adjusting 5 6 ...

Page 104: ... the Shading Utility failed the Shading Dialog box will read Failed to adjust In this case clean the CIS glass and sensor rollers again confirm that the shading paper is clean and retry If shading still fails call for service Click OK on the Shading Dialog box and click Close on the Main Dialog box 7 8 ...

Page 105: ...nts 31 M Main Dialog 57 P Paper feed roller 34 44 48 49 50 67 72 73 Paper Jams 37 password 61 Power Source 14 Printing 93 R Removing the Ink Cartridge 92 Repacking 69 Replacing Consumables 48 Replacing Sensor Rollers 53 Replacing the Paper Feed Roller 48 71 Replacing the Retard Roller 51 74 Roller Exchange 70 Roller Cleaning Paper 12 S Safety and Precautions 9 Scanner Specifications 6 SCSI Interfa...

Page 106: ...registered trademark of Intel Corporation VirtualReScan Capio Kofax ImageControls and Adrenaline are registered trademarks of Kofax Image Products ISIS PixTools are registered trademarks of Pixel Translations a division of Captiva Software Corporation TWAIN is a registered trademarks of the TWAIN Working Group Adobe Acrobat is a registered trademark of Adobe Systems Incorporated All other products...

Page 107: ...ther a make a reasonable quantity of copies of the SOFTWARE solely for backup or archival purposes or b transfer the SOFTWARE to a single hard disk provided that you keep the original solely for backup or archival purposes All other copies of the SOFTWARE are in violation of this Agreement 3 You may not rent or lease the SOFTWARE but you may transfer your right under this License Agreement on a pe...

Page 108: ...UPPLIER WARRANTS THAT THE SOFTWARE WILL BE ERROR FREE OR THAT IT WILL MEET YOUR REQUIREMENTS NEITHER BÖWE BELL HOWELL NOR BÖWE BELL HOWELL S SUPPLIER SHALL BE LIABLE FOR ANY DAMAGE SUFFERED BY YOU INCLUDING BUT NOT LIMITED TO CONSEQUENTIAL INCIDENTAL SPECIAL OR PUNITIVE DAMAGES THE ABOVE LIMITATIONS SHALL APPLY REGARDLESS OF THE FORM OF ACTION WHETHER IN CONTRACT TORT INCLUDING NEGLIGENCE STRICT P...

Reviews: