Action and Event Tables
99
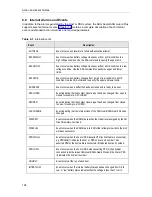
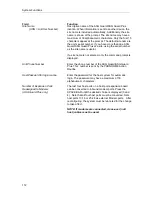
Field
Function
Parameters
Type the parameter, or parameters, that you want to associate
with this Action Routine. Press the ENTER key to advance the
cursor to the next field.
Schedule Date
The day on which you want the Action Routine to activate, where:
today
= The Action Routine is scheduled to occur today at the
time specified (pressing the ENTER key selects this date).
mm/dd/yy
= Type the month, day, and year that you want the
Action Routine to occur and then press the ENTER key.
nn
= Type the number of days from today that you want the
Action Routine run and then press the ENTER key.
Schedule Time
The time of day (using the 24-hour clock format) at which you
want the Action Routine to activate, where:
now
= The Action Routine will occur immediately (ASAP).
Pressing the ENTER key selects this time.
hh:mm
= Type the time of day, in 24-hour clock format (for
example, 2:00 PM is given as 14:00) at which you want the
routine run and then press the ENTER key.
nn
= Type the number of minutes from now that you want the
routine run and then press the ENTER key.
Event
If you are simulating a particular Event for testing, type the event
here as it would have been received to trigger this action. For
example, if you test PHONHOME, this field could be used to
signify it is a test. The system defaults to "Sysop Generated".
Comment
Type any comments that you want attached to the Event.
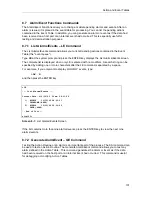
8.6.5 Delete Action Item – XA Command
The Delete Action Item command allows you to remove an action item from the Action Table.
Type XA at the system prompt and press the ENTER key to display the Delete Action Item
screen.
Depending on the number of action items in the table, you may be prompted to press the ENTER
key to view additional action items. If the number corresponding to the action item you wish to
delete is higher than 18, press the ENTER key to display the next screen of action items.
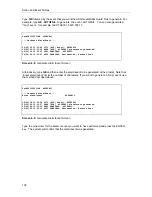
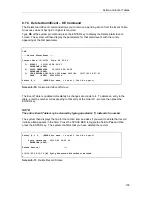
The Action Table is updated immediately as changes are made to it. To delete an entry from the
table, enter the number corresponding to that entry following the Select # - prompt, then press the
ENTER key. The system then displays the line for that action item and asks if you want to delete
that record. Initially, a No appears in the field. Press the SPACE BAR to toggle the field to Yes
and then press the ENTER key. The system confirms that you have deleted that record.
Summary of Contents for Lucent Technologies Access Security Gateway Guard
Page 12: ...x Page intentionally left blank ...
Page 28: ...ASG Guard Overview 16 Page intentionally left blank ...
Page 36: ...Physical Connections 24 Page intentionally left blank ...
Page 60: ...Modem Port Setup 48 Page intentionally left blank ...
Page 82: ...Modifying the User Database 70 Page intentionally left blank ...
Page 120: ...Action and Event Tables 108 Page intentionally left blank ...
Page 158: ...User Connectivity 146 Page intentionally left blank ...
Page 188: ...Log Functions 176 Page intentionally left blank ...
Page 236: ...Troubleshooting 224 Page intentionally left blank ...
Page 252: ...Internal Battery Replacement 240 Page intentionally left blank ...
Page 258: ...Glossary of Command References 246 Page intentionally left blank ...


