background image

Anchor

 Wi

nch
 Wi

rin

g Di

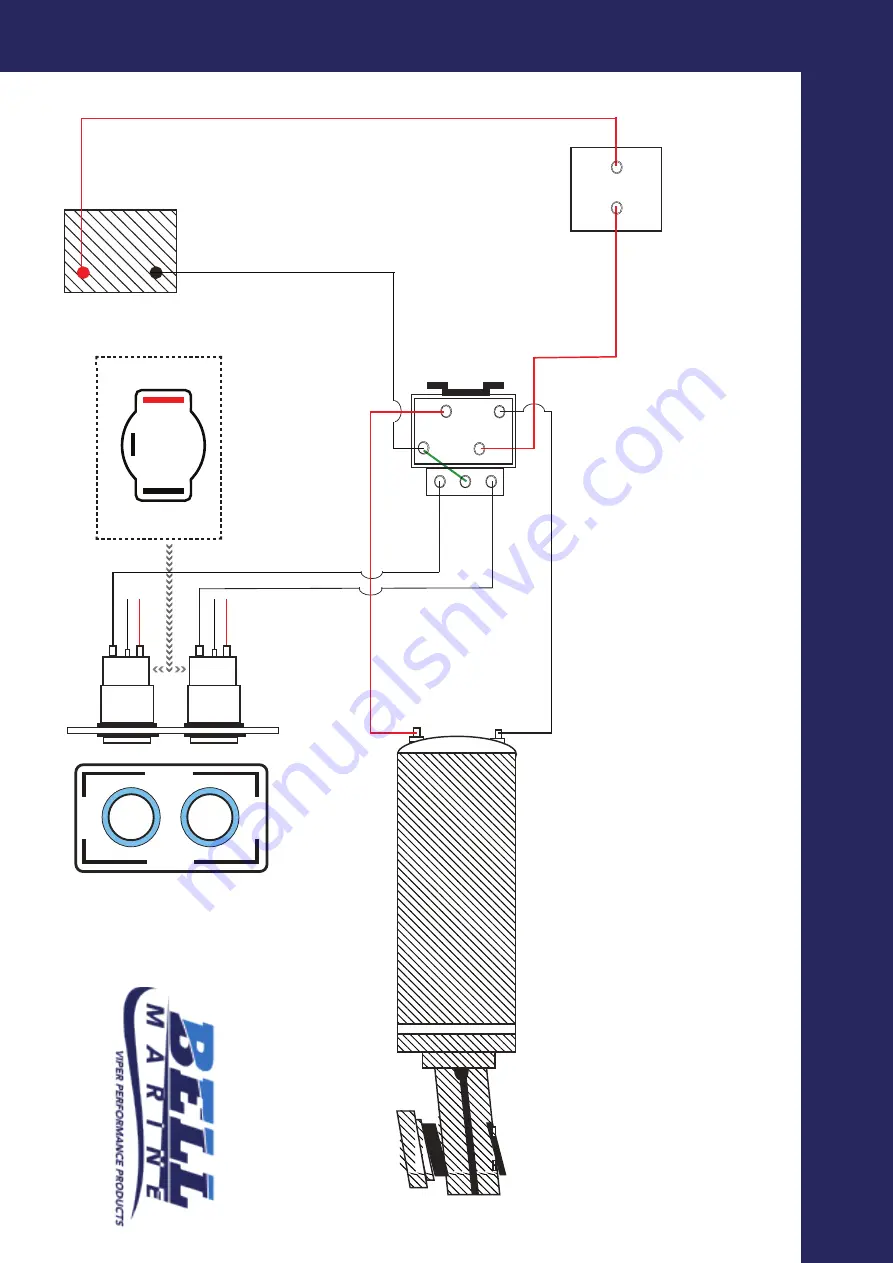
ag

ram
 A

Ba

ttery

Electri

Wi

nch

M

otor

Up

 Dow
n

Switch

100
 A

m

p

Cir

cu

it Brea
ker

+

-

B&S 
Cabl
e

Re

versi
ng

Sol

enoi
d

B&S 
Cabl
e

B&S 
Cabl
e

B&S 
Cabl
e

4

BAT

AU
X

RE: 01072016C

S

  SERIES GRAVITY FEED DRUM WIN

CH

Please not

e: solenoid must

be moun

ted with t

er

minals

in the up position.

Polar
ity (+/-) only denot

es

mot
or r
ota
tion dir

ec

tion

Onl

use 
3 B&S
 Ti

nned 

M

arine 

Cabl
e =

 25mm

 Sq

 Cabl
e

All 

sw

itch

 wi

re

 must 

be 

1.5mm

 Ti

nned 

M

ari

ne 

Cabl
e

https://bellmar

ine
.c

om.au/wp

-c

on

ten

t/uploads/GR

AVIT
YFEED

-WIRING-DIA

GR

A

M.pdf

WARN

IN

G: Remember nev

er

 to connect

 your bat

tery leads until your inst

allat

ion is complete!

PL

EA

SE 

NO

TE:
 Pul

l y

our 
wi

ring 

loom 

thr

ough 

your 
boat 

first to cal

cul

ate the posi

tion 
of y
our

wi

nch
 ac

cessori

es bef

or

cut

ting 

an

hol

es.

Please 

note:

 Do 
not

 remove 

the 
seri
al 

number 

st

icker 
or 

dismant

le 

the 
el

ect

ric 

motor under any circumstances as you wi

ll voi
d your warrant

y as you could 

cause yoursel

f serious 

harm.

Every Vi

per wi

nch el

ectric motor i

s pressure tested and seal

ed in our factory to 

ensure 

no 

water i

ngress 

into 
your 

electri

c motor.

support@bellmarine.com.au

Viper

A

B

C

1

2

3

VIPER PER

FORMANC

E

VIPER PERFORMANCE

VIPER PERFORMANCE

VIPER PERFORM

ANCE

C

C

(+)

(-)

C

Rear view

TO 

+

TO 

TO 

+

TO 

Side view

-

-

-

-

+

+

bellmarine.com.au

Summary of Contents for Viper S Series

Page 1: ...E POWER MORE SPEED MORE TORQUE Factory 1 2 Network Drive Carrum Downs Victoria Australia 3201 Tel 61 3 9708 2846 Fax 61 3 9708 2845 sales bellmarine com au bellmarine com au Gravity Feed Free Fall Anchor Winch USER GUIDE ...

Page 2: ...ation use and storage of the Product 5 Have Warranty work installation performed by a authorized dealer or representative approved by the company if required 6 Except as noted in B 2 transportation charges to return the unit back to the manufacturer are the responsibility of the Purchaser 7 Labour costs incured at any authorised non authorised service centre shop and or place or repair are not cov...

Page 3: ...f WARNING Remember never to connect your battery leads until your installation is complete PLEASE NOTE Pull your wiring loom through your boat first to calculate the position of your winch accessories before cutting any holes Please note Do not remove the serial number sticker or dismantle the electric motor under any circumstances as you will void your warranty as you could cause yourself serious...

Page 4: ...working design see the list below to help you work out which direction will work for your installation These directions are based on your view if you are standing at the steering wheel and facing towards the bow Rope Installation Winch Motor is on the Right Starboard side feed the rope over the drum shaft Winch Motor is on the Left Port side feed the rope under the drum shaft Factory 1 2 Network D...

Page 5: ...the circuit breaker to power up your winch Press the down button for 1 2 seconds or until your winch starts to feed rope and release the switch immediately Once your anchor has hit the bottom if you require more rope simply reverse your boat back to release more rope Select boats neutral gear when your drum stops rotating press the up button for 1 2 seconds to lock your winch into gear DO NOT OVER...

Page 6: ...G LOOMS FOR MICRO RAPID GRAVITY FEED 1500 WINCHES Viper Viper P N 30034 MARINE WIRING LOOM FOR BOATS UP TO 6 MTR MICRO 1000 RRP 259 P N 30035 MARINE WIRING LOOM FOR BOATS UP TO 8 MTRS MICRO 1000 RRP 299 P N 30060 MARINE WIRING LOOM FOR BOATS 9MTRS UNDER SERIES 1500 RRP 399 P N 30061 CUSTOM MADE WIRING LOOM POA Anchor Winch Options PRO SERIES HAWSE PIPES Viper Viper PRO SERIES DELUXE ANCHOR SWIVELS...

Reviews: