background image

Summary of Contents for 5100AM

Page 1: ...de inoperable as covered by 3 33 then it can only provide incoming service and card dialer service It can also automatically dial and electronically transmit information read from a magnetic stripe on a credit card or keyed on a 15 button manual entry pad Fig 1 to a data center for immediate credit authorization check verification or inventory control In addition it is possible for a transaction t...

Page 2: ...ly Table A 2 05 Ordering Guide b a The 51OOAM Transaction II telephone set base consists of all the necessary circuitry including power unit and card reader and should be ordered as Base Telephone Set 51OOAM includes the following Cord Handset H4DU 50 c Cord Mounting D4BU 29 7 foot provided 840996003 Test Card B additional cards may be ordered Subscriber Instruction Booklet SIB 2482C One of the fo...

Page 3: ...Terminate the block suitable SEE NOTE PLUG INTO BASE OF TELEPHONE SET D4BU A 625A CONNECTING BLOCK MOJJNTING CONSISTS OF A 625C AND CORO A 42A CONNECTING BLOCK Fig 2 installation of 625A Connecting Block modular connecting blocks or adapters refer to Section 503 100 100 local loop into a connecting for the D4BU 29 mounting Warning Any magnetic stripe card cord but do not connect the mounting cord ...

Page 4: ...required for safety K and proper operation of the set Third conductor must be grounded If third wire is not provided and grounded the resistance of the set to electrostatic damage is 10wered and the probability of failure is greatly increased 3 o4 To intall 138 type faceplate proceed as follows 1 Remove disposable faceplate by lifting at the midpoints of the left and right edges When faceplate is ...

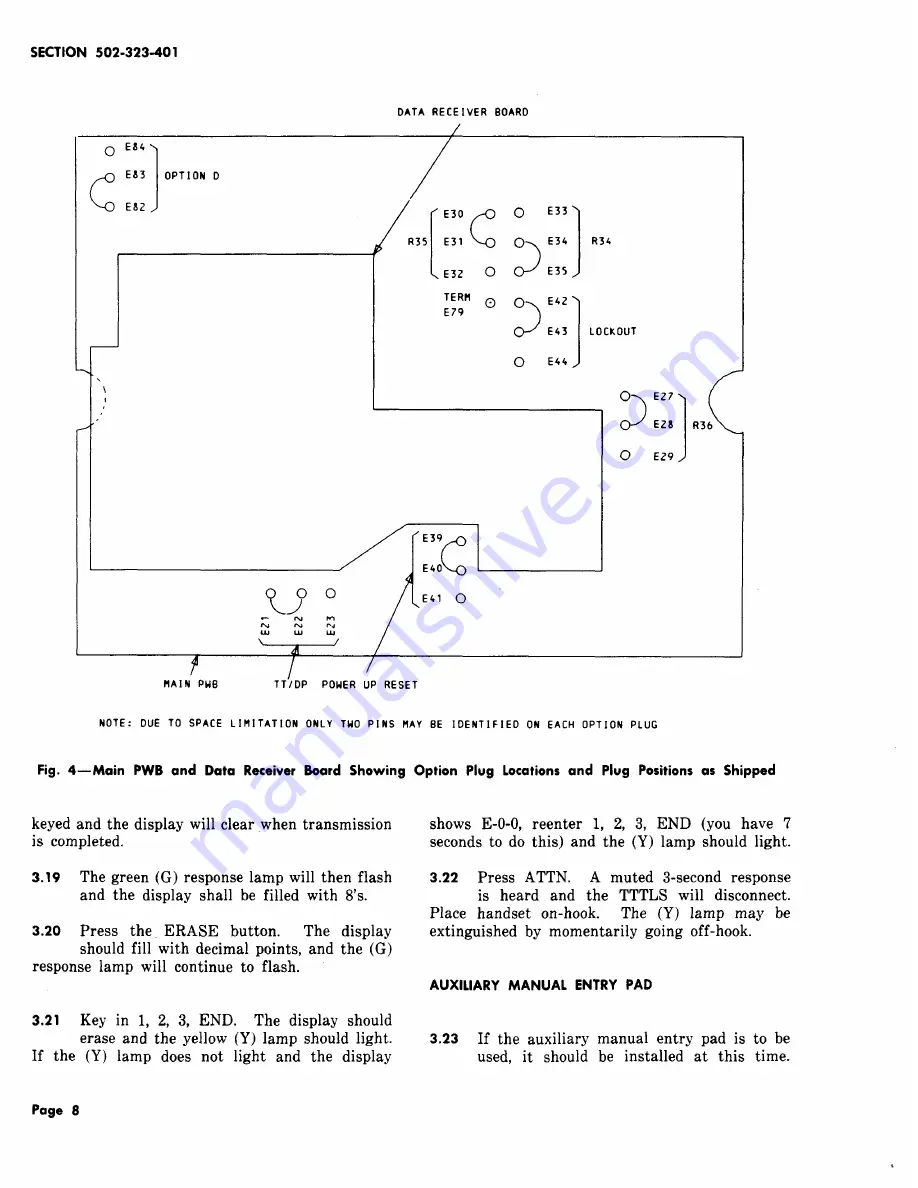
Page 5: ...d OPTIONS sticker which is pa ked with the base and attach it to the bottom of the base near the front If the service order does not call for the implementation of any options Dial Pulse Lockout or disconnection of the ringer at this time reassemble set and proceed to 3 12 1SS 1 SECTION 502 323 401 Note If the order calls for making dial of hand telephone set inoperable do not disable dial until a...

Page 6: ... for location of wiring option on control board TABLE D PLACEMENT OF OPTION PLUGS SEE NOTE OPTION pLUG POSITION RESULT Key Pad E42 E43 Not locked can dial out from key pad Lock E43 E44 out Locked cannot dial out from key pad TT DP E21 E22 Key pad dials in TT frequencies Dialing E22 E23 Key pad sends out dial pulses Power up E39 E40 Resets terminal to ON HOOK condition Reset following commercial po...

Page 7: ... progress tone sounder volume control Fig 1 Adjust volume control to acceptable level and depress OFF button REMOTE TEST PROCEDURE lr In the following tests there must not be over a 10 second delay between steps or the test line will interpret this as an error 3 16 Note If an interrupted 1 2 second on 1 2 second off lasting about 5 seconds is heard at any time an error is indicated The 1A Transact...

Page 8: ...l then flash and the display shall be filled with 8 s 3 20 Press the ERASE button The display should fill with decimal points and the G response lamp will continue to flash 3 21 Key in 1 2 3 END The display should erase and the yellow Y lamp should light If the Y lamp does not light and the display Page 8 shows E O O reenter 1 2 3 END you have 7 seconds to do this and the Y lamp should light 3 22 ...

Page 9: ...mounting plate under the spring Replace the screw holding the spring and the associated lead This should secure right side of mounting plate b Secure left side of mounting plate with 2 840694194 screws c Insert 651G key with cut out portion of key mounting to right and the two indexing or alignment holes over tabs on the mounting plate to the left d Secure right side of key using the other 3 4 5 t...

Page 10: ...trol board using a D 161488 connector Insulate the connection Note In later production models terminal Y1 is accessible at the lower right corner of the control board Connect the S mounting cord conductor to terminal Y1 Page 10 f Insulate and store any unused mounting cord leads 6 Pull slack out of mounting cord as upper housing and chassis are replaced Invert set and tighten captive screws holdin...

Page 11: ... Depress the END button on the manual entry pad of the 51OOAM telephone set base and then depress the END button on the 5000A 50 dial First instruction lamp is extinguished Kit of Parts and second lamp is lighted Depress OFF button and then the PIN key All lamps should now be extinguished This completes the testing procedure of the auxiliary manual entry pad 3 29 If the customer has a dialing card...

Page 12: ... be replaced with a 220 type hand telephone set that has been modified per 3 33 3 33 To restrict the dial in a 220 type telephone set proceed as follows 1 Remove handset cord from handset KS 21107 releaser or equivalent Page 12 hand using 2 Remove cover or number card retainer located just above dial using KS 21107 releaser or equivalent 3 Remove light seal plate and the 2 screws located under ret...

Page 13: ...ed 3 33 the set can not be E used as a standard telephone set The restricted handset may be unplugged and replaced for maintenance testing purposes Be sure to reinstall customer s handset when testing is completed 4 02 There are two fuses FI for 12 volt and F2 for 5 volt circuitry housed in plastic in line holders and located at the left rear corner of the main PWB If a fuse failure is suspected t...

Page 14: ... tone b Check for proper connection of cords and jacks c d e f g 4 04 Check for loose wire or PWB or control board connections on main Fig 11 Replacement of H4DU 50 handset cord and or 227A adapter Replacement of D4BU 29 mounting cord Replacement of TRIMLINE handset Replacement of auxiliary manual entry pad If the loss of the loop changes due to cable activity etc and or difficulty is encountered ...

Page 15: ...B G R VOL LIME CONTROL IBK SK 0 C SPKR c Q Bo o E L i d SPKR D w o SPEAKER Y G LEGENO SCREW TERMINAI IR Y G 8K R i I I I 1 I i I I I I I I I II f 0 BKI SH I I 0 BR 0 5 12 GRD 0 BR YI PUSH ON TUBULAR FITTING OVER ROUNO PIN D SPANISH TERMINALS THAT RECEIVE CORO SPADE SOLOEREO CONNECTION Fig 11 Partial I Ps 1 J J 1 F Schematic Showing Conductors Attached by Screws or Push On G VI ...

Reviews: