background image

 8

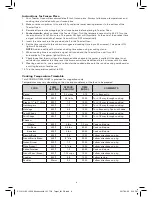
Instructions for Frozen Pizza

1.  Your Toaster Oven will accommodate a 9-inch frozen pizza. Always follow oven temperatures and 

cooking times included with your frozen pizza. 

2.  Make sure the crumb tray is inserted fully under the lower heating element in the bottom of the 

Toaster Oven.

3.  Remove all protective wrappings from frozen pizza before placing in Toaster Oven. 
4. 

For best results,

 always preheat the Toaster Oven. Turn the temperature control to 400ºF. Turn the 

timer control to 10 to 15 minutes. The power ON light will illuminate. At the end of the preheat time, 
a signal will sound and the Toaster Oven will turn OFF automatically. 

5.  Insert the wire rack into the provided shelf in the Toaster Oven.  
6.  Set the timer control to the minimum suggested cooking time (up to 30 minutes). The power ON 

light will illuminate.


NOTE

: Add an additional 4 minutes cooking time when using a cooking stone. 

7.  When cooking time is complete, a signal will sound and the Toaster Oven will turn OFF 

automatically. The power light will turn off.

8.  Check to see that the crust is golden brown, and the cheese in the center is melted. If the pizza is not 

satisfactorily cooked at this time, reset the timer control for an additional 4 to 5 minutes until it is done.

9.  Wearing oven mitts, use a spatula to transfer the cooked pizza onto the round packing cardboard or 

a cutting board; cut and serve. 

10. Turn the temperature control to OFF.

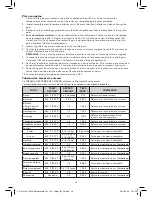
Cooking Temperature Timetable

This COOKING TIME CHART is provided for suggestions only. 
Temperatures may vary depending on the size and consistency of the food to be prepared

FOOD

TEMP. 

SETTING

APPROX. 

AMOUNT

TIME 

(MINS.)

COMMENTS

Bacon

450ºF

2-3 strips

5-10

Turn frequently.

Sausage

450ºF

5-6 links

20-25

Turn 1/2 way through cooking.

Steaks, 1/2” to 1” thick 

450ºF

1-2

15-30

Turn 1/2 way through cooking.

Hamburgers

450ºF

1-2

10-25

Turn 1/2 way through cooking.

Hot dogs

450ºF

3-4

10-25

Turn frequently. Cook until done.

Lamb Chops

450ºF

1-4

15-33

Turn 1/2 way through cooking.

Pork Chops

450ºF

1-4

20-25

Turn 1/2 way through cooking.

Chicken:

 Whole

350ºF

3 lbs.

1-2 hrs.

Cook until done.

On Bone

350ºF

3-4 lbs.

40-55

Cook until done.

Boneless

350ºF

3 lbs.

30-40

Cook until done.

Biscuits/Rolls 

400ºF

2-8

12-20

Follow directions on pkg.

French/Garlic Bread

400ºF

8” dia.

20-25

Follow directions on pkg.

Frozen Dinner 

400ºF

1-2

25-35

Follow directions on pkg.

Pizza (frozen)

400ºF

9” dia.

15-20

Follow directions on pkg.

Baked Potatoes

400ºF

1-5

60-80

Cook until done.

French Fries (frozen) 

400ºF

1-1.5 cups

15-25

Follow directions on pkg.

Cookies

400ºF

5-8

15-20

Follow recipe.

Pastries

Warm

2-3

23-30

Follow directions on pkg.

SO-314162_12028_Kitchen smith_10L TOV_Target_IM_R3.indd   8

2017-04-03   6:14 PM

Summary of Contents for KITCHENSMITH 12028

Page 1: ...Manuel d instructions Manual de instrucciones Register your product and get support at Pour vous inscrire et obtenir l aide de votre produit Para registrar y obtener asistencia de su producto ir www bellahousewares com SO 314162_12028_Kitchen smith_10L TOV_Target_IM_R3 indd 1 2017 04 03 6 14 PM ...

Page 2: ...g for the First Time 6 Operating Instructions 6 Instructions for Toast 7 Instructions for Bake 7 Hints for Bake 7 Instructions for Frozen Pizza 8 Cooking Tempurature Timetable 8 USDA Cooking Guidelines 9 Instructions for Reheating Leftovers 9 Instructions for Defrost 9 User Maintenance Instructions 9 Care Cleaning Instructions 9 Storing Instructions 10 Warranty 11 SO 314162_12028_Kitchen smith_10L...

Page 3: ...ngement 20 Garantie 21 Índice Medidas de seguridad importantes 22 Otras medidas de seguridad importantes 23 Notas sobre el enchufe 24 Notas sobre el cable 24 Advertencia sobre los plastificantes 24 Corriente eléctrica 24 Conozca su horno tostador de 4 rebanadas 25 Rejilla de alambre 26 Recipientes de cocción 26 Antes de utilizar por primera vez 26 Instrucciones de funcionamiento 26 Instrucciones p...

Page 4: ...ces 11 Do not place on or near a hot gas or electric burner or in a heated oven 12 Extreme caution must be used when moving an appliance containing hot oil or other liquids 13 To disconnect turn the timer control and the temperature control to OFF then remove the plug from the wall outlet 14 Do not use appliance for other than intended use 15 Oversized foods or metal utensils must not be inserted ...

Page 5: ...to the water 3 When using this appliance provide adequate air space above and on all sides for air circulation Do not operate this appliance while it is touching or near curtains wall coverings clothing dishtowels or other flammable materials 4 To reduce the risk of fire do not leave this appliance unattended during use 5 If this appliance begins to malfunction during use immediately turn the time...

Page 6: ...ripping over a longer cord An extension cord is not recommended for use with this product PLASTICIZER WARNING CAUTION To prevent Plasticizers from migrating to the finish of the counter top or table top or other furniture place NON PLASTIC coasters or place mats between the appliance and the finish of the counter top or table top Failure to do so may cause the finish to darken permanent blemishes ...

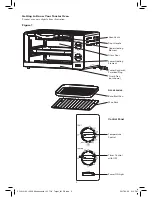
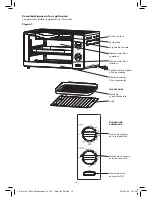
Page 7: ...n Vents Glass Door Door Handle Upper Heating Element Lower Heating Element CrumbTray not shown Power Cord with Polarized Plug Bake Broil Pan Wire Rack Accessories Temperature Control Timer Control with OFF Control Panel Power ON Light SO 314162_12028_Kitchen smith_10L TOV_Target_IM_R3 indd 5 2017 04 03 6 14 PM ...

Page 8: ...outer surfaces 2 Use a clean damp cloth to wipe the inside and outside surfaces of the Toaster Oven Wash the wire rack and bake broil pan in warm soapy water rinse and dry thoroughly Do not use abrasive cleaners 3 To ensure that the Toaster Oven is free from oils used in manufacturing turn the temperature control to 400ºF 4 Set the timer control for 15 minutes The power ON light will illuminate 5 ...

Page 9: ... sound and the Toaster Oven will turn OFF automatically 4 Insert the wire rack into the provided shelf in the Toaster Oven 5 Center food in the bake broil pan or baking container or center food directly on the wire rack 6 Close door NOTE Do not cover the wire shelf completely air flow is necessary for proper operation of your Toaster Oven 7 Turn temperature control to the desired temperature 8 Set...

Page 10: ... 9 Wearing oven mitts use a spatula to transfer the cooked pizza onto the round packing cardboard or a cutting board cut and serve 10 Turn the temperature control to OFF Cooking Temperature Timetable This COOKING TIME CHART is provided for suggestions only Temperatures may vary depending on the size and consistency of the food to be prepared FOOD TEMP SETTING APPROX AMOUNT TIME MINS COMMENTS Bacon...

Page 11: ...r Defrost 1 Make sure the crumb tray is inserted fully under the lower heating element in the bottom of the Toaster Oven 2 Remove all protective wrappings from food before placing in Toaster Oven 3 Turn temperature control to 150ºF CAUTION Do not defrost at higher temperatures than recommended Defrosting at hotter temperatures may cause incomplete thawing 4 Set the timer control according to packa...

Page 12: ...he bottom of the Toaster Oven 3 Store Toaster Oven in its box in a clean dry place 4 Never store appliance while it is hot or still plugged in 5 Never wrap cord tightly around the appliance Do not put any stress on the cord where it enters the unit as it could cause the cord to fray and break SO 314162_12028_Kitchen smith_10L TOV_Target_IM_R3 indd 10 2017 04 03 6 14 PM ...

Page 13: ...d by the breach of any express or implied warranty Apart from the extent prohibited by applicable law any implied warranty of merchantability or fitness for a particular purpose is limited in time to the duration of the warranty Some states provinces or jurisdictions do not allow the exclusion or limitation of incidental or consequential damages or limitations on how long an implied warranty lasts...

Page 14: ...lectrique ou mécanique à un technicien qualifié 8 L utilisation d accessoires non recommandés par le fabricant de l appareil peut causer des blessures 9 Ne pas utiliser à l extérieur 10 Ne pas laisser le cordon pendre à côté d une table ou d un comptoir ni toucher des surfaces chaudes 11 Ne pas placer sur ou à proximité d un brûleur électrique ou à gaz ni dans un four chaud 12 Être très prudent au...

Page 15: ...omprendre le mode d emploi avant d utiliser ou de nettoyer l appareil 2 Débrancher immédiatement l appareil s il tombe ou s il est immergé accidentellement dans l eau ou dans un autre liquide Ne pas plonger la main dans l eau 3 Pendant l utilisation veiller à ce qu il y ait suffisamment d espace au dessus et autour de l appareil pour que l air circule adéquatement Ne pas utiliser l appareil s il t...

Page 16: ... présente un cordon long L utilisation d une rallonge n est pas recommandée avec cet appareil AVERTISSEMENT DE MIGRATION DE PLASTIFIANTS MISE EN GARDE Pour éviter la migration de plastifiants du fini de comptoirs de tables ou de tout autre meuble placer des sous plats ou des napperons faits de matière NON PLASTIQUE entre l appareil et le dessus du comptoir ou de la table Si cette consigne n est pa...

Page 17: ...ignée de la porte Élément chauffant inférieur Ramasse miettes Non représenté Cordon d alimentation à fiche polarisée Moule de cuisson lèchefrite Grille Accessories Bouton de réglage de la température Bouton de minuterie avec fonction OFF Panneau de commande Témoin de mise en marche ON SO 314162_12028_Kitchen smith_10L TOV_Target_IM_R3 indd 15 2017 04 03 6 14 PM ...

Page 18: ... accessoires de l emballage et retirer tous les matériaux d emballage Retirer toutes les étiquettes des surfaces extérieures 2 À l aide d un chiffon humide propre essuyer l intérieur et l extérieur du four grille pain Laver la grille ainsi que le moule à cuisson lèchefrite dans de l eau chaude savonneuse puis rincer et sécher soigneusement Ne pas employer de nettoyants abrasifs 3 Pour s assurer qu...

Page 19: ...r grille pain 5 Placer les aliments au centre du moule à cuisson lèchefrite ou du contenant à cuisson ou encore directement sur la grille en son centre 6 Fermer la porte REMARQUE Ne pas couvrir complètement la grille une circulation d air est nécessaire pour un bon fonctionnement du four grille pain 7 Tourner le bouton de réglage à la température désirée 8 Placer la minuterie selon le temps de cui...

Page 20: ...Tourner le bouton de réglage de la température à OFF Tableau des temps de cuisson Ce TABLEAU DES TEMPS DE CUISSON est fourni à titre indicatif uniquement Les températures peuvent varier selon la taille et la consistance des aliments préparés FOOD TEMP SETTING APPROX AMOUNT TIME MINS COMMENTS Bacon 450 F 232 C 2 à 3 tranches 5 10 Retourner fréquemment Saucisse 450 F 232 C 5 à 6 20 25 Retourner à la...

Page 21: ...tillant aux aliments en les plaçant au four à une température de 350 F à 400 F 177 C à 204 C et vérifier toutes les 5 minutes Produits de boulangerie Tartes muffins tartelettes et même biscuits secs Redonner une vie aux pâtisseries en les réchauffant à une température de 350 F à 400 F 177 C à 204 C pendant 2 à 3 minutes Viandes cuites Réchauffer du poulet BBQ ou tout autre reste de viande dans le ...

Page 22: ...frotter trop fort car cela risquerait d égratigner la surface intérieure du four grille pain Laisser sécher avant de refermer la porte vitrée 6 Nettoyer la porte vitrée ainsi que l extérieur du four grille pain à l aide d un produit nettoyant à vitres ou d un détergent doux ainsi que d un chiffon humide ou d un tampon en plastique Ne pas employer de nettoyant ni de tampon abrasif car ils risquerai...

Page 23: ...arantie explicite ou implicite Sauf dans la mesure où cela est interdit par la loi toute garantie implicite concernant la valeur commerciale ou l adéquation à la fin visée se limite à la durée de la garantie Certains États et certaines provinces ou compétences administratives ne permettent pas l exclusion ou la limitation des dommages indirects ou accessoires ou les limitations quant à la durée de...

Page 24: ...No utilice este aparato en exteriores 10 No permita que el cable cuelgue del borde de una mesa o de una encimera ni que entre en contacto con superficies calientes 11 No lo coloque sobre un quemador a gas o eléctrico o cerca de este ni dentro de un horno caliente 12 Se debe ser sumamente cuidadoso al mover un electrodoméstico que contiene aceite caliente u otros líquidos 13 Para desconectar gire e...

Page 25: ...co 2 Si el electrodoméstico se cae o accidentalmente se sumerge en agua desenchúfelo del tomacorriente de pared de inmediato No introduzca la mano en el agua 3 Cuando utilice este electrodoméstico proporcione una buena ventilación por encima y a los lados de la unidad para que circule el aire No utilice este electrodoméstico mientras esté en contacto con cortinas o cerca de cortinas recubrimientos...

Page 26: ...ver a longer cord An extension cord is not recommended for use with this product PLASTICIZER WARNING CAUTION To prevent Plasticizers from migrating to the finish of the counter top or table top or other furniture place NON PLASTIC coasters or place mats between the appliance and the finish of the counter top or table top Failure to do so may cause the finish to darken permanent blemishes may occur...

Page 27: ...ento de calentamiento superior Elemento de calentamiento inferior Bandeja para migas no mostrada Cable de alimentación con enchufe polarizado Rejilla de alambre Bandeja para hornear asar Accessories Control de temperatura Control del temporizador con OFF Apagado Panel de control Luz ON Encendido SO 314162_12028_Kitchen smith_10L TOV_Target_IM_R3 indd 25 2017 04 03 6 14 PM ...

Page 28: ...acto con agua ni otros líquidos 1 Desempaque con cuidado el horno tostador y quite todos los materiales de empaque Quite las etiquetas de las superficies externas 2 Utilice un paño limpio y húmedo para limpiar las superficies internas y externas del horno tostador Lave la rejilla de alambre y la bandeja para hornear asar con agua tibia y jabón enjuague y seque bien No utilice limpiadores abrasivos...

Page 29: ...icamente 4 Coloque la rejilla de alambre en la posición del estante inferior del horno tostador 5 Centre los alimentos en la bandeja para hornear asar o en el recipiente para hornear o centre los alimentos directamente en la rejilla de alambre 6 Cierre la puerta NOTA No cubra la rejilla de alambre completamente se requiere flujo de aire para que el horno tostador funcione correctamente 7 Gire el c...

Page 30: ...gado Tabla de tiempos de cocción Esta TABLA DE TIEMPOS DE COCCIÓN es solo de referencia Las temperaturas podrán variar según el tamaño y la consistencia de los alimentos que prepare Alimento Ajuste de temperatura Cantidad aproximada Tiempo min Comentarios Tocino 450 ºF 232 ºC 2 a 3 tiras 5 a 10 Gire frecuentemente Salchicha 450 ºF 232 ºC 5 a 6 unidades 20 a 25 Gírelas a la mitad de la cocción Bife...

Page 31: ...s Vuelva a calentar las sobras entre 350 ºF y 400 ºF 177 ºC a 204 ºC y controle cada 5 minutos Alimentos horneados Pasteles panecillos tartas e incluso galletas duras Para recuperar las sobras de productos horneados caliéntelos entre 350 ºF y 400 ºF 177 ºC a 204 ºC durante 2 a 3 minutos Carnes cocidas Recaliente pollo a la barbacoa y sobras de alimentos en el horno tostador Cubra bien la bandeja p...

Page 32: ...ría rayar la superficie interior del horno tostador Deje secar antes de cerrar la puerta de vidrio 6 Limpie la puerta de vidrio del horno y el exterior del horno tostador con un limpiador para vidrios o detergente suave y un paño húmedo o esponja de plástico No utilice una esponja o un limpiador abrasivo ya que podría rayar el acabado Instrucciones de almacenamiento 1 Desenchufe la unidad déjela e...

Page 33: ...violación de cualquier garantía expresa o implícita Salvo en la medida en que lo prohíban las leyes aplicables cualquier garantía implícita de comerciabilidad o aptitud para un propósito particular se limita temporalmente a la duración de la garantía Algunos estados provincias o jurisdicciones no permiten la exclusión ni la limitación de daños incidentales o resultantes o limitaciones sobre la dur...

Page 34: ...SO 314162_12028_Kitchen smith_10L TOV_Target_IM_R3 indd 32 2017 04 03 6 14 PM ...

Page 35: ...SO 314162_12028_Kitchen smith_10L TOV_Target_IM_R3 indd 33 2017 04 03 6 14 PM ...

Page 36: ...demark owned by 8479950 Canada Inc All rights reserved BELLA est une marque déposée de Sensio Inc Montréal Canada H3B 3X9 Tous droits réservés KitchenSmith est une marque détenue par 8479950 Canada Inc Tous droits réservés BELLA es una marca registrada de Sensio Inc Montréal Canada H3B 3X9 Todos los derechos reservados KitchenSmith es una marca propiedad de 8479950 Canada Inc Todos los derechos re...

Reviews: