background image

5

INFLATOR OPERATION

TO INFLATE TIRES:

1. 

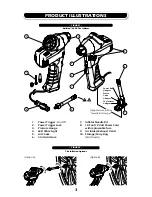
Unwind 12 Volt power cord.  See #8 in figure 1, page 3. 

2. 

Make certain the inflator power trigger is in the off (unlocked) position.  See #1 and #2 
in figure 1.

3. 

Set emergency brake and start vehicle engine.  See “Warning: Vehicle Exhaust Without 
Proper Ventilation”, page 4. 

4. 

Plug inflator lighter plug into vehicle 12 Volt cigarette lighter socket.

5. 

Check manufacturer’s recommended tire pressure specifications indicated on the tire 
sidewall.

6. 

There are two options in which you may inflate vehicle tires.  See “Tire Inflation Op-
tions” in figure 2, page 3. 

Option A:  Loosen air chuck (counterclockwise), attach 4 inch air hose into air  

 chuck (#5 and #6 in figure 1) and tighten chuck (clockwise) to secure.  
 Attach the air hose nozzle to vehicle tire valve stem by threading the  
 nozzle onto the tire stem (clockwise) until secure.  Do not turn 
 inflator on. 

Option B:  Loosen air chuck (counterclockwise), attach the air chuck (#5 in figure  

1) directly onto the tire valve stem and tighten air chuck until secure.

 Do not turn inflator on.

NOTE:

 When the nozzle is connected correctly, wait 5-7 seconds and the gauge will indi-

cate the current tire pressure.  See #3 in figure 1.  Always follow the manufacturer’s inflation 
pressure recommendations to avoid over-inflation. 
The pressure gauge on the inflator is for reference only and is therefore not binding for 
exact values.  While inflating, the gauge is a measurement of the fluctuating pressure 
between the tire and the high pressure hose.  To reduce the risk of over-inflation, use a reli-
able pressure gauge periodically during inflation before driving a vehicle inflated with the 
inflator.   
7. 

Squeeze on the inflator power trigger to begin inflation.  See #1 in figure 1. The Bell- 
Aire™ 9000 will now inflate your tire.  Carefully monitor the pressure gauge to avoid 
over-inflation.  To lock trigger in place, slide middle lever all the way up the trigger.
See #2 in figure 1. 

8. 

Once the desired pressure has been reached, slide lock lever down if in use and stop 
the inflator by releasing the inflator power trigger to the off position.  See #1 in 
figure 1.

9. 

Wait several moments as air hose and nozzle or air chuck may naturally heat during 
inflation. Then, remove air hose nozzle (by turning counterclockwise) or air chuck (by 
turning clockwise) from vehicle tire valve stem.

10.  Unplug inflator from vehicle 12 Volt cigarette lighter socket.
11.  Turn off vehicle.
12.  Properly store your tire inflator in the carry bag provided.

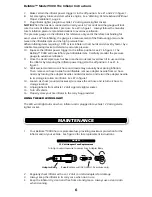
TO INFLATE SPORTS BALLS AND OTHER HIGH PRESSURE SMALL INFLATABLES:

1. 

Unwind 12 Volt power cord.  See #8 in figure 1, page 3. 

2. 

Loosen air chuck (counterclockwise), attach 4 inch air hose into air chuck (#5 and #6 
in figure 1) and tighten chuck (clockwise) to secure.

3. 

Select one of the small adapter needles provided in the storage compartment. 
See #7, page 3.

4. 

Attach the adapter needle to the air hose nozzle (see #6 in figure 1) by turning the 
adapter needle clockwise.

5. 

Check manufacturer’s recommended pressure specifications for inflatable. 

6. 

Insert adapter needle into inflatable.

Summary of Contents for 9000

Page 1: ...re Model 9000 Tire Inflator Instructions Tire Inflator BellAire9000 12V 12V PURE PSI ATTENTION READ ALL INSTRUCTIONS AND WARNINGS CAREFULLY BEFORE USE INFLATES CAR TIRES OTHER INFLATABLES INSTRUCTIONS FOR USE ...

Page 2: ...o operate the product better and safer SYMBOL NAME DESIGNATION EXPLANATION Safety Alert Read The Operator s Manual Eye Protection Wet Conditions Alert Hot Surface Indicates a potential personal injury hazard To reduce the risk of injury user must read and under stand operator s manual before using this product Always wear eye protection with side shields marked to comply with ANSI Z87 1 Do not exp...

Page 3: ...Options FIGURE 2 Toy Inflator Adapter Option A Option B Presta Valve Adapter Sports Ball Adapter 1 Power Trigger On Off 2 Power Trigger Lock 3 Pressure Gauge 4 LED Work Light 5 Air Chuck 6 4 Inch Air Hose 7 Inflator Needle Kit 8 10 Foot 12 Volt Power Cord with replaceable fuse 9 Air Intake Exhaust Vents 10 Storage Carry Bag Not shown High Pressure Inflator Needle Kit Storage ...

Page 4: ...tretch power cord or air hose Never point an inflator air hose toward yourself others or animals Never start a vehicle with the inflator plugged into the DC 12 Volt power socket See operation instructions on pages 5 through 6 Use the inflator for its intended use only Do not alter or modify the inflator Do not store inflator in a damp or wet location Protect the inflator from rain snow or other mo...

Page 5: ...ent of the fluctuating pressure between the tire and the high pressure hose To reduce the risk of over inflation use a reli able pressure gauge periodically during inflation before driving a vehicle inflated with the inflator 7 Squeeze on the inflator power trigger to begin inflation See 1 in figure 1 The Bell Aire 9000 will now inflate your tire Carefully monitor the pressure gauge to avoid over ...

Page 6: ...been reached slide lock lever down if in use and stop the inflator by releasing the inflator power trigger to the off position See 1 in figure 1 12 Wait several moments as air hose and nozzle may naturally heat during inflation Then remove air hose nozzle from inflatable remove adapter needle from air hose nozzle by turning the adapter needle counterclockwise and return the adapter needle to its s...

Page 7: ... 12 Volt lighter plug has blown See fuse replacement instructions in the maintenance section See figure 3 page 6 12 Volt power cord gets hot Make certain power cord is not coiled up or in a knot or damaged Pressure gauge appears to read incorrectly Make certain when you attach the air hose nozzle to the tire stem that the gauge is reading the current tire pressure before turning on the inflator sw...

Page 8: ... product use other than the operating instructions disassembly repair or alteration by anyone other than Bell Automotive Products Inc Further the warranty does not cover Acts of God such as fire flood hurricanes and tornadoes Bell Automotive Products Inc shall not be liable for any incidental or consequential dam ages caused by the breach of any express or implied warranty or conditions except to ...

Reviews: