background image

22

Using the Ovens

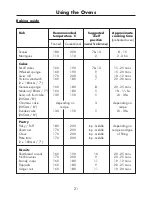
Baking guide

Dish

Recommended

Suggested

Approximate

temperature

˚

C

shelf

cooking time

position

(preheated oven)

Fanned

Conventional

Puddings

Rice pudding

130

150

6

1

3

4

- 2hrs

Baked custard

140

170

9

50 - 60 mins

Bread & butter

140

170

9

45 - 1hr

pudding
Fruit crumble

170

200

9

40 mins - 1hr

Miscellaneous

Yorkshire pudding
- large

180

220

11

40 - 45 mins

- small

180

220

12

15 - 20 mins

Toad in the hole

180

220

11

40 - 45 mins

Bread
- 2 x 1lb loaves

190

230

7

20 - 30 mins

- Bread rolls

190

230

10

10 - 15 mins

Summary of Contents for CE 1100DF

Page 1: ...00cm Dual Fuel Range Cooker Gas hob with electric ovens INSTALLATION AND USER INSTRUCTIONS Model DF951 You must read these instructions prior to using the appliance and retain them for future referenc...

Page 2: ...ooling fan to run at its optimum efficiency Particularly Built In appliances See clearance dimensions in the installation section of the booklet During use the Appliance must never be disconnected fro...

Page 3: ...er Clock if fitted 6 Using the Hob 7 The Fold Down Lid 9 Using the Grill 10 Using the Ovens 13 Care cleaning 28 Installation Instructions 31 35 Technical Data 36 Belling Customer Care Back cover 1 Ple...

Page 4: ...UK Before using the appliance for the first time remove any protective polythene film and wash the oven shelves and furniture in hot soapy water to remove their protective coating of oil Even so when...

Page 5: ...of the appliance may call for additional ventilation for example opening of a window or more effective ventilation for example increasing the level of mechanical ventilation where present If the igni...

Page 6: ...ith any steam which may escape from the cooking Never use the appliance for heating a room When cooking heavy items eg turkeys do not pull the oven shelf out with the item still on the shelf Do not us...

Page 7: ...in the compartment Do not store items with plastic or wooden handles in the compartment as they may be damaged by heat from the oven Do not store flammable liquids even when cold in the storage compar...

Page 8: ...and remain illuminated Setting the minute minder 1 Press and release the Function button to change the display from clock to minute minder the Minute Minder LED will flash top right hand side 2 Use th...

Page 9: ...inus button and press again to listen to the second tone etc Releasing the minus button after a tone has sounded will automatically select that tone Setting the minute minder 1 Press and release the p...

Page 10: ...ns For optimum safety and performance we recommend the use of flat bottomed pans with a base diameter of minimum 100mm 4 and maximum 250mm 10 Avoid using old misshapen pans or any pan which is unstabl...

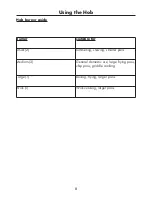
Page 11: ...ob burner guide Burner suitable for Small 2 Simmering stewing smaller pans Medium 3 General domestic use large frying pans chip pans griddle cooking Large 1 Boiling frying larger pans Wok 1 Wok cookin...

Page 12: ...he lid trim The lid must be opened fully so there is no danger of it closing while the hob is being used The appliance is fitted with a switch back system which will automatically turn off the hot pla...

Page 13: ...fan will continue to operate for a period after the grill control has been switched off Should any fault occur with the cooling fan the appli ance will require servicing contact Customer Support Deta...

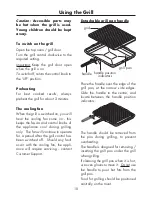
Page 14: ...n be inverted to give a high or low position or it may be removed altogether For toasting use the highest trivet position The lower trivet position is useful for grilling all types of meat or fish Wit...

Page 15: ...igh 10 15 mins Pork chops 3 High 15 25 mins Gammon steaks 1 High 12 15 mins Poultry Chicken fillets 4 or 5 Low 20 30 mins Fish Fish fillets 4 Low 10 15 mins depends on thickness Grilling guide Grill s...

Page 16: ...zer in the oven at the same time this is more economical as it saves time and fuel Oven furniture Baking trays and roasting tins For best cooked results and even browning the maximum size baking trays...

Page 17: ...ightly hot ter towards the top of the oven and slightly cooler towards the base This variation is known as zones of heat Using the zones of heat The zones of heat are useful as sev eral dishes requiri...

Page 18: ...s an even temperature throughout the oven This allows for batch cook ing batch baking which is advantageous when planning a party or stocking the freezer There is little flavour transfer in a fanned o...

Page 19: ...turn the oven control to the defrost position and open the door Defrosting times Small or thin pieces of frozen fish or meat eg fish fillets prawns and mince will take approximately 1 2 hours Placing...

Page 20: ...the cake tin is not stood on layers of brown paper as this can hinder effective circulation of air Do not use soft tub margarine for rich fruit cakes unless specified in the recipe Always use the cor...

Page 21: ...e larger sizes of cakes than the oven can cope with You should allow at least 2 5cm 1 inch space between the oven walls and the tin Remember to place food centrally on the oven shelf and leave at leas...

Page 22: ...n in the baking guides are based on dishes made with block margarine If soft tub mar garine is used it may be nec essary to reduce the temperature setting Cooking times given in the baking guide are a...

Page 23: ...gh efficiency oven therefore some adjustment will have to be made to conventional cook ing temperatures The table shows conventional cooking temperatures A efficiency fanned temperatures and gas marks...

Page 24: ...enoese sponge 160 180 8 20 25 mins Madeira 180mm 7 160 180 5 1hr 11 4 hrs Semi rich fruit cake 130 150 5 21 2 3hrs 205mm 8 Christmas cake depending on 3 depending on 205mm 8 recipe recipe Dundee cake...
Page 25: ...dings Rice pudding 130 150 6 13 4 2hrs Baked custard 140 170 9 50 60 mins Bread butter 140 170 9 45 1hr pudding Fruit crumble 170 200 9 40 mins 1hr Miscellaneous Yorkshire pudding large 180 220 11 40...

Page 26: ...texture of the meat and of course personal preference In order to calculate the roasting time weigh the meat or poultry including the stuffing and follow the times given in the roasting guide Frozen...

Page 27: ...be roasted around the joint The use of a roasting tin larger than that recommended is not advised as this may impair per formance and lead to extended cooking times Roast turkey Roasting turkey invol...

Page 28: ...e will show how long foods should be cooked according to per sonal preference In general foods should be cooked for at least 6 hours and may be left up to 8 10 hours without spoil ing if covered As a...

Page 29: ...poul try weighing more than 2kg 41 2lb by the slow cooking method Do not stuff poultry or rolled joints when slow cooking always cook the stuffing separately When slow cooking cut root veg etables int...

Page 30: ...r of the oven cavity Remove the loose oven back unscrew the 4 securing screws one at each cor ner Right hand side fanned oven only Unscrew the lens cover turn anticlock wise Unscrew the bulb and repla...

Page 31: ...hot soapy water Painted plastic metal finish parts where fitted PAINTED FACIA METAL DOOR PANELS SIDE PANELS HANDLES CONTROL KNOBS Only use a clean cloth wrung out in hot soapy water Burner caps and he...

Page 32: ...DLES HOB SPILLAGE WELL OVEN SIDES DOORS FASCIA Only use a clean cloth wrung out in hot soapy water and dry with a soft cloth Stubborn marks can be removed using Luneta We recommend that you clean the...

Page 33: ...to the stop position To remove the glass panel open the door wide hold the top and bottom edges and slide out Cast iron pansupports After cooking allow the pan supports to cool completely before atte...

Page 34: ...nt 3 Building Standards Scotland Consolidated Issued by the Scottish Development Department 4 The current I E E Wiring Regulations 5 Electricity at Work Regulations 1989 6 BS 6172 Installation of Dome...

Page 35: ...ft or uneven floor coverings when moving the appliance Some cushioned vinyl floor coverings may not be designed to withstand sliding appliances without marking or damage Cooker dimensions All sizes ar...

Page 36: ...and mark off 450mm from the pencil line to locate the front edge of the lower bracket 4 Fix the bracket to the floor Measure from floor level to engagement edge in the back of the cooker and add 3mm 5...

Page 37: ...al is gained by opening the terminal block cover at the rear of the appliance use a small flat bladed screwdriver 2 Connection should be made with 6 0mm2 twin and earth cable 3 First strip the wires t...

Page 38: ...portant ensure that you route all mains and electrical cables and flexible tubing well clear of any adjacent heat source Commissioning Burner aeration All burners have fixed aeration and no adjustment...

Page 39: ...ntrolled by a single switch at the left of the fascia to individual electrodes Gas hob Burners have burner heads and caps which are removable for cleaning Concealed electrodes to each burner Electrica...

Page 40: ...e and be given a number of options This indicates that your call has been accepted and is being held in a queue Calls are answered in strict rotation as our Customer Care Representatives become availa...

Reviews: