background image

40

T E C H N I C A L   D ATA

Electrical components

Load

Lamps

25 W each

Cooling fans

10 W each

Oven stir fans

30 W each

Hob top

Electrical supply

Hotplate

Zone

Load (kW)

240 V

Induction

All zones

1.40 boost to 1.85

Appliance

Electrical supply

Oven

Load (kW)

240 V

Fanned Right

2.0

Fanned Left

2.50

Dual variable grill

1.7 / 2.7

Conventional top

1.39

Model

Electrical supply

Max. load (kW)

Single Grill

240 V

13.99

Dual Grill

14.84

Summary of Contents for KENSINGTON

Page 1: ...GOURMET KENSINGTON User manual EI 90 cm...

Page 2: ...lable from our website at www belling co uk Calls are charged at the basic rate please check with your telephone service provider for exact charges Yournewappliancecomeswithour12 monthguarantee UK onl...

Page 3: ...NG YOUR APPLIANCE 10 USING THE HOB 11 USING THE GRILL 20 USING THE TOP OVEN 21 USING THE MAIN OVEN FANNED 23 COOKING GUIDE 26 BAKING GUIDE 29 ROASTING GUIDE 33 CLOCK PROGRAMMER 34 REMOVING SHELF RUNNE...

Page 4: ...compliance with the WEEE directive All our electricproductsarelabelledaccordinglywiththecrossed out wheeled bin symbol This indicates for disposal purposesatendoflife thattheseproductsmustbetaken to...

Page 5: ...oid electric shock ensure that the appliance is switched off before replacing the lamp 6 The appliance is not intended to be operated by means of an external timer or separate control system 6 Unatten...

Page 6: ...implant whether there implant is adequate and fail safe Please place pans centrally on the cooking zones The British Heart Foundation provide additional advice regarding using induction hobs when a pa...

Page 7: ...O D U C T 4 Note Your appliance layout may differ depending on the model HOB HOB CONTROL PANEL 1 1 2 3 4 5 1 Cook Zones 4 Minus Key 2 Timer Symbol 5 Plus Key 3 On off Key OVERVIEW 90cm 1 2 3 3 1 Fasc...

Page 8: ...Programmer 10 Warming zone 5 Thermostat indicator OVEN CONTROLS Oven OFF 6 0 8 0 1 2 0 1 4 0 1 6 0 180 2 0 0 2 2 0 2 4 0 S Top Oven Grill OFF 60 8 0 1 0 0 1 2 0 1 4 0 1 6 0 1 8 0 2 0 0 2 2 0 2 4 0 2...

Page 9: ...for best cooking results please preheat your oven for 15 minutes and 3 5 minutes for grilling Intense Baking Base Heat with Fan S Slow Cook Fanned Grill Oven Selector Control Conventional Grill Top He...

Page 10: ...g use the fan may cycle on and off this is normal 6 Important Never put items directly on top the base of the oven or cover the oven base with foil as this may cause the element to overheat Always pos...

Page 11: ...ng them across the surface to avoid marks and scratches 6 If you use a wet paper towel to remove spills from a warm heating area of the hob be careful to avoid steam burns 6 Do not use abrasive powder...

Page 12: ...is placed on the zone This reduces the energy used during the cooking process i e when you take your pan off the zone the hob automatically reduces the power and only switches back on when you replac...

Page 13: ...A Pan detection If no pan or an unsuitable pan is detected on an activated cook zone the pan detection symbol will be displayed Suitable pans cast iron metals with magnetic properties Non suitable pan...

Page 14: ...switched off by touching the ON OFF key for 1 second A beep sounds and all the heaters will switch off Switching on an individual hob cook zone Choose required cook zone Set desired power level 4 Note...

Page 15: ...l P appears Press and hold the minus key and right hand front cook zone A sound will be heard Press the right hand front cook zone L will appear on the display Press the On Off key When the hob is swi...

Page 16: ...ting the minute minder Press and hold the minus key and plus key Set a time by pressing the minus or plus keys When the time is up Please ensure that no cook zones have been selected When the set time...

Page 17: ...nd is not displayed Operation of a timer is shown by a stationary dot in the cook zone display for the timed cook zone To modify or cancel the cooking time When the set time has expired a sound will b...

Page 18: ...een set it will be displayed first In this case other timed cooking zones are shown by a dot in the cook zone display Bridge function Press the linked cook zones keys together Bridge symbol will appea...

Page 19: ...emperature Allow system to cool E3 1 Pot pan not suitable example Loss of magnetic properties because of temperature at bottom of pot 2 Power of cooking zones permanently exceeded 1 This error is rese...

Page 20: ...s better suited to grill smaller amounts of food THE GRILL PAN This appliance comes with a grill pan and trivet SHELF TRIVET ADJUSTMENTS Speed of grilling can be adjusted by changing the shelf positio...

Page 21: ...uality trays and tins may warp when heated leading to uneven baking results Shelf positions As a general guide when cooking frozen or chilled food use the highest possible shelf position while allowin...

Page 22: ...e oven shelves in the position required before preheating the oven The oven shelf must be positioned with the up stand at the rear of the oven and facing up Position baking trays and roast ing tins on...

Page 23: ...l guide when cooking frozen or chilled food use the highest possible shelf position while allowing some clearance between the food and the top element Follow the instructions given on packaging To hel...

Page 24: ...rences to cooking with a fan oven which will require a different approach There are no zones of heat in a fan oven as the convection fan at the back of the oven ensures an even temperature throughout...

Page 25: ...pen the door Defrosting times 4 Small or thin pieces of frozen fish or meat eg fish filets prawns mince will take approximately 1 2 hours 4 Placing the food in a single layer will reduce the thawing t...

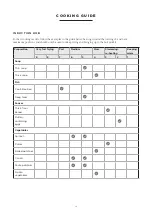
Page 26: ...and should only be used for deep frying and bringing up to the boil quickly Preparation Very fast frying Fast Medium Slow Simmering re heating Keeping warm 9 8 7 6 5 4 3 2 1 Soup Thin soup Thick soup...

Page 27: ...warm 9 8 7 6 5 4 3 2 1 Meat Thin cuts of meat Fried steak Other types of cooking Deep frying frozen chips Deep frying fresh chips Pressure cooking Stewed fruit Pancakes Custard To melt chocolate Jam M...

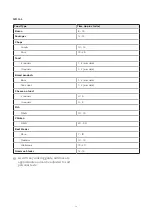
Page 28: ...nds 1 2 per side Bread products Buns 1 2 per side Tea cakes 1 2 per side Cheese on toast 2 rounds 4 5 4 rounds 4 5 Fish Fillets 10 15 Chicken Fillets 20 30 Beef Steaks Rare 7 10 Medium 10 15 Well done...

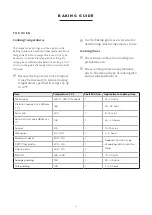
Page 29: ...erence for determining which temperatures to use Cooking times 4 These times are based on cooking in a preheated oven 4 These cooking times are approximate due to the size and type of cooking dish and...

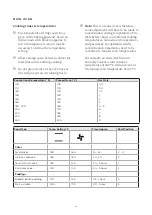
Page 30: ...ing temperatures fanned oven temperatures and gas marks For optimum results conventional temperatures need to be converted to fanned oven temperatures For example an item which would normally cook at...

Page 31: ...the cake tin is not stood on layers of brown paper as this can hinder effective circulation of air 4 Do not use soft tub margarine for rich fruit cakes unless specified in the recipe 4 Always use the...

Page 32: ...ouble shooting sponge cakes Problem Possible Cause Domed top Insufficient creaming of mixture Cake baked on too high a shelf position or at too high a temperature Paper liners can cause the outer edge...

Page 33: ...in foil or covered roasters and for lidded casseroles add 5 minutes per 450g 1lb to the calculated cooking time 4 Smaller joints weighing less than 1 25kg 2 lb may require 5 minutes per 450g 1lb extra...

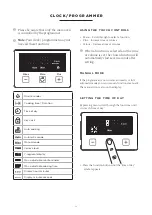
Page 34: ...play minutes seconds USING THE TOUCH CONTROLS Menu Scroll through to select a function Plus Increase time or volume Minus Decrease time or volume 4 When a function is selected and the time or volume i...

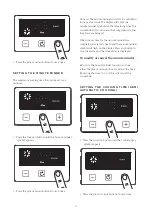
Page 35: ...ontinue in the background if other functions are being set When the set time for the minute minder has completed an alarm is heard and the minute minder symbol will flash on the display Press any butt...

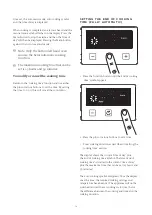
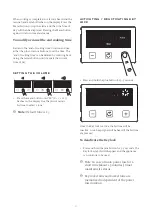
Page 36: ...et the time By setting the time to 0 00 this will cancel the countdown SETTING THE END OF COOKING TIME FULLY AUTOMATIC 1 Press the function button until the end of cooking time symbol appears 2 Press...

Page 37: ...of day SETTING TH E VOLUME Press the menu button until LX X 1 2 or 3 flashes on the display Use the plus or minus buttons to select a tone 4 Note Default tone is L3 ACTIVATING DEACTIVATING KEY LOCK 1...

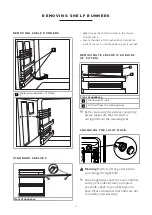
Page 38: ...f stopper is reached REMOVING TELESCOPIC SHELVES IF FITTED 2 1 2 Front of appliance 1 Grasp and lift shelf 2 Lift shelf from the retaining tabs 4 Before removing the shelves completely please make sur...

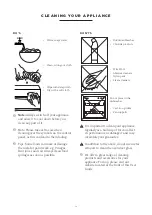
Page 39: ...ar fruit juices and salt Always clean food spillages as soon as possible DON TS Undiluted bleaches Chloride products Wire Wool Abrasive cleaners Nylon pads Steam cleaners Do not place in the dishwashe...

Page 40: ...W each Hob top Electrical supply Hotplate Zone Load kW 240 V Induction All zones 1 40 boost to 1 85 Appliance Electrical supply Oven Load kW 240 V Fanned Right 2 0 Fanned Left 2 50 Dual variable gril...

Page 41: ...41...

Page 42: ...42...

Page 43: ...43...

Page 44: ...084015500 Stoney Lane Prescot Merseyside L35 2XW belling co uk Customer Care 0344 815 3740 Product Information Helpline 0344 248 4149 W W W B E L L I N G C O U K...

Reviews: