This appliance is for household use and may be plugged into any AC
electrical outlet (ordinary household current). Do not use any other
electrical outlet.
TO USE:
For a complete styling, hair should be clean, dry and free from dirt, hair
spray, creams, etc. (This iron can also be used for quick touch-ups.)
PRE-HEAT: Rest the iron on its safety stand on a smooth, flat surface and
plug in. Set the heat switch at Hi or Low position, and allow iron to heat.
When ready dot on barrel turns dark, the iron is ready for use. (Iron takes
about 5-6 minutes to heat up.
But for optimum curling performance let
the iron continue to heat for about 2-3 minutes more before using.)
Use Hi heat for normal, easy-to-curl hair and for hard-to-curl hair, simply
holding hair wound around barrel a bit longer for hair that resists curling.
Use Low heat for hair that has been color-treated or is fragile or
damaged.
STYLING: Start by sectioning hair into strands of not more than 1 inch
deep and 2 inches wide.
Keep the hair strand smooth by brushing or combing through the section
while holding the ends taut with the other hand.
Taking one section at a time, place the ends of hair
over
t
he barrel with
the clamp open. Then close the clamp, making sure that the ends extend
just a tiny bit beyond the clamp. Grasp the safety tip with the other hand,
and it will be easy to roll hair.
Keep the section of hair taut as it is wound around the hot barrel by
turning the handle with one hand and the safety tip with the other. Wind
the curl toward the scalp as far as desired without touching scalp with
the hot barrel.
Hold the curl in place for up to 20 seconds for tight curls or if hair is hard
to curl. Hold for less time if hair is easy to curl, or if you want loose curls
or just waves are preferred. When ready to release curl, unwind about
half a turn (for longer hair, unwind a bit more) and push down on the
clamp release lever to open the clamp. Now, gently withdraw the barrel
from the center of curl. Allow curl to cool, and try not to disturb curls
while proceeding in the same manner around whole head.
When completely finished, and all curls have cooled thoroughly, gently
brush and comb hair into the style desired.
STYLING TIP: For bouncy, flip-up curls, the clamp should be
under
and
the barrel
over
the section of hair at the start of curl. For curl-under,
page-boy styles, the clamp should be
over
and the barrel
under
the hair
section at the start of curl.
Cet appareil est prévu pour l'usage domestique et peut être branché dans
toute prise électrique CA (courant domestique ordinaire). Ne pas utiliser
d'autre prise électrique.
MODE D’EMPLOI :
Pour bien coiffer les cheveux doivent être propres, secs et sans saleté,
laque, crème etc. (Ce fer peut aussi être utilisé pour une retouche rapide)
PRÉCHAUFFAGE : Reposer le fer sur son support de sécurité sur une
surface plane et plate et le brancher. Mettre le bouton de température
sur Hi ou Low et laisser chauffer. Quand le témoin de température sur
le tube s’assombrit, le fer est prêt à être utilisé. (Le fer met environ 5-6
minutes à chauffer.
Pour qu’il atteigne son rendement optimum, laisser
chauffer pendant 2 à 3 minutes de plus avant d’utiliser.)
Mettre sur Hi pour des cheveux normaux, faciles à boucler ou difficiles
à boucler, tenant simplement les cheveux enroulés autour du tube un
peu plus longtemps pour des cheveux difficiles à boucler. Utiliser sur
température Low pour les cheveux teints, fragiles ou endommagés.
COIFFURE : Commencer par séparer les cheveux en mèches ne
dépassant pas 1 pouce de profondeur et 2 pouces de largeur.
Lisser la mèche en la brossant ou la peignant d’une main tout en la
tenant tendue avec l’autre main.
Prenant une mèche à la fois, mettre le bout des cheveux sur le tube
en tenant le levier ouvert. Fermer le levier en s’assurant qu’une petite
section des cheveux dépasse du levier. Attraper l’embout isolant de
l’autre main et il sera facile de faire des boucles.
Garder la mèche de cheveux tendue quand on l’entoure autour du tube
chaud en tournant le tube d’une main et l’embout isolant de l’autre.
Rouler la boucle aussi près que l’on désire du cuir chevelu sans le
toucher avec le tube chaud.
Maintenir la boucle en place pendant un maximum de 20 secondes
pour des boucles serrées ou si les cheveux sont difficiles à boucler.
La maintenir moins longtemps si les cheveux sont faciles à boucler ou
si vous préférez des boucles lâches ou simplement des ondulations.
Quand on est prêt à relâcher la boucle, dérouler d’environ un demi-tour
(un peu plus pour les cheveux longs) et appuyer sur le poussoir pour
ouvrir le levier. Tirer délicatement le tube du centre de la boucle.
Laisser refroidir la boucle et essayer de ne pas la défaire en continuant
le processus sur le reste de la tête.
Quand on a complètement fini et que toutes les boucles sont bien
refroidies, brosser et peigner doucement les cheveux dans le style
désiré.
CONSEILS POUR LA COIFFURE : Pour des boucles retournées vivantes
tenir le levier sous la mèche et le tube dessus au début de la boucle.
Pour coiffures de style pointes tournées vers l’intérieur ou page, le levier
doit être sur la mèche et le tube dessous au début de la boucle.
OPERATING INSTRUCTIONS/MODE D’EMPLOI
PRODUCT MAY VARY SLIGHTLY FROM ILLUSTRATIONS/LE PRODUIT PEUT ÊTRE LÉGÈREMENT DIFFÉRENT DES ILLUSTRATIONS
HOW TO USE
This appliance requires little maintenance and contains no user
serviceable parts. Do not try to fix it yourself. Refer it to qualified service
personnel if servicing is needed.
TO CLEAN:
Unplug curling iron and allow to cool. Iron must be cleaned
only when cold. Use a soft, slightly damp cloth to wipe the handle. Do not
allow water or any other liquid to go into handle of the iron.
TO STORE:
Unplug appliance and let it cool; store in its box or in a clean,
dry place. Store the cord loosely coiled.
Never wrap the cord around
unit;
this could cause the cord to wear prematurely and break. Do not
put any stress on cord where it enters the handle, as it could cause cord
to fray and possibly break. Never hang unit up by the power cord.
CARE AND CLEANING
Cet appareil n'a besoin que de peu d'entretien. Il ne contient aucunes
pièces réparables par l'utilisateur. Ne pas essayer de le réparer
soi-même. Si des réparations sont nécessaires, consulter une personne
qualifiée.
POUR NETTOYER :
Débrancher le fer à friser et laisser refroidir. Il ne faut
nettoyer le fer que quand il est froid. Utiliser un chiffon doux légèrement
humide pour essuyer le manche. Ne pas laisser pénétrer de l’eau ou tout
autre liquide dans le manche du fer.
POUR RANGER :
Débrancher l’appareil et laisser refroidir ; ranger dans
sa boite ou dans un endroit propre et sec. Ranger le fil enroulé de façon
lâche.
Ne jamais enrouler le fil autour de l’appareil ;
cela pourrait user
le fil prématurément et le faire casser. Ne pas causer de tension sur le fil
à sa jointure avec le manche car cela pourrait et l'effilocher ou le
couper. Ne jamais pendre l’appareil par le fil électrique.
UTILISATION
ENTRETIEN ET NETTOYAGE
A
B
C
D
E
F
G
H
I
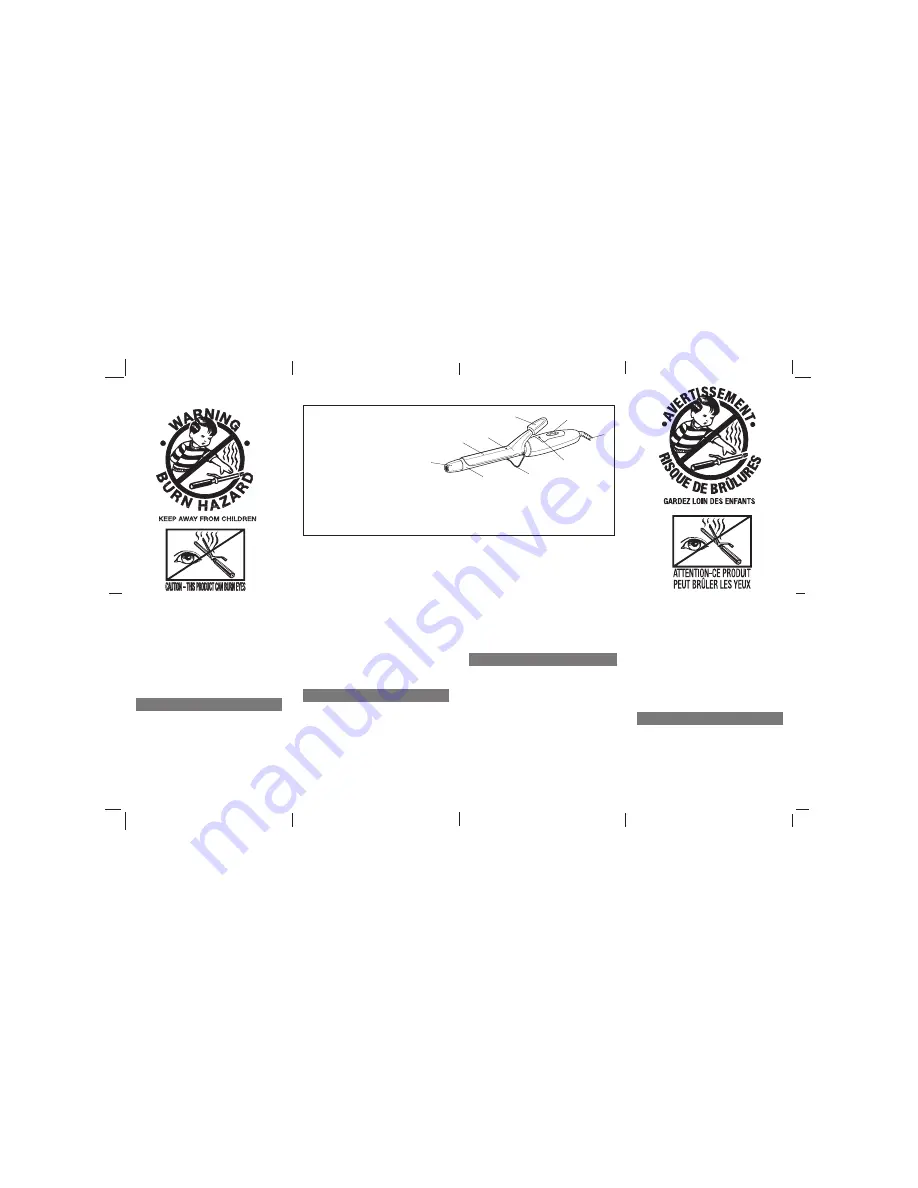
1. Safety Tip
Embout de securité
2. Clamp
Pince
3. Ready Dot
Point de fer prêt
4. Clamp Release Lever
Levier de dégagement de la pince
5. Hi/Off/Lo (2/0/1) Switch
Commande Hi/Off/Low (2/0/1)
(Pleine Puissance/Arrêt/Basse Puissance)
6. Tangle-free Swivel Cord
Fil électrique pivotant non emmêlant
7. Power Indicator Light
Indicateur de fonctionnement
8. Safety Stand
Support de sécurité
9. Barrel
Baril
CONSEILS DE SÉCURITÉ POUR LE FIL ÉLECTRIQUE
1. Ne jamais tirer sur le fil ou sur l’appareil
2. Pour brancher la fiche : Attraper fermement la fiche et la guider
dans la prise.
3. Pour débrancher l’appareil, attraper la fiche et l’enlever de la
prise.
4. Avant chaque usage, inspecter le fil électrique pour coupures ou
marques d’usure. Si on en trouve cela indique qu’il faut réparer
l’appareil et changer le fil électrique. Retourner l’appareil au
« Service Department » ou à un service de réparations agréé.
5. Ne jamais enrouler le fil trop étroitement autour de l'appareil car
cela pourrait exercer trop de pression sur le fil à l'endroit ou il
entre dans l’appareil et pourrait l'effilocher et le faire casser.
NE PAS UTILISER L’APPAREIL SI LE FIL ÉLECTRIQUE EST ENDOMMAGÉ,
SI L’APPAREIL NE FONCTIONNE QUE DE FAÇON INTERMITTENTE OU
S’IL NE FONCTIONNE PLUS DU TOUT.
IMPORTANT:
Pendant les quelques premières minutes de fonctionnement, vous
remarquerez peut-être un peu de fumée et une petite odeur. C'est normal
et elles se dissiperont rapidement.
LINE CORD SAFETY TIPS
1. Never pull or yank on the cord or the appliance.
2. To insert plug, grasp it firmly and guide it into outlet.
3. To disconnect appliance, grasp plug and remove it from outlet.
4. Before each use, inspect the line cord for cuts and/or abrasion
marks. If any are found, this indicates that the appliance should be
serviced and the line cord replaced. Please return it to our Service
Department or to an authorized service representative.
5. Never wrap the cord tightly around the appliance, as this could
place undue stress on the cord where it enters the appliance and
cause it to fray and break.
DO NOT OPERATE APPLIANCE IF THE LINE CORD SHOWS ANY DAMAGE,
OR IF APPLIANCE WORKS INTERMITTENTLY OR STOPS WORKING
ENTIRELY.
IMPORTANT:
During the first few minutes of initial use, you may notice smoke and
a slight odor. This is normal and will quickly disappear.


