XPR-10 Series Two-Post Lifts
43
P/N 5900951 — Rev. D — May 2019
Mounting the Power Unit
This section describes how to mount the Power Unit for your Lift. You do
not
need an Electrician to
mount
the Power Unit, but you do need an Electrician to
connect
the Power Unit.
Imp
ortant
: Do not connect the Power Unit to the Hydraulic System or to the power source at this
point in the installation; those connections will be made later.
Your Lift came with the Power Unit that was ordered. In order to support a wide variety of applications,
that Power Unit could be one of multiple Power Units that are available. Because of this, the Power
Unit that came with your Lift may look slightly different from the drawings in this Manual.
Refer to
Connecting the Power Unit
for installation information for your Electrician and specific
information about the Power Unit that came with your Lift.
The Power Unit
must
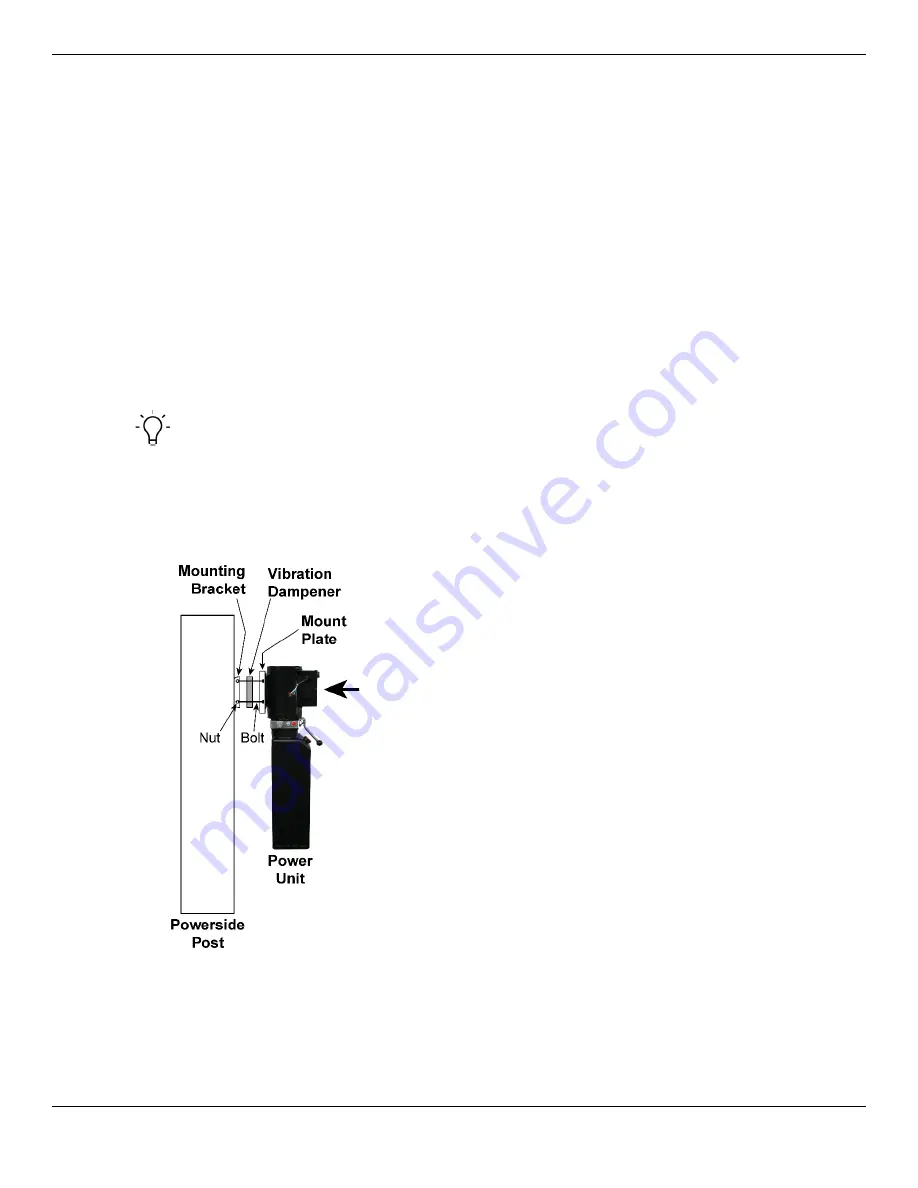
be mounted on the Mounting Bracket on the Powerside Post.
To mount the Power Unit
:
1.
Find the supplied four Hex Bolts, four Nuts, and one Vibration Dampener.
Tip
The Power Unit is heavy. BendPak recommends having one person hold the Power Unit
while a second person bolts it into place.
2.
Put the Vibration Dampener into place next to the Mounting Bracket on the Powerside Post.
Both the Vibration Dampener and the Mounting Bracket have four holes, one in each corner. Make
sure to use all four holes to hold the Power Unit.
3.
Move the Mount Plate on the back of the Power Unit
next to the Vibration Dampener.
There are multiple holes on the Mount Plate you can
use. You must use four holes to secure the Power Unit.
4.
Push one of the Bolts through a hole in the Mount Plate,
through the Vibration Dampener, and into the Mounting
Bracket; attach a Nut to the thread end of the Bolt, then
tighten the Nut.
5.
Repeat Step 4 for the other three Bolts and Nuts.
6.
Fill the reservoir with approved fluids.
The reservoir holds approximately 3.6 gallons (14 liters).
Use care to keep the fluid clean when filling the reservoir.
Important
: Do not connect the Power Unit to the
Hydraulic System or the power source at
this point.
Summary of Contents for XPR-10 Series
Page 9: ...XPR 10 Series Two Post Lifts 9 P N 5900951 Rev D May 2019 Specifications ...
Page 77: ...XPR 10 Series Two Post Lifts 77 P N 5900951 Rev D May 2019 Labels ...
Page 78: ...XPR 10 Series Two Post Lifts 78 P N 5900951 Rev D May 2019 ...
Page 79: ...XPR 10 Series Two Post Lifts 79 P N 5900951 Rev D May 2019 ...
Page 81: ...XPR 10 Series Two Post Lifts 81 P N 5900951 Rev D May 2019 ...
Page 82: ...XPR 10 Series Two Post Lifts 82 P N 5900951 Rev D May 2019 ...
Page 83: ...XPR 10 Series Two Post Lifts 83 P N 5900951 Rev D May 2019 ...
Page 84: ...XPR 10 Series Two Post Lifts 84 P N 5900951 Rev D May 2019 ...
Page 85: ...XPR 10 Series Two Post Lifts 85 P N 5900951 Rev D May 2019 ...
Page 86: ...XPR 10 Series Two Post Lifts 86 P N 5900951 Rev D May 2019 ...
Page 87: ...XPR 10 Series Two Post Lifts 87 P N 5900951 Rev D May 2019 ...
Page 88: ...XPR 10 Series Two Post Lifts 88 P N 5900951 Rev D May 2019 ...
Page 91: ...XPR 10 Series Two Post Lifts 91 P N 5900951 Rev D May 2019 Maintenance Log ...


