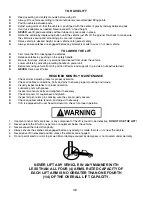
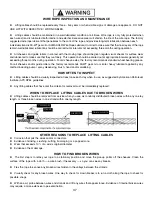
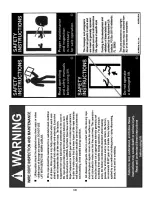
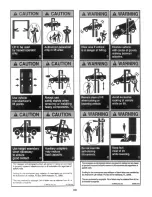
background image

25

POWER-UNIT CONNECTION

Guard against electric shock. 

Never connect the green power 

cord wire to a live terminal. 

This is for ground only.

ALL WIRING MUST BE PERFORMED BY A CERTIFIED ELECTRICIAN ONLY. 

SEE WIRING INSTRUCTIONS AFFIXED TO MOTOR FOR PROPER WIRING INSTRUCTIONS.

Summary of Contents for XPR-9S

Page 1: ...and the important safety instructions shown inside Keep this operation manual near the lift at all times Make sure that ALL USERS read and understand this manual 1645 Lemonwood Dr Santa Paula CA 93060 USA Toll Free 1 800 253 2363 Tel 1 805 933 9970 Fax 1 805 933 9160 www bendpak com 9 000 LB 4 082 KG CAPACITY SURFACE MOUNTED TWO POST LIFTS MODELS XPR 9S XPR 9S LP XPR 9TS IMPORTANT SAFETY INSTRUCTI...

Page 2: ...r failure is a direct result of manufacturer defect due to material and or workmanship e Any component damaged in shipment or any failure caused by installing or operating lift under conditions not in accordance with installation and operation guidelines or damaged by contact with tools or surroundings f Motor or pump failure caused by rain excessive humidity corrosive environments or other contam...

Page 3: ...rect initial function t Read and follow the safety instructions Keep them readily available for machine operators t Make certain all operators are properly trained know how to safely and correctly operate the unit and are properly supervised t Allow unit operation only with all parts in place and operating safely t Carefully inspect the unit on a regular basis and perform all maintenance as requir...

Page 4: ... Step 7 Mounting The Hydraulic Power Unit 15 16 Step 8 Installing the Safeties and Safety Cable 16 18 Step 9 Installing Hydraulic Lines 18 Step 10 Routing the Equalizer Cables 19 20 Step 11 Installing Power Unit Hose Assembly and Power Side Safety Cover 20 Step 12 Installing the Lift Arms 20 22 Post Tie Rod Installation Warning 22 Leveling Instructions 23 Step 13 Power Unit Connection 24 26 Step 1...

Page 5: ...ift Failure to follow danger warning and caution instructions may lead to serious personal injury or death to operator or bystander or damage to property Please read entire manual prior to installation Do not operate this machine until you read and understand all the dangers warnings and cautions in this manual For additional copies or further information contact BendPak Inc Ranger Products 1645 L...

Page 6: ...parts of body away from moving parts Keep feet clear of lift when lowering Avoid pinch points 11 DANGER To reduce the risk of elec tric shock do not use on wet surfaces or expose to rain The power unit used on this lift contains high voltage Disconnect power at the receptacle or at the circuit breaker switch before performing any elec trical repairs Secure plug so that it cannot be accidentally pl...

Page 7: ...lting building architect LIFT MODEL CONCRETE REQUIREMENTS XPR 9S 4 Min Thickness 3 000 PSI XPR 9S LP 4 Min Thickness 3 000 PSI XPR 9TS 4 Min Thickness 3 000 PSI All models MUST be installed on 3000 PSI concrete only conforming to the minimum requirements shown above New concrete must be adequately cured by at least 28 days minimum IMPORTANT NOTICE These instructions must be followed to ensure prop...

Page 8: ...lete inventory of parts prior to beginning installation Description Qty Floorplate 1 Front Arm Assembly 2 Rear Arm Assembly 2 Off Side Post with Lift Head Assembly 1 Power Side Post with Lift Head Assembly 1 Hydraulic Cylinder 2 Parts Box Packing List Enclosed 1 Parts Bag Packaged in Part Box 1 Hydraulic Power Unit 1 Off Side Post Assembly Power Side Post Assembly Hydraulic Power Unit Frame Contac...

Page 9: ...2 1308 mm H Reach Rear Arm Min 34 863 mm 28 1 2 724 mm 27 1 2 698 mm I Reach Rear Arm Max 54 1 2 1384 mm 47 1 2 1206 mm 51 1 2 1308 mm J Min Pad Height 4 25 108 mm 4 25 108 mm 4 25 108 mm Screw Pad Adjustment 1 75 44 5 mm 1 75 44 5 mm 1 75 44 5 mm K Rise 72 1829 mm 72 1829 mm 72 1829 mm L Max Lift Height Pad Only 78 1981mm 78 1981mm 78 1981mm M Max Lift Height 2 5 Adapter 80 5 2044mm 80 5 2044mm 8...

Page 10: ... lift head still slid towards the top of the post remove the sheaves on the post base plate to aid in equalizer cable routing by first removing the two cotter pins securing them then by sliding the sheaves off of the sheave shaft See Fig 3 5 FAILURE TO TORQUE LIFT CHAIN BOLTS PROPERLY MAY RESULT IN PERSONAL INJURY AND OR DEATH ENSURE THE SOCKET HEAD CAP SCREWS ARE TIGHT PRIOR TO LIFT OPERATION Sli...

Page 11: ... Fig 3 9 7 Install the Top Plate Assembly using the M10 hardware as provided in the Parts Bag See Fig 3 10 NOTE FOR XPR 9S MODELS FOR NARROW CONFIGURATION USE THE BUTTON LOCATED AT 12 ABOVE CABLE END FOR WIDE CONFIGURATION USE THE BUTTON LOCATED ON THE END OF THE CABLE For narrow configuration For wide configuration To threaded cable end Fig 3 6 NOTE REFER TO STEP 10 FOR CABLE ROUTING DETAILS ROUT...

Page 12: ... above the lift head See Fig 3 13 OPTIONAL SHEAVE COVER INSTALLATION INSTRUCTIONS To install optional sheave covers first fit sheaves over sheave shafts Then fit sheave cover over both sheave shaft ends Ensure the notched face of the sheave cover faces the base plate Secure sheave cover by inserting cotter pins through the cotter pin holes in the sheave shaft Sheave Cover Sheave Shaft Sheave Fig 3...

Page 13: ...r the post locations Keep all dimensions squarewithin1 8 3mm ormalfunctioningoftheliftcanoccur 5 After the post locations are properly marked use chalk or crayon to make an outline of the posts on the floor at each post location using the post base plates as a template See Fig 4 1 6 CHECK ALL DIMENSIONS TWICE and make sure that the layout is perfectly square CHALK LINE FOR XPR 9S CONFIGURATIONS US...

Page 14: ...nst the base plate If shimming is required be sure that enough threads are left exposed See Fig 5 2 NOTE BENDPAK LIFTS ARE SUPPLIED WITH INSTALLATION INSTRUCTIONS AND CONCRETE FASTENERS MEETING THE CRITERIA AS PRESCRIBED BY THE AMERICAN NATIONAL STANDARD AUTOMOTIVE LIFTS SAFETY REQUIREMENTS FOR CONSTRUCTION TESTING AND VALIDATION ANSI ALI ALCTV 2011 LIFT BUYERS ARE RESPONSIBLE FOR ANY SPECIAL REGI...

Page 15: ...ng plate on the Power Side post using four M8 hex head bolts and nuts supplied See Fig 7 1 2 Fill the reservoir with 10 WT HYDRAULIC OIL OR DEXRON ATF approximately four gallons Make sure the funnel used to fill the Power Unit is clean Do not connect power unit hydraulic hose assembly at this time 3 The standard power unit for your lift is 220 volt 60HZ single phase All wiring must be performed by...

Page 16: ... BE COVERED UNDER WARRANTY MOTOR CAN NOT RUN ON 50HZ WITHOUT A PHYSICAL CHANGE IN THE MOTOR USE A SEPARATE CIRCUIT BREAKER FOR EACH POWER UNIT PROTECT EACH CIRCUIT WITH TIME DELAY FUSE OR CIRCUIT BREAKER FOR 208 230 VOLT SINGLE PHASE USE A 25 AMP FUSE FOR 208 230 VOLT THREE PHASE USE A 20 AMP FUSE FOR 380 440 VOLT THREE PHASE USE A 15 AMP FUSE Fig 8 1 Hairpin Cotter Safety Clevis Pin Off Side and ...

Page 17: ...8 8 8 Operate the Power Side safety handle check for proper operation of both safety assemblies and adjust cable tension as required 9 Raise and lock each lift head approximately 28 above the ground See Fig 8 9 ENSURE THAT BOTH THE POWER SIDE OFF SIDE SAFETIES ENGAGE PROPERLY PRIOR TO LIFT OPERATION Fig 8 5 Route safety cable over Off Side safety sheave and down towards base plate NOTE Post cut aw...

Page 18: ... OFF SIDE SAFETIES ENGAGE PROPERLY PRIOR TO LIFT OPERATION Fig 8 9 Safety Cable Power Side Hose Off Side Hose 90 Fitting Power Unit Hose Tee Fitting Fig 9 1 Cylinder Hose Fig 9 2 NOTE Post and lift head cut away for clarity WHEN ROUTING HYDRAULIC HOSES THROUGH THE POSTS ROUTE HOSES THROUGH THE HOSE CLIPS WELDED ON EACH POST MAKE SURE THAT THE HOSE IS CLEAR OF ANY MOVING PARTS IT MAY BE NECESSARY T...

Page 19: ...CEEDING WHEN THE CABLE ADJUSTING NUTS BOTTOM OUT ON THE THREADED END OF THE CABLE CONNECTOR AND THERE IS STILL SLACK IN THE CABLES THE CABLES HAVE STRETCHED BEYOND THE SAFE USEFUL LENGTH AND NEED TO BE REPLACED WITH FACTORY APPROVED CABLE ASSEMBLIES DO NOT PLACE WASHERS SPACERS OR OTHER DEVICES TO SHORTEN THE EFFECTIVE CABLE LENGTH AS DAMAGE TO THE LIFT OR INJURY TO PERSONS MAY OCCUR THE EQUALIZER...

Page 20: ...over and Off Side safety cover mounting screws See Fig 11 1 2 Install the floor plate between the columns as shown For Wide configuration use the floor plate extension See Fig 11 2 STEP 12 Installing the Lift Arms 1 Place the appropriate lift arm assembly in the lift heads See Fig 12 5 2 Install the lift head pins into the lift head and through the holes in the arm assembly See Fig 12 1 3 Install ...

Page 21: ...IDE OPEN SIDE OF THE LIFT POST THE ARM RESTRAINT GEARS MUST BE POSITIONED AND ADJUSTED PROPERLY CONFIRMATION OF PROPER GEAR ENGAGEMENT MUST BE MADE PRIOR TO THE OPERATION OF THE LIFT PERIODIC INSPECTION AND ADJUSTMENT IS REQUIRED FAILURE TO INSPECT AND ADJUST THE ARM RESTRAINT GEARS ON ALL FOUR ARMS PROPERLY CAN RESULT IN DAMAGE TO THE VEHICLE OR INJURY AND OR DEATH Fig 12 4 LEFT RIGHT Lift Head P...

Page 22: ...ED DO NOT OPERATE THE LIFT IF ANY OF THE FOUR ARM RESTRAINT SYSTEMS ARE NOT FUNCTIONING PROPERLY REPLACE ANY BROKEN COMPONENTS OR COMPONENTS WITH BROKEN TEETH ONLY WITH AUTHORIZED OR APPROVED REPLACEMENT PARTS POST TIE ROD INSTALLATION WARNING YOU MUST INSTALL POST TIE ROD AS SHOWN TIGHTEN POST TIE ROD TO 2 3 FT LB OF TORQUE UPON FINAL INSTALLATION INSPECTION THESE INSTRUCTIONS MUST BE FOLLOWED TO...

Page 23: ...23 ...

Page 24: ...Protect each circuit with time delay fuse or circuit breaker n For 208 230 volt single phase use a 25 amp fuse n For 208 230 volt three phase use a 20 amp fuse n For 380 440 volt three phase use a 15 amp fuse Installation and Adjustment DO NOT attempt to raise vehicle until a thorough operation check has been completed DO NOT PERFORM ANY MAINTENANCE OR INSTALLATION OF ANY COMPONENTS WITHOUT FIRST ...

Page 25: ...ial Voltages Available Upon Request Line 1 Line 2 White Black Guard against electric shock Never connect the green power cord wire to a live terminal This is for ground only ALL WIRING MUST BE PERFORMED BY A CERTIFIED ELECTRICIAN ONLY SEE WIRING INSTRUCTIONS AFFIXED TO MOTOR FOR PROPER WIRING INSTRUCTIONS ...

Page 26: ...or clips are secure 5 Check to make sure that all safety locks are cleared and free 6 Continue to press the button to raise lift until the cables get taut and the lift starts to move 7 KEEP HANDS AND FEET CLEAR Remove hands and feet from any moving parts Keep feet clear of lift when lowering Avoid pinch points 8 Check all MAIN SAFETY LOCKS to make sure they move freely and spring back to the lock ...

Page 27: ...ts Quick Reference Guide for Frame Engaging Lifts Shall establish procedures to periodically inspect the lift in accordance with the lift manufacturer s instructions or ANSI ALI ALOIM 2000 American National Standard for Automotive Lifts Safety Requirements for Operation Inspection and Maintenance and The Employer shall ensure that lift inspectors are qualified and that they are adequately trained ...

Page 28: ...eing in shop area while lift is in use DO NOT permit anyone on lift or inside vehicle when it is either being raised or lowered ALWAYS keep area around lift free of tools debris grease and oil NEVER overload lift Capacity of lift is shown on nameplate affixed to the lift DO NOT stand in front of the vehicle while it is being positioned in lift bay DO NOT hit or run over lift arms or adapters This ...

Page 29: ...optional frame cradle adapters when necessary to ensure good contact See Fig 19 2 19 3 3 Some vehicles may have the manufacturer s Service Garage Lift Point locations identified by triangle shape marks on the underlift head reference ANSI SAE J2184 1992 Also there may be a label located on the right front door jamb area showing specific vehicle lift points WHEN LOWERING THE LIFT PAY CAREFUL ATTENT...

Page 30: ...in secure contact with vehicle at vehicle manufacturer s recommended lift points 12 Repeat entire loading and raising procedures if required 13 Lower lift onto safety locks DO NOT enter work area or go under vehicle if safety locks are not engaged CLEAR AREA if vehicle is in danger of falling DO NOT position yourself between a wall and the lift If the vehicle falls in that direction you may be sev...

Page 31: ...visual inspection of ALL MOVING PARTS and check for excessive signs of wear Daily Check safety locks to ensure they are in good operating condition Daily Check cables and sheaves for wear Replace worn parts as required with genuine BendPak parts Daily Inspect adapters for damage or excessive wear Replace as required with genuine BendPak parts Weekly Lubricate all sheave and rollers with general pu...

Page 32: ...32 LIFT OPERATION SAFETY CONT D Before lifting the vehicle make sure it is neither front nor rear heavy See image below Center of balance should be midway between adapters ...

Page 33: ...33 OPTIONAL AND STANDARD ACCESSORIES Optional Equipment available through your Authorized BendPak Dealer Telescoping Screw Pad Frame Cradle Pad ...

Page 34: ...Foot Guard on the longer Arm Assembly To install firmly squeeze the ends of the Foot Guard inwards and insert the ends underneath the bent ends of the arm support Release to allow the Foot Guard to spring into place Check to be sure that Foot Guard is firmly in place Repeat this step for each Arm Assembly Foot Guard Arm Support ...

Page 35: ...35 OPTIONAL EQUIPMENT INSTALLATION ...

Page 36: ...orts to provide an unobstructed exit t NEVER drive over lift arms REQUIRED MONTHLY MAINTENANCE t Check all arm adjusting locks for proper operation t Check all cables connections bolts and pins to ensure proper mounting and torque t Visually inspect safeties for proper operation t Lubricate posts with grease t Inspect all anchors bolts and retighten if necessary t Check all posts for squareness an...

Page 37: ...any method including pump spray dispensing brush hand and or swabbing HOW OFTEN TO INSPECT t Lifting cables should be visually inspected at least once each day when in use as suggested by American Petroleum Institute API RP54 guidelines t Any lifting cables that have met the criteria for removal must be immediately replaced WHEN TO REPLACE LIFTING CABLES DUE TO BROKEN WIRES t Lifting cables should...

Page 38: ...38 ...

Page 39: ...39 ...

Page 40: ...n t The vehicle manufacturer s recommendations should be used for spotting and lifting the vehicle LIFT OPERATION SAFETY t It is important that you know the load limit Be careful that you do not overload the lift If you are unsure what the load limit is check the data plate found on one of the lift columns or contact the manufacturer t The center of gravity should be followed closely to what the m...

Page 41: ...ures before operating lift t KEEP HANDS AND FEET CLEAR Remove hands and feet from any moving parts Keep feet clear of lift when lowering Avoid pinch points t ONLY TRAINED OPERATORS should operate this lift All non trained personnel should be kept away from work area Never let non trained personnel come in contact with or operate lift t USE LIFT CORRECTLY Use lift in the proper manner Never use lif...

Page 42: ...rt unit allowing possible contamination it to run for 15 seconds 4 Dirty oil Replace oil with clean Dexron ATF 5 Tighten all fasteners Tighten fasteners to recommended torques 6 Check for free movement of release If handle does not move freely replace bracket or handle assembly 7 Check if motor is wired correctly Compare wiring of motor to electrical diagram on drawing 8 Oil seal damaged or cocked...

Page 43: ...new part Replace with new part 5 Reset circuit breaker fuse Reset circuit breaker fuse 6 Return unit for repair Return unit for repair 7 See Installation Manual See Installation Manual 8 Check wall outlet voltage and wiring Make sure unit and wall outlet is wired properly Motor must run at 208 230 VAC LIFT LOWERS SLOWLY OR NOT AT ALL POSSIBLE CAUSE 1 Cylinders binding 1 2 Release valve clogged 5 4...

Page 44: ...rt 6 Check vehicle weight Compare weight of vehicle to weight limit of the lift 7 Flush release valve Hold release handle down and start unit allowing it to run for 15 seconds 8 Replace with new part Replace with new part 9 Return unit for repair Return unit for repair 10 Check motor is wired correctly Compare wiring of motor to electrical diagram on power unit drawing 11 Inlet screen clogged Clea...

Page 45: ...BLE CAUSE 1 Air in oil 1 2 3 2 Check valve leaks 6 3 Cylinders leak internally 7 4 Lowering valve leaks 4 5 1 7 6 5 Leaking fittings 8 REMEDY INSTRUCTION 1 Check oil level The oil level should be up to the bleed screw in the reservoir with the lift all the way down 2 Oil seal damaged and cocked Replace oil seal around pump shaft 3 Bleed cylinder Refer to Installation Manual 4 Flush release valve H...

Page 46: ...___________________________________________ ____________________________________________________________________ ____________________________________________________________________ ____________________________________________________________________ ____________________________________________________________________ ____________________________________________________________________ ___________...

Page 47: ...47 ...

Page 48: ...015_SERIAL_TAG A 5905950 1 REVISION REV DESCRIPTION DATE EDITED BY ECO A PRODUCTION RELEASE DERIVED FROM 5260445 12 15 2015 JM 00738 SHEET 1 OF 2 REV DWG NO A SIZE TITLE NAME DATE CHECKED DRAWN A 1645 LEMONWOOD DR SANTA PAULA CA 93060 PROPRIETARY AND CONFIDENTIAL THE INFORMATION CONTAINED IN THIS DRAWING IS THE SOLE PROPERTY OF BENDPAK INC ANY REPRODUCTION IN PART OR AS A WHOLE WITHOUT THE WRITTEN...

Page 49: ...TAG A 5905950 1 REVISION REV DESCRIPTION DATE EDITED BY ECO A PRODUCTION RELEASE DERIVED FOR 5260501 12 15 2015 JM 00738 SHEET 1 OF 2 REV DWG NO A SIZE TITLE NAME DATE CHECKED DRAWN A 1645 LEMONWOOD DR SANTA PAULA CA 93060 PROPRIETARY AND CONFIDENTIAL THE INFORMATION CONTAINED IN THIS DRAWING IS THE SOLE PROPERTY OF BENDPAK INC ANY REPRODUCTION IN PART OR AS A WHOLE WITHOUT THE WRITTEN PERMISSION ...

Page 50: ...EVISIONS 05 14 2015 TM 00689 P UPDATED TITLE TO REFLECT WHERE USED UPDATED NEXT ASSEMBLY AND BOM REVISION 11 03 2015 HG 00738 SHEET 1 OF 1 REV DWG NO A SIZE TITLE NAME DATE CHECKED DRAWN P 1645 LEMONWOOD DR SANTA PAULA CA 93060 PROPRIETARY AND CONFIDENTIAL THE INFORMATION CONTAINED IN THIS DRAWING IS THE SOLE PROPERTY OF BENDPAK INC ANY REPRODUCTION IN PART OR AS A WHOLE WITHOUT THE WRITTEN PERMIS...

Page 51: ... 5215700 XPR 9S 9DS 10S LOW PROFILE MEDIUM ARM ASSEMBLY 2 C REVISION REV DESCRIPTION DATE EDITED BY ECO A PRODUCTION RELEASE DERIVED FROM 5260449 12 14 2015 JM 00738 SHEET 1 OF 2 REV DWG NO A SIZE TITLE NAME DATE CHECKED DRAWN A 1645 LEMONWOOD DR SANTA PAULA CA 93060 PROPRIETARY AND CONFIDENTIAL THE INFORMATION CONTAINED IN THIS DRAWING IS THE SOLE PROPERTY OF BENDPAK INC ANY REPRODUCTION IN PART ...

Page 52: ... 5736604 TWO POST LIGHT DUTY BOLT ON ARM RESTRAINT GEAR 4 E 20 5746167 DOUBLE THREADED ROD M10 x 1 5 x 275 2 B 21 5530307 AB 3 4 x 5 12 22 5905151 SAFETY TIPS CARD ALI ST 90 1 23 5900147 SAFETY MANUAL ALI SM 93 1 1 24 5900152 ALIGN OIM OPERATION INSPECTION MAINTENANCE 1 25 5900280 ALI LP FRAME ENGAGING LIFTS GUIDE 1 26 5900048 XPR 9 INSTALLATION MANUAL 1 27 5746192 ARM ADAPTER MEDIUM 4 C REVISION ...

Page 53: ...IC 06 ORB 1 8 5540075 2 5 WIRE DIA Ø20 5 x 75 LG 4 A 9 5530261 PHPS M6 x 1 x 10 8 10 5530010 HHB M8 x 1 25 x 25 4 11 5545347 WASHER M12 FLAT WASHER 2 12 5530756 HHB M6 x 1 x 25 4 13 5535357 NUT M6 x 1 0 NL 4 14 5505350 MODEL 211 HAIR PIN LARGE 4 15 5535354 NUT M12 x1 75 2 16 5505001 GP 7 PL 6000 XPR SERIES SAFETY CLEVIS PIN 4 A 17 5545535 C WASHER SHIM FOR LIFTS 20 18 5535013 NUT M10 x 1 5 NL 4 19...

Page 54: ... 9000 lb capac Floorplate Chain Shorty Adjustable Width Serial numbers 5175392 00000 to 99999 99999 99999 A sample of this machinery has been presented to Notified Body number 1105 CCQS UK Ltd Level 7 Westgate House Westgate Rd London W5 1YY UK Who have issued an EC type examination certificate number CE GB 20150427 01 5A dated 2015 12 10 The equipment in respect of which this declaration is made ...

Page 55: ...55 ...

Page 56: ...56 ...

Reviews: