3
ASSEMBLY INSTRUCTION
NO:Q Carriage Bolt M8
NO:Q-3 Curved Washer
(8)
NO:Q-2 Acorn Nut for M8 Bolt (8)
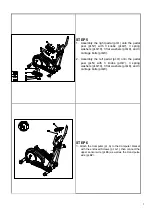
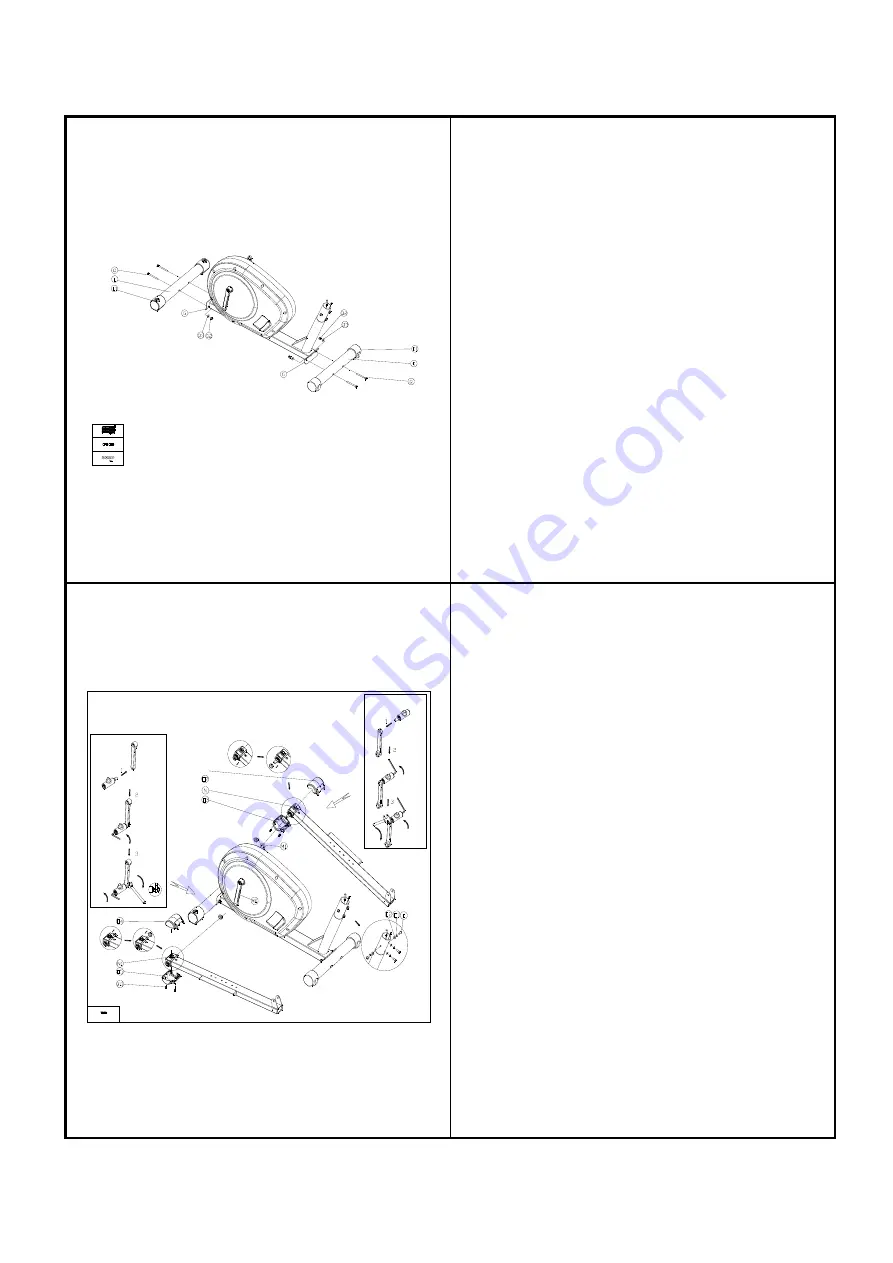
STEP 1
1. I
nstall the front stabilizer (pt.K) with 2 carriage
bolts(pt.Q), semicircle washers (pt.Q3) and nuts
(pt.Q2) by using the hand tools. Make sure the
transportation wheels(pt.K1)
are in correct
direction.
2. Assemble the Rear Stabilizer (pt.L) with 2
carriage bolts (pt.Q), semicircle washers (pt.Q3)
and nuts(pt.Q2) by using the hand tools. Adjust
the end caps(pt.L1)
on the rear stabilizer to set
up a stable, balanced position.
After the assembly the bike can be adjusted to
slightly uneven ground by adjusting the height of the
foot caps in the back. The pre-assembled
transportation wheels in the front allow easy
movement
of the bike: therefore the
transportation-wheels need to point downwards to
the front.
NO:Q-13Screw M3* 14L (4)
STEP 2
1. Attach the Pedal hinge bolt R (pt.N7). Attach the entire
series crank (pt.M11) in the diagram.
Keep pedal axel bolt (pt.N7) in place with the wrench
and twist nylon nut 9 / 16 "x 6 mm (blue) (pt.N5)
counterclockwise with a wrench until it is properly
tightened.
2. Attach the pedal hinge bolt L (pt.N13). Attach the entire
series crank (pt.M1) according to the sketch.
Keep pedal axel bolt L (pt.N13) in place with the wrench
and twist nylon nut 9 / 16 "x 6 mm (red) (pt.N15)
clockwise with a wrench until it is properly tightened
3. Assemble Pedal connecting sheet (pt.N8) and crank
(pt.M11/M1, right / left).
4. Then mount the rear cover (Left / Upper) (pt.O2) and
rear cover (Left / down) (pt.O3) using the screws.
5.
Then mount the rear cover (Right / Upper) (pt.O4) and
rear cover (Right / down) (pt.O5) using the screws
(Q13).
6. Please remove four sets of the Allen bolt (pt.E) and
semicircle washers (pt.E2) and spring washers (pt.E1)
from the Main Frame (pt.G).
Summary of Contents for 93101
Page 1: ...BENEFIT E420 CROSSTRAINER 93101 ...
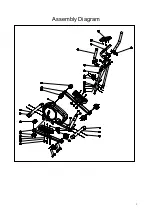
Page 4: ...1 Assembly Diagram ...
Page 5: ...1 EXPLODED DIAGRAM ...
Page 11: ...6 INSTRUCTIONAL MANUAL FOR BENEFIT E420 CONSOLE ...


