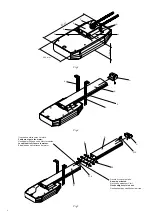
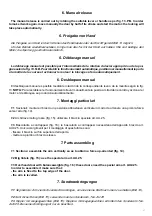
background image

17

6. Manual release

The manual release is carried out by rotating the suitable lever or handle as per fig. 13. P.N. In order

to make it work again, move manually the door by half of its stroke and start the motor: the locking will
take place automatically.

6. Freigabe von Hand

Die Freigabe von Hand ist durch Drehen des Extrahebels oder durch Griff gemäß Bild 13 möglich.
Um den Betrieb wiederherzustellen, bringe man das Tor mit der Hand auf halben Hub und betätige den

Motor; die Sperrung geschieht automatisch.

6. Déblocage manuel

Le déblocage manuel est possible par l’intermédiaire de la rotation du levier approprié ou de la poi-

gnée selon la fig. 13. N.B. Pour rétablir le fonctionnement automatique, positionner manuellement la porte
à la moitié de la course et actionner le moteur: le blocage se fera automatiquement.

6. Desbloqueo manual

El desbloqueo manual es posible mediante rotación de la correspondiente leva o de la manilla según la fig.

13. NOTA: Para restablecer el funcionamiento llevar manualmente la puerta a mitad del recorrido y accionar el
motor; el desbloqueo se producirá automáticamente.

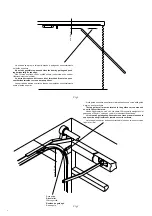
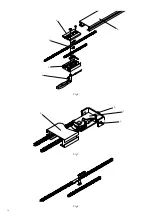
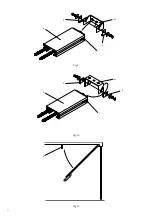
7. Montaggi particolari

7.1 Sezionali: montare il braccio in posizione abbastanza verticale in modo da ottenere una piccola forza

verso l’alto (fig. 14).

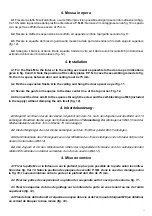
7.2 Architrave molto grosso (fig. 15): utilizzare il braccio speciale art. AU.25.

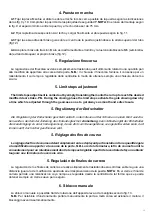
7.3 Basculante a contrappesi (fig. 16): le basculanti a contrappesi necessitano dell’apposito braccio art.

AU.C25. Unici accorgimenti per il montaggio di quest’ultimo sono:

- fissare il braccio sul filo superiore della porta
- mettere a piombo il braccio stesso.
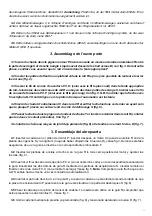
7. Parts assembling

7.1 Sections: assemble the arm vertically so as to obtain a force up-oriented (fig. 14).

7.2 Big lintels (fig. 15): use the special arm art. AU.25.

7.3 Overhead door with balanceweights (fig. 16): these doors need the special arm art. AU.C25.
In order to assemble it make sure that:
- the arm is fixed to the top edge of the door.
- the arm is levelled.

7. Sonderanbringungen

7.1

 Segmentore: Arm ziemlich senkrecht anbringen, um eine kleine Kraft nach oben zu erhalten (Bild 14).

7.2

 Sehr dicke Stürze (Bild 15): verwende man den Sonderarm, Teil. AU.25.

7.3

 Kipptor mit Gegengewichten (Bild 16): Kipptore mit Gegengewichten erfordern den Sonderarm Teil.

AU.C25. Bei seiner Anbringung ist nur zu beachten:

Summary of Contents for Aurora Super

Page 1: ...RA PUERTAS BASCULANTES AUTOMATISMI PER CANCELLI L8542006 Rev 01 98 Libro istruzioni e catalogo ricambi Operating instructions and spare parts catalogue Betriebsanleitung und Ersatzteilliste Livret d i...

Page 2: ...zed standards in particular Angewendete harmonisierte Normen insbesondere Normes harmonis e utilis es notamment Normas armonizadas utilzadas particularmente EN 55022 EN 61000 3 2 EN 61000 3 3 EN 50082...

Page 3: ...s diesem Grund sind wir heute in der Lage zuverl ssige Produkte anzubieten die dank ihren St rke Wirksamkeit und Haltbarkeit der Anforderungen des Endverbrauchers v llig gerecht werden Alle Produkte s...

Page 4: ...empujando horizontalmente sobre el borde superior x min 35 mm Rullo guida Drive roller F hrungsrolle Rouleau de guidage Rueda gu a Il rullo guida superiore deve trovarsi almeno nella zona curva delle...

Page 5: ...chsten Stelle des Tores und der Decke mu wenigstens 35 mm sein Bild 1 das Tor mu zu ffnen und zu schlie en sein indem man es an seinem Oberrand zieht und schiebt Bild 1 Die Handgriffe m ssen sanft und...

Page 6: ...ati tecnici Alimentaci n Absorci n Velocidad de tracci n Fuerza de tracci n Longitud total Dimensiones grupo motor Altura m xima de puerta Peso grupo motor Peso total grupo de cadena Datos t cnicos Te...

Page 7: ...la licht leicht einstellbaren magnetischen Endshaltern und einer Sichereitsvorrichtung ausger stet die den sofortigen Halt des Tores bei der geringsten Ber hrung eines Hin dernisses sichert Seine Laut...

Page 8: ...eisender Pfeil Fl che dirig e vers le haut Flecha puesta en sentido hacia arriba Il cavo deve uscire verso il motore Cable must go to the motor Das Kabel mu gegen den Motor austreten Le cable doit sor...

Page 9: ...osening the 8 nuts D see fig 3 Make sure during this phase that the rail enters the special slit F 3 2 Insert the ceiling connection flasks A into the rail R as closest as possible to the motor and ti...

Page 10: ...10 Fig 6 Fig 7 Fig 8 C P R C S D T V R...

Page 11: ...nement C dans le rail R et enfiler la cha ne dans ce dernier en ayant soin que la plaque P plac e sur celle ci soit du c t du d blocage S fig 6 3 5 Passer la cha ne dans le pignon du tendeur de cha ne...

Page 12: ...12 Fig 10 Fig 11 Fig 9 P R P M T R T P P M A...

Page 13: ...ocking nut M6 included in the supply without clamping the arm itself fig 12 4 Inbetriebsetzung 4 1 B gel M am Sturz oder an der Decke m glichst nah dem Tor nach den Angaben auf das Bild 9 und 10 befes...

Page 14: ...anette avec plaque Manilla con placa Morsetto Clamp Klammer tau Perrillo Kit sblocco a filo art AU MS25 Wire release Art AU MS25 Freigabe ber Draht AU MS25 D blocage fil art AU MS25 Kit de desbloqueo...

Page 15: ...h is adjusted through the gearcase so as to get always a smooth and safe closure 5 Regulierung der Endschalter Die Regulierung der Endschalter geschieht einfach indem diese auf der Schiene um einen We...

Page 16: ...orte a contrappesi art AU C25 Overhead doors with balanceweights special arm art AU C25 Kipptor mit Gegengewichten Sonderarm Teil AU C25 Portes basculantes contrepoids bras sp cial art AU C25 Brazo pa...

Page 17: ...do y accionar el motor el desbloqueo se producir autom ticamente 7 Montaggi particolari 7 1 Sezionali montare il braccio in posizione abbastanza verticale in modo da ottenere una piccola forza verso l...

Page 18: ...ras appropri art AU C25 Les seuls moyens pour le montage de ce dernier sont fixer le bras sur l ar te sup rieure de la porte mettre plomb le bras m me 7 Montajes especiales 7 1 Seccionales montar el b...

Page 19: ...Versicherung deckt nur Personen oder Sachsch den die durch Fertigungsfehler verursacht werden und gilt nur bei Einsatz von Beninc Original Ersatzteilen und wenn die Anlage der UNI Normen 8612 ent spr...

Page 20: ...20 1 2 3 4 5 9 8 7 6...

Page 21: ...atore Motore Lampada Centralina Tensor de cadena Gu a Pat n de tracci n Protecci n Engranaje Trasformador Motor L mpara Centralita Chain tightener Rail Drive trolley Guard Gear Transformer Motor Lamp...

Page 22: ...22 AUTOMATISMI BENINC Srl Via Scamozzi 3 36030 Montecchio Precalcino VI Tel 0445 334191 r a Fax 0445 334265 AUTOMATISMI PER CANCELLI...

Reviews: