background image

15

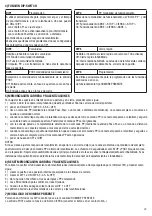
4) DIP-SCHALTER-FUNKTION

DIP1

Programmierung

DIP4

P.P. : Betriebsmodus

Nur zur Programmierung des Drehmoments, der Vorblink-Zeit 

und der Geschwindigkeitsabnahme zu verwenden. DIP1 auf ON 

schalten und:

- über die Taste P1 das Drehmoment einstellen

- über die Taste P2 das Vorblinken aktivieren/deaktivieren

- über den Eingang Schritt/Schritt oder die gespeicherte 

Fernbedienung wird der Raum zur Geschwindigkeitsabnahme 

geregelt. Siehe die entsprechenden Paragraphen. Nachdem die 

Parameter eingerichtet worden sind, wieder auf OFF schalten.

Wählt die Betriebsweise der “Taste P.P.” und des Sende-
geräts.
Off: Betrieb: ÖFFNEN > STOP > SCHLIESSEN > STOP >
On: Betrieb: ÖFFNEN > SCHLIESSEN > ÖFFNEN

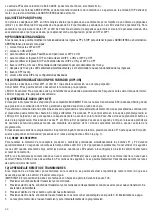
DIP2

Wohngemeinschaft

DIP5

Schnelles Schließen

Aktiviert oder deaktiviert die Funktion Wohngemeinschaft. 
Off: Funktion Wohngemeinschaft deaktiviert. 
On: Funktion Wohngemeinschaft aktiviert. 
Auf den Öffnungsvorgang haben weder der Schritt-Schritt-
Impuls noch der Impuls des Sendegeräts Einfluss.

Aktiviert oder deaktiviert den schnellen Schließvorgang.(nur 
wenn TCA aktiv)
Off: Schnelles Schließen deaktiviert
On: Schnelles Schließen aktiviert. Das Einschalten der Foto-
zelle hat nach 3s das Schließen der Tür zur Folge.

DIP3

PHOT: Betriebsmodus

DIP6

Programmierung

Wählt die Betriebsweise des Eingangs PHOT.
Off: Eingang beim Öffnen und Schließen aktiv
On: Eingang nur beim Schließen aktiv

Ausschließlich für die Programmierung der erweiterten 
Funktionen oder bei  TOTMANN-Steuerung verwenden.

5) ÜBERNAHME VON LAUF UND VERLANGSAMUNG

Um den Raum für die Geschwindigkeitsabnahme beim Öffnen und Schließen einzustellen, folgendermaßen vorgehen:
1)  Das Tor schließen oder öffnen (vergewissern Sie sich, dass der Endschalter für das Schließen/Öffnen gedrückt worden ist)
2)  Den DIP 1 auf ON schalten (DIP 2-3-4-5-6=OFF)
3)  Eine Schritt-Schritt-Steuerung durch den Eingang Schritt-Schritt oder die Fernbedienung geben. Das Tor öffnet sich bei normaler 

Geschwindigkeit.

4)  Wenn das Tor den Punkt erreicht, an dem die Geschwindigkeit abnehmen soll, nochmals eine Schritt-Schritt-Steuerung geben. 

Das Tor verlangsamt die Geschwindigkeit bis zur vollständigen Öffnung. Weitere Schritt-Schritt-Steuerungen werden danach 
nicht mehr berücksichtigt.

5)  Bei stillstehendem und vollständig geöffnetem Tor, eine Schritt-Schritt-Steuerung durch den Eingang Schritt-Schritt oder die 

Fernbedienung geben. Das Tor schließt sich bei normaler Geschwindigkeit.

6)  Wenn das Tor den Punkt erreicht, an dem die Geschwindigkeit abnehmen soll, nochmals eine Schritt-Schritt-Steuerung geben. 

Das Tor verlangsamt die Geschwindigkeit bis es vollständig geschlossen ist. Weitere Schritt-Schritt-Steuerungen werden danach 
nicht mehr berücksichtigt.

7)  Den DIP1 wieder auf OFF schalten.
BEMERKUNGEN:  
Falls das Tor beim Öffnen oder Schließen seine Geschwindigkeit nicht verlangsamen soll, lassen Sie die Bewegung durchführen 
ohne die Schritt-Schritt-Steuerung zu geben. Das Einschalten der Sicherheiten STOPP und PHOT blockieren die Regelungsproze-
dur. Wiederholen Sie den Vorgang von Anfang an. Während dieser Phase ist der Quetschsicherheitssensor deaktiviert. Wenn das 
Encoder-Gerät installiert ist, wird der Anti-Drucksensor während der Übernahmephase deaktiviert.

6) ÜBERNAHME VON LAUF UND VERLANGSAMUNG ZURÜCKSETZEN

Um das Gerät ohne Verzögerungen in Betrieb zu setzen (Laufzeit mittels Trimmer TW einstellbar), ist folgendermaßen vorzugehen:
1)  Das Tor ist, weit entfernt vom Grenzschalter, in eine Zwischenposition zu versetzen
2)  Den DIP 1 auf AN stellen (DIP 2-3-4-5-6=OFF)
3)  Einen Befehl Schritt/Schritt mittels PP-Eingang oder Fernbedienung abgeben
4)  Die LED-Lampen blinken zur Bestätigung des eingeleiteten Rücksetzens
5)  Sobald die LED-Lampen erlischen, ist der DIP 1 auf AUS zu stellen.
Die Daten hinsichtlich des Laufes und der Verlangsamung sind vom Gerät gelöscht worden.

7) BETRIEB IM MODUS „MANN VORHANDEN“

Wenn alle DIP-Schalter auf ON geschaltet sind, schaltet die Zentrale auf den Modus „Mann vorhanden“.
Der Eingang PHOT übernimmt in diesem Fall die Funktion des Schalters SCHLIESSEN (Schalter mit Kontakt N.O. anschließen).
Der Eingang PP übernimmt in diesem Fall die Funktion ÖFFNEN (Schalter mit Kontakt N.O. anschließen).

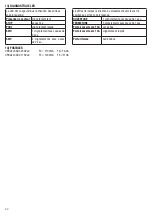
Summary of Contents for CP.BULL5 ARC

Page 1: ...L854200209 10 2019 rev 0 UNIONE NAZIONALE COSTRUTTORI AUTOMATISMI PER CANCELLI PORTE SERRANDE ED AFFINI CP BULL5 ARC ...

Page 2: ...TOP COM P P OPEN 24 Vac 200mA max SCA 24 Vac 3W max C LAMP 115 230Vac 40W max TW TCA SHIELD ANT ANT U3 F2 230Vac T100mA 115Vac T200mA T2 P1 P2 S1 ENC1 ENCODER MAG E OPTIONAL 1 6 R16 R17 ON OFF STEP BY STEP DL1 DL2 F3 230Vac F6 3A 115Vac F10A ...

Page 3: ...ispositivi di sicurezza e di comandi conformi alla EN12978 e EN12453 Raccomandiamo di utilizzare accessori e parti di ricambio originali utilizzando ricambi non originali il prodotto non sarà più coperto da garanzia utte le parti meccaniche ed elettroniche che compongono l automazione soddisfano i requisiti e le norme in vigore e presentano marcatura CE SICUREZZA ELETTRICA Prevedere sulla rete di ...

Page 4: ...olato per collegamento spia cancell o aperto Contatto aperto ad anta chiusa intermittente durante il movimento dell anta chiuso ad anta aperta ENC1 ENCODER Ingresso collegamento Encoder opzionale Vedi paragrafo 5 SHIELD ANT Antenna Collegamento antenna scheda radioricevente incorporata SHIELD schermo ANT segnale Nota La centrale dispone di un pulsante P2 con la medesima funzionalità del pulsante P...

Page 5: ...udere il cancello assicurandosi che sia premuto il finecorsa di chiusura 2 mettere a ON il DIP 1 DIP 2 3 4 5 6 OFF 3 dare un comando PP Ingresso Passo Passo o telecomando memorizzato Il cancello inizia a muoversi in apertura a velocità normale 4 quando il cancello raggiunge il punto di rallentamento desiderato dare un altro comando PP il cancello inizierà a rallentare e proseguirà la corsa fino a ...

Page 6: ... necessario apprenderlo la procedura di memorizzazione è illustrata di seguito il dispositivo è in grado di memorizzare fino a 64 codici diversi Premendo P1 la centrale entra in fase di apprendimento radio il LED rosso DL1 lampeggia 1 volta al secondo in attesa del tasto da associare alla funzione Passo Passo Una volta appreso il tasto si esce dalla programmazione Premendo 2 volte P1 il LED rosso ...

Page 7: ...genda Presenza Rete Lampeggio lento APERTURA 1 lampeggio al secondo STOP acceso fisso CHIUSURA 2 lampeggi al secondo PHOT lampeggio veloce Cancello aperto senza TCA acceso fisso SWO 1 lampeggio con pausa di 2 sec Cancello aperto con TCA lampeggio veloce SWC 2 lampeggi con pausa di 2 sec Cancello chiuso led spento 14 FUSIBILI CP BULL5 ARC 230Vac F2 T100mA F3 F6 3A CP BULL5 ARC 115Vac F2 T200mA F3 F...

Page 8: ...andards EN 12978 and EN 12453 Only use original accessories and spare parts use of non original spare parts will cause the warranty planned to cover the products to become null and void All the mechanical and electrical parts composing automation must meet the requirements of the standards in force and outlined by CE marking ELECTRICAL SAFETY An omnipolar switch section switch with remote contact ...

Page 9: ...or lamp Open contact with closed door leaf Flashing light during the door leaf movement With open door leaf the contact is closed ENC1 ENCODER Input connection of the encoder OPTIONAL See section 5 SHIELD ANT Antenna Connection of the antenna to the incorporated radio receiver module SHIELD screen ANT signal Note The control unit uses a P2 key with the same functions of the Step by Step push butto...

Page 10: ... desired braking point send another PP control signal the gate will start braking until it is completely opened Subsequent PP control signals will be ignored 5 With totally open and stopped gate send a PP control signal through Step by Step Input or memorised remote control The gate starts closing at normal speed 6 When the gate reaches the desired braking point send another PP control signal the ...

Page 11: ...ntrol unit enters the radio learning phase DL1 red LED flashes 1 time per second awaiting the key to the matched to the Step by Step function When the key is stored in memory exit from the programming mode By pressing P1 twice the DL1 red LED flashes 2 times per second and the pedestrian learning phase is entered the pedestrian function controls an opening operation of 7s When the key to be matche...

Page 12: ...legend hereunder The Unit is Powered flashing slowly OPENING 1 blinking per second STOP on with fixed light CLOSING 2 more than 1 blinking per sec PHOT rapid flashing Open gate without TCA on with fixed light SWO 1 flash with 2 second interval Open gate with TCA rapid flash SWC 2 flashes with 2 second interval Closed gate LED off 14 FUSES CP BULL5 ARC 230Vac F2 T100mA F3 F6 3A CP BULL5 ARC 115Vac ...

Page 13: ...enommen werden die der Norm EN 12978 und EN 12453 entsprechen Verwenden Sie ausschließlich Originalzubehör und Originalersatzteile dieVerwendung von nicht originalenTeilen zieht einen Verfall der vom Garantiezertifikat vorgesehenen Gewährleistungen nach sich Alle mechanischen und elektrischenTeile der Automatisierung müssen den Vorgaben der gültigen Normen entsprechen und mit der CE Kennzeichnung ...

Page 14: ... geschlossenem Flügel aussetzend während der Flügelbewegung geschlossen bei offenem Flügel ENC1 ENCODER Eingang Encoder Anschluss OPTIONAL Siehe Paragraph 5 SHIELD ANT Antenne Anschluss Antenne Platine des eingebauten Funke mpfängers SHIELD Bildschirm ANT Signal Bemerkung Die Zentrale verfügt über eineTaste P2 mit derselben Funktion derTaste Schritt Schritt die zur Steuerung derAutomation während ...

Page 15: ...hwindigkeit abnehmen soll nochmals eine Schritt Schritt Steuerung geben Das Tor verlangsamt die Geschwindigkeit bis zur vollständigen Öffnung Weitere Schritt Schritt Steuerungen werden danach nicht mehr berücksichtigt 5 Bei stillstehendem und vollständig geöffnetem Tor eine Schritt Schritt Steuerung durch den Eingang Schritt Schritt oder die Fernbedienung geben Das Tor schließt sich bei normaler G...

Page 16: ... Speicherungsprozedur ist nachstehend beschrieben die Vorrichtung kann bis zu 64 verschiedene Codes speichern Um die Zentrale auf die Lernfunktion zu schalten Taste P1 drücken Die rote LED DL1 blinkt 1 Mal pro Sekunde bis die Taste gedrückt wird die der Funktion Schritt Schritt zugeordnet werden soll Nachdem die Taste gespeichert worden ist wird die Programmierung beendet Um die Zentrale auf die F...

Page 17: ... Blinken ÖFFNEN Blinkt 1 Mal mit einer Pause von 1 Sek STOP Leuchtet fest SCHLIESSEN Blinkt 2 Mal mit einer Pause von 1 Sek PHOT Blinkt schnell Offenes Tor ohne TCA Leuchtet fest SWO Blinkt 1 Mal mit einer Pause von 2 Sek Offenes Tor mit TCA Blinkt schnell SWC Blinkt 2 Mal mit einer Pause von 2 Sek Geschlossenes Tor Led aus 14 SICHERUNGEN CP BULL5 ARC 230Vac F2 T100mA F3 F6 3A CP BULL5 ARC 115Vac ...

Page 18: ...des conformes aux normes EN 12978 et EN 12453 Utiliser exclusivement des accessoires et des pièces de rechange originales l utilisation de composants non originaux comporte l exclusion du produit des couvertures prévues par le certificat de Garantie Toutes la parties mécaniques et électriques qui composent l automation doivent correspondre aux conditions requises des réglementations en vigueur et ...

Page 19: ...lignotant portail ouvert Contact ouvert à vantail fermé intermittent durant le mouvement du vantail fermé à vantail ouvert ENC1 ENCODEUR Entrée branchement encodeur Voire paragraphe 5 SHIELD ANT Antenne Branchement antenne carte radio réceptrice intégrée SHIELD écran ANT signal Note La centrale dispose d une touche P2 avec la même fonction de la touche Pas à Pas utile pour commander l automation e...

Page 20: ...ale 4 lorsque le portail arrive au point de ralentissement désiré donner une ultérieure commande PP le portail va ralentir pour continuer sa course jusqu à ce qu il soit complètement ouvert Toute commande PP qui suit sera ignorée 5 avec le portail arrêté donner une commande PP avec l entrée Pas à Pas ou une télécommande mémorisée Le portail commence à bouger à vitesse normale 6 lorsque le portail ...

Page 21: ...supérieure Pour utiliser une télécommande il faut l apprendre à l avance la procédure de mémorisation est illustrée ci de suite le dispositif est à même de mémoriser jusqu à 64 codes différents En appuyant sur P1 la centrale entre en phase d apprentissage radio la LED rouge DL1 clignote 1 fois par seconde dans l attente de la touche à associer à la fonction Pas à Pas Une fois apprise la touche sor...

Page 22: ...otement lent OUVERTURE 1 clignotement avec pause de 1 sec STOP accès fixe FERMETURE 2 clignotements avec pause de 1 sec PHOT clignotement rapide Portail ouvert sans TCA accès fixe SWO 1 clignotement avec pause de 2 sec Portail ouvert avec TCA clignotement rapide SWC 2 clignotements avec pause de 2 sec Portail fermé Led éteinte 14 FUSIBLES CP BULL5 ARC 230Vac F2 T100mA F3 F6 3A CP BULL5 ARC 115Vac ...

Page 23: ...sar exclusivamente accesorios y repuestos originales el uso de componentes no originales implica la exclusión del producto de las coberturas previstas por el certificado de Garantía Todas las partes mecánicas y eléctricas que componen la automatización deben cumplir con los requisitos de las nor mativas vigentes y que se muestran en la marca CE SEGURIDAD ELECTRICA Prever en la red de alimentación ...

Page 24: ...on puerta cerrada parpadeo durante el movimiento de la puerta cerrado con puerta abierta ENC1 ENCODER Entrada conexión encoder OPCIONAL Véase apartado 5 SHIELD ANT Antena Conexión antena tarjeta radioreceptora incorporada SHIELD pantalla ANT señal Nota La central dispone de un botón P2 con la misma funcionalidad que el botón Paso Paso útil para mandar la automatización durante la fase de instalaci...

Page 25: ...o a distancia memorizado La cancela empieza a moverse en apertura a velocidad normal 4 cuando la cancela llega al punto de ralentización que se desea dar otro comando PP la cancela empezará a ralentizar y seguirá su carrera hasta la completa apertura Posteriores comandos PP serán ignorados 5 con la cancela parada y completamente abierta dar un comando PP mediante la entrada Paso Paso o un mando a ...

Page 26: ... de copia Para utilizar un mando a distancia primero es necesario aprenderlo el procedimiento de memorización es presentado a continuación el dispositivo puede memorizar hasta 64 códigos diferentes Presionando P1 la central entra en la fase de aprendizaje radio el LED rojo DL1 parpadea 1 vez por segundo a la espera del botón a asociar con la función Paso Paso Una vez aprendido el botón se sale de ...

Page 27: ...Presencia de red parpadeo lento APERTURA 1 parpadeo con pausa de 1 segundo STOP encendido fijo CIERRE 2 parpadeos con pausa de 1 segundo PHOT parpadeo rápido Puerta abierta sin TCA encendido fijo SWO 1 parpadeo con pausa de 2 segundos Puerta abierta con TCA parpadeo rápido SWC 2 parpadeos con pausa de 2 segundos Puerta cerrada LED apagado 14 FUSIBLES CP BULL5 ARC 230Vac F2 T100mA F3 F6 3A CP BULL5...

Page 28: ...sterowniki spełniające wymogi norm EN 12978 i EN12453 Używać wyłącznie oryginalnych akcesoriów i części zamiennych stosowanie nieoryginalnych części powoduje wykluc zenie produktu z gwarancji przewidzianej w certyfikacie Gwarancyjnym Wszystkie części mechaniczne i elektryczne wchodzące w skład mechanizmu muszą odpowiadać wymogom obowiązujących przepisów i posiadać oznakowanie CE BEZPIECZEŃSTWO ELE...

Page 29: ...tyk otwarty z zamknię tym skrzydłem przerywający w trakcie ruchu skrzydła zamknięty przy otwartym skrzydle ENC1 ENKODER Wejście podłączenia enkodera OPCJA Zobacz paragraf 5 SHIELD ANT Antena Podłączenie anteny wbudowanej karty radioodbiorczej SHIELD ekran ANT sygnał Nota Centralka jest wyposażona w przycisk P2 mający taką samą funkcję co przycisk krokowy przydatny do sterowania automatycznym mecha...

Page 30: ...ama osiągnie żądany punkt spowalniania wydać polecenie PP brama zacznie zwalniać i zakończy swój tor do pełnego otwarcia Kolejne polecenia PP będą ignorowane 5 przy nieruchomej i całkowicie otwartej bramie wydać polecenie PP za pomocą wejścia trybu krokowego lub zdalnego pilota z odpowiednim zapisem Brama zacznie się przesuwać w kierunku zamykania na normalnej prędkości 6 w chwili gdy brama osiągn...

Page 31: ...tać do 64 różnych kodów Po naciśnięciu P1 centralka przechodzi do fazy ustawienia radiowego dioda LED czerwona DL1 miga 1 raz w ciągu sekundy w oczekiwaniu na klawisz do przypisania do funkcji krokowej Po ustawieniu klawisza wychodzi się z trybu programowania Naciskając 2 krotnie P1 dioda LED czerwona DL1 miga 2 razy w ciągu sekundy i wchodzi w fazę regulacji pieszej funkcja piesza steruje manewre...

Page 32: ...owolne miganie OTWARCIE 1 miganie z 1 sekundową pauzą STOP świeci stałym światłem ZAMYKANIE 2 miganie z 1 sekundową pauzą PHOT szybkie miganie Brama otwarta bez TCA świeci stałym światłem SWO 1 miganie z 2 sekundową pauzą Brama otwarta z TCA szybkie miganie SWC 2 miganie z 2 sekundową pauzą Brama zamknięta dioda led wyłączona 14 BEZPIECZNIKI CP BULL5 ARC 230Vac F2 T100mA F3 F6 3A CP BULL5 ARC 115V...

Page 33: ...05 EN 61000 6 3 2007 A1 2011 EN 60335 1 2012 A11 2014 EN 60335 2 103 2015 50581 2012 Control box 230Vac Nome del produttore Indirizzo Codice postale e Città Telefono E mail EU Certificato di Conformità DOC Dichiara che il documento è rilasciato sotto la propria responsabilità e appartiene al seguente prodotto Modello Tipo Tipo di prodotto Il prodotto sopraindicato risulta conforme alle disposizion...

Page 34: ... EN 61000 6 3 2007 A1 2011 EN 60335 1 2012 A11 2014 EN 60335 2 103 2015 50581 2012 Steuerung 230Vac Nom du producteur Adresse Ville et code postal Téléphone E mail Déclaration CE de conformité DOC Nous déclarons que le document est délivré sous notre propre responsabilité et qu il appartient au produit suivant Modèle Type Type de produit Le produit mentionné ci dessus est conforme aux dispositions...

Page 35: ...EN 60335 2 103 2015 50581 2012 Centralka sterowania 230Vac Nombre del productor Dirección Ciudad y código postal Teléfono E mail Declaración CE de conformidad DOC Declara que el documento ha sido emitido bajo la propia responsabilidad y pertenece al siguiente producto Modelo Tipo Tipo de producto El producto indicado arriba cumple con las disposiciones establecidas por las siguientes directivas Ha...

Page 36: ...scita alimentazione accessori Power supply of accessories Ausgang Speisung Zubehör Sortie alimentation accessoires Salida alimentación accesorios Wyjście zasilania osprzętu 24Vdc 200mA max Grado di protezione Protection level Schutzklasse Dégrée protection Grado de protección Stopień ochrony IP55 Temp funzionamento Operating temperature Betriebstemperatur Temp fonctionnement Temp de funcionamiento...

Reviews: