02/ 2011
BENNING MM P3
20
8.5 Continuity test with buzzer
- Select the desired function (Ω,
, ) by means of the rotary switch
7
of the
BENNING MM P3.
- Switch over to the continuity test ( ) by means of the „SELECT“ key
5
of the
BENNING MM P3 (press the key once).
- Bring the safety measuring leads into contact with the measuring points.
- If the resistance between the measuring points falls below 50 Ω, the integrated
buzzer of the BENNING MM P3 sounds.
See figure 6:
Continuity test with buzzer
8.6 Capacity measurement
Before performing capacity measurements, discharge capacitors com-
pletely!
Never apply voltage to the capacity measurement jacks!
This might damage or destroy the device! A damaged device might
represent an electrical hazard!
- Select the desired function (
) by means of the rotary switch
7
of the
BENNING MM P3.
- Determine the polarity of the capacitor and completely discharge the capacitor.
-
If necessary, make the null balance by means of the „RANGE/ REL Δ (
)“ key
6
.
- Bring the safety measuring leads into contact with the discharged capacitor ac-
cording to ist polarity and read the measured value on the digital display
of the
BENNING MM P3.
See figure 7:
Capacity measurement
8.7 Frequency measurement
- In order to measure square wave signals of up to 5 V
SS
, select the desired func-
tion (Hz, %) by means of the rotary switch
7
.
- In order to measure sinusoidal signals of up to 600 V
eff
, select the desired func-
tion (V
AC
, Hz, %) by means of the rotary switch
7
and switch over to frequency
measurement (Hz) by means of the „SELECT“ key.
- Please observe the minimum sensitivity for frequency measurements of the
BENNING MM P3!
-
Bring the safety measuring leads into contact with the measuring
points and read the measured value on the digital display
of the
BENNING MM P3.
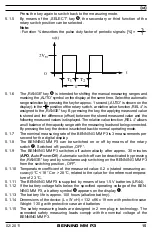
See figure 8:
Frequency/ pulse duty factor measurement
8.8 Pulse-Duty Factor Measurement
- Select the desired function (Hz, %) at the BENNING MM P3 by means of the
rotary switch
7
.
-
Switch over to the pulse-duty factor measurement (%) by means of the „SELECT“
key
5
of the BENNING MM P3 (press the key once).
- Bring the safety measuring leads into contact with the measuring points and read
the measured value on the digital display
of the BENNING MM P3.
See figure 8:
Frequency/ pulse duty factor measurement

