38
Base-2
Security Panel
ENGLISH
Opening the Panel after installation
Work carefully through the following steps to open the Panel after installation.
1.
Taking care
not to dislodge the frontplate
, remove the two frontplate
screws.
2.
Turn the Key [
9
] to position
I
and wait until the Panel emits a beep
(approximately 5 seconds). You will have 10 seconds to open the Panel
without triggering an Alarm.
If necessary, repeat step 2 to refresh the ‘10 second Timeout’.
3.
Insert the TEST jumper [
20
] to inhibit Alarms.
4
. Complete the work on the Panel, then remove the TEST jumper [
20
] and
reattach the frontplate.
WARNING
Do not press the Tamper switch [11] whilst the panel is open, as the
Panel will interpret this as Closure, and will generate an Alarm when the TEST
jumper is removed.
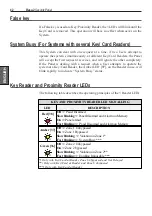
Alternatively, if the system is equipped with Key Readers, insert and leave a key
in one of the Key Readers, this will have the same effect as inhibiting Alarms by
means of the TEST jumper [
20
].
2.
Extract the Key or move the Card/Key away from the Proximity Reader,
then press the PROG button [
10
]until the Panel emits a beep and the Reader
LEDs blink 3 times to confirm deletion.
If Key/Card deletion is unsuccessful, the Panel will emit an error beep.
To Reset default data and delete the system configuration (enrolled devices and
Keys/Cards), work carefully through the following steps.
1.
Open the Panel and insert the TEST jumper [
20
](refer to ‘
Opening the
Panel after installation
’.
2.
Disconnect the Mains 220 V
~
.
3.
Disconnect one of the battery wires.
4.
Push the PROG button [
10
], and at the same time reconnect the battery wire.
5.
Release the PROG button [
10
] after 5 seconds: a double beep will confirm
Reset of Default data.
6.
Reconnect the Mains 220 V
~
.
Default Data


