background image

25


Bentone 

172 515 04  2018-01-02

4.10 

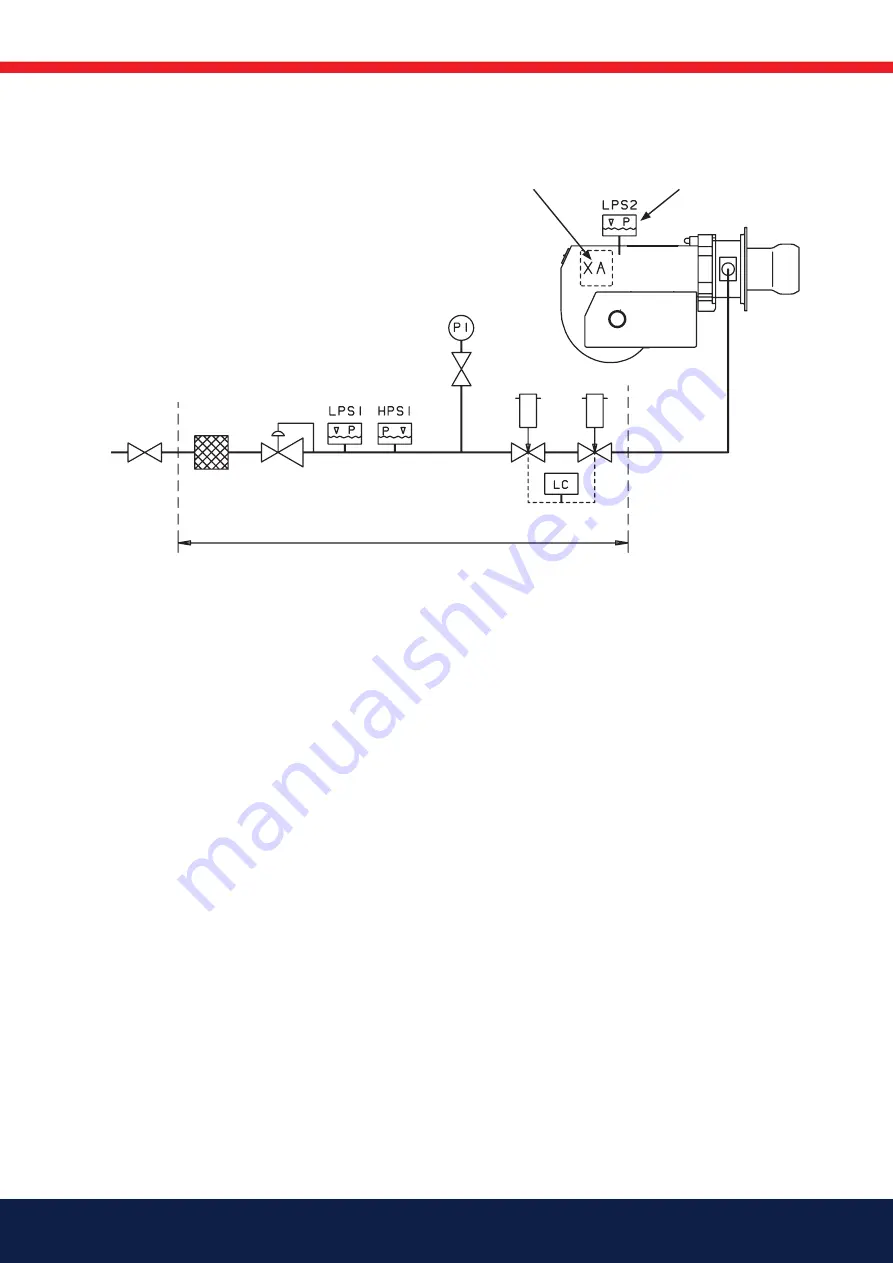
Skeleton diagrams

1-stage burner

1  Ball valve

2 Filter

3 Governor

4  Pressure gauge with shut-off cock

5a  Gas pressure switch, mini

5b  Gas pressure switch, maxi

6a  Main valve

6b  Safety valve

1)

  Valve proving system

9  Air pressure switch

10  Gas burner control


Pos. 5b, 7: Components not required according to EN 676.

1)

   Required over 1200 kW according to EN 676.

3

6b

5b

10

6a

9

7

1

2

5a

4

Summary of Contents for STG 146i/2

Page 1: ...iding sustainable energy solutions worldwide CR00395 178 083 26 1 2022 03 22 Installation and maintenance instruction STG 146i 2 J K IP40 LMV37 MB DLE 407 RWF50 2 Translation of the original instructi...

Page 2: ...loaded at www bentone com ecodesign da 1 Manualer p andre sprog 2 www bentone com download eller scan QR koden 3 Indtast br nderens artikelnummer der findes p typeskiltet se billede og v lg dit sprog...

Page 3: ...5 2 Fan motor and fan wheel 27 5 3 Air intake and intake cone 28 5 4 Replacement of electrical components 29 5 5 Vibration 29 5 6 Flame monitoring and ionisation current check 30 5 7 Flame detector Q...

Page 4: ...lation and work on the burner and associated system components may only be carried out by persons who have undergone relevant training The product is packaged to prevent damage from occurring when han...

Page 5: ...ushing injuries Seal inspections must be performed during installation and servicing to prevent leakage Fitting and installation work has been completed and approved Electrical installation has been c...

Page 6: ...s H E L LL LPG Butane G30 and Propane G31 2 1 Dimensions STG 146i 2 Min recommended distance to floor 2 1 1 Measurements for connection to boiler N M L O D E F G H I J K STG 146i 2 269 239 197 200 158...

Page 7: ...IT LT LU LV MK MT NL NO PL PT RO RS SE SI SK TR 20 mbar II2H3B P AT CH CY DK FI LT RO SE SK 20 mbar II2H3P GB IE 20 mbar II2L3B P NL RO 20 mbar II2E3B P PL 20 mbar I2E R B BE 20 mbar I3P BE 20 mbar 16...

Page 8: ...s started and established flame it is necessary to adjust the settings so that they are adapted to the installation and the fuel used mbar kW G20 G25 41 133 kW G30 G31 47 144 kW 1 0 0 0 1 0 2 0 3 0 4...

Page 9: ...ection Gas valve 4 Gas pressure switch VPS 5 Gas valve MultiBloc 6 Pressure regulator 7 Filter 8 Ignition electrode 9 Ionization electrode 10 Brake plate 11 Motor 12 Fan wheel 13 Brake plate adjustmen...

Page 10: ...switch max Overload protection switch 18 Flame tube 19 Air pressure switch 20 Main switch 21 Fuse 22 Connection block 23 Automatic control unit LMV 24 Display AZL automatic control unit 25 Reset 26 Op...

Page 11: ...nt boiler The power information on the type plate refers to the burner model s min and max effect 3 5 Gas supply In order to obtain good operational safety it is important that the installation of the...

Page 12: ...9 4 m3 h Hi 0 9 9 45 kW m3 Calculate standard volume using the following formula f 273 x PBaro PGas f 273 945 20 0 90 273 tGas 1013 273 15 1013 Calculate conversion factor using the following formula...

Page 13: ...e values V Volume fire box m3 2 m3 Q Burner output kW 200 kW T Prepurge time s Industrial applications according to EN 746 The prepurge time must correspond to at least 5 complete air circulations in...

Page 14: ...ge as a template and fasten with M8 M10 screws 2 Loosen the burner tube D and fit the enclosed gasket E around the flame tube and check that the electrodes are set correctly see chapter Gas nozzle 3 M...

Page 15: ...15 Bentone 3 10 Gas nozzle Check that the ignition electrodes are set correctly before assembly on the boiler LPG Naturgas 160303 548 160303 551 8 0 2 5 160303 549 45 2 5...

Page 16: ...control goes into blockage Solenoid valve and motor become de energized Remove the link after testing 3 11 De aerating De aerating the gas line by closing the tap for the gas connection and unscrewin...

Page 17: ...rake plate adjustment that changes the position of the brake plate in the burner head The position of the brake plate must be adjusted to achieve as favorable a pressure drop across the brake plate as...

Page 18: ...rried out the burner is ready for start up Read the sections on setting of the gas valve damper motor and combustion device before starting Open the ball valve and switch on the main switch start the...

Page 19: ...ssure drops so much that poor combustion occurs 1 Remove protective cover 2 Start the burner 3 Carefully turn the scale on the air pressure switch clockwise until the air pressure switch stops the bur...

Page 20: ...ing socket and connect a manometer for measuring connection pressure 3 Start the burner 4 Measure and note the connection pressure to the burner at the highest input power 5 Set the gas pressure switc...

Page 21: ...can be connected so that it provides automatic restart or that the burner is blocked see S10 or S16 in the wiring diagram The system s safety regulations control connection options 1 Remove protective...

Page 22: ...1 8 possible 8 Test point connection G 1 8 downstream of valve 1 possible on both sides 9 Output flange 10 Gas flow direction 11 Test point connection G 1 8 upstream of V1 possible on both sides 12 Ve...

Page 23: ...t as above Adjustment of governor Adjust outlet pressure from governor by means of a screw Min and max outlet pressures corresponds to appr 60 turns of the spring It is not possible to change pressure...

Page 24: ...24 Bentone Pressure taps 1 3 4 5 Screwed sealing plug G 1 8 2 Measuring nozzles Electrical connection 1 4 pa 3 pe 2 3 pe 4 pa 5 1 2 4 4 3 1 5 5 P1 L1 MP N 2 1 P1 L1 Mp N S 20 S 50...

Page 25: ...ssure gauge with shut off cock 5a Gas pressure switch mini 5b Gas pressure switch maxi 6a Main valve 6b Safety valve 7 1 Valve proving system 9 Air pressure switch 10 Gas burner control Pos 5b 7 Compo...

Page 26: ...ning the electrical cabling and screws G to the gas valve and lift out 3 Loosen screws H and lift burner out of fixing flange 4 Loosen screws I and remove flame tube 5 Clean brake plate and nozzle if...

Page 27: ...wheel clean or replace if necessary 5 If replacing the motor mount on the existing motor flange 6 Check that the o ring J is intact and that it is not damaged during mounting 7 Fit the fan wheel so t...

Page 28: ...ir intake and flame tube 5 Disconnect ignition cable 6 Disassemble the burner by loosening the through screw K and removing the front piece 7 Check function and appearance of the various components in...

Page 29: ...unt a new component with the same connection or with the specified alternative connection 4 Turn on the main power and check the function of the new component 5 Start burner and check adjust combustio...

Page 30: ...ding to the ionisation principle The ionisation current should be checked on initial start up and at each service visit The reason for low ionisation current can be leakage current poor connection to...

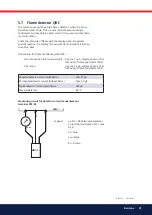
Page 31: ...limited to approx 55 Required detector current with flame Min 70 A Permissible detector current without flame Max 5 5 A Typical detector current with flame 100 A Max temperature 60 C Measuring circuit...

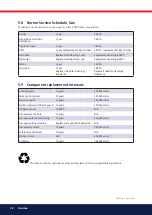
Page 32: ...starts Contactor 10 years 500 000 starts Burner 1 year 3 000 h Inspection of electrical installation 1 year 3 000 h Tightness check 1 year 3 000 h Filter 1 year replacement at p 10 mbar 3 000 h replac...

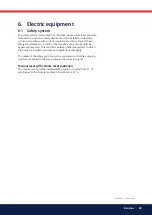
Page 33: ...y requirements are met by other means safety circuits must be bypassed jumpered This can differ between different systems in which the burner is installed see rules and regulations that apply The cabl...

Page 34: ...34 Bentone 6 2 Wiring diagram...

Page 35: ...n S10 Gas pressure switch max S17 Gas pressure switch VPS S30 Extern reset T1 Ignition transformer X1 Connection block X20 Connection block X56 Connection display Y1 Solenoid valve 1 Y2 Solenoid valve...

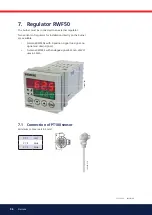
Page 36: ...on the burner are available Siemens RWF50 2 with 3 position signal up signal no signal and down signal Siemens RWF50 3 with analogue signal 4 20 mA LMV37 uses 4 20 mA For information and operation of...

Page 37: ...shown on the actual value display red and tUnE flashes on the setpoint display green See chapter 9 Self setting function in the enclosed manual Flashing actual value display The actual value display r...

Page 38: ...ACS411 See chapter 8 6 Display diSP in the enclosed manual Manual control self setting the user parameter and configuration levels can be activated from here RWF50 X 160303 504 Basic display Enter 78...

Page 39: ...at OPr appears Press Enter so that SP1 appears Press Enter and SP1 flashes Press or to adjust the required setpoint temperature or pressure and press Enter to confirm Timeout Timeout after about 180 s...

Page 40: ...ress for 5 seconds Cancel Cancel with It is not possible to start tUnE in manual control or low fire operation 160303 503 When tUnE stops flashing the self setting function has been ended The paramete...

Page 41: ...ss so that PArA appears Press Enter so that the first parameter of the parameter level is displayed Basic display ESC 2 s or timeout Enter OP r Enter User level OPr SP1 SP2 InP1 Y or editable or only...

Page 42: ...e chapter 5 2 High fire operation in the enclosed manual Switch off threshold Heating controller HYS3 0 0 9999 digit 5 See chapter 5 2 High fire operation in the enclosed manual Switch on threshold Co...

Page 43: ...rinting Basic display ESC 2 s or timeout Enter OP r Enter User level OPr SP1 SP2 InP1 Y or editable or only display Navigation principle Enter ESC One level back One level down Next previous parameter...

Page 44: ...correctly used inadmissible values of the control variable can be produced Measured value corrections must therefore be made within certain limits only Start of display SCL1 Scale low level 1999 0 999...

Page 45: ...es from being entered outside the end defined range 1999 9999 Setpoint limitation end SPH Setpoint limitation high Self optimization 0 1 Free Locked Self optimization can only be disabled or enabled v...

Page 46: ...monitor the actual value in connection with thermal shock protection TSS a tolerance band can be laid about the setpoint curve If the limit values are crossed the ramp is stopped See chapter 5 7 Therm...

Page 47: ...ng choices Only RWF50 3 Analog output The RWF50 3 has an analog output The analog output offers the following setting choices ConF OutP Parameter Value selection Description Function FnCt Function 1 4...

Page 48: ...r 5 4 Predefined setpoint in the enclosed manual ConF binF Parameter Value selection Description Binary input bin1 Binary inputs 0 1 2 4 No function Setpoint changeover Setpoint shift Changeover of op...

Page 49: ...play value for lower display Switched off Analog input InP1 Controller s angular positioning Setpoint End value with thermal shock protection Timeout tout 0 180 255 Time s on completion of which the c...

Page 50: ...e system components display and operating unit actuators are connected directly to the LMV37 4 basic unit All safety related digital inputs and outputs of the system are monitored by a contact feedbac...

Page 51: ...mum adaptations to the relevant application A change of parameters varies in levels of authorization this manual will give info on those that might be changed by the installer The actuators are driven...

Page 52: ...n 1 2 X5 01 pin 2 3 X5 02 pin 2 3 X5 02 pin 2 3 X3 05 pin 1 X4 02 pin 2 3 X6 03 pin 2 3 X8 02 pin 1 3 X7 01 pin 2 3 X7 02 pin 2 3 X3 05 pin 2 P P X9 04 pin 2 3 X5 01 pin 2 3 R ON Function Inputs Funct...

Page 53: ...39 Test pressure switch min Pmin 40 Fuel valve V ON 42 Ignition Z OFF 44 Interval 1 t44 50 Safety time 2 TSA2 52 Interval 2 t52 60 Operation 1 stationary 62 Operation 2 air damper LK low fire KL posit...

Page 54: ...currence of start prevention to signaling 7 Only in case of valve proving during startup valve proving via pressure switch min 8 Only in case of startup without valve proving valve proving via pressur...

Page 55: ...P Combustion pressure switch SA Actuator SA K Low fire position of actuator SA N Postpurge position of actuator SA R Home position of actuator SA V Rated load position of actuator SA Z Ignition load p...

Page 56: ...Power supply neutral conductor N Protective earth PE Supply signal for safety loop Safety loop Fuel valve V2 Wiring point for series valve Fuel valve V1 Fuel indication oil gas Reset manual locking Su...

Page 57: ...tor Air 1 ACT0_IN_B ACT0_IN_A ACT0_OUT_B ACT0_OUT_A GND UAC_SA Actuator Fuel 1 Signal reference GND RxD1 TxD1 DC 5 V Building automation 1 Signal reference GND RxD0 TxD0 DC 5 V Display BCI Speed feedb...

Page 58: ...tion For changing to parameter setting mode P press simultaneously F and A reset Info and Enter button For navigating in info or service mode Selection symbol flashing press button for 1 s For changin...

Page 59: ...nfo or service mode ESC and button Escape function press and simultaneously No adoption of value One menu level up P V h min s Fault status message Flame present Valve controlled Ignition controlled F...

Page 60: ...rval 2 waiting time Ph66 Switching back to pilot Reactivation of ignition pilot Ph67 Switching back to pilot Shutdown of main valves Ph68 Switching back to pilot Pilot mode waiting phase Ph69 Switchin...

Page 61: ...l display Change to normal display Parameter level 9 3 Automatic control unit levels When working on burners there are different levels at which the automatic control unit can be accessed The info and...

Page 62: ...set reset Internal parameter password level General Basic unit Air fuel ratio control curves primary setting Air fuel ratio control Actuator Error histery Process data The following sections explain t...

Page 63: ...lected parameter set Version 143 Reserve End 9 3 2 Parameter of level info 9 3 3 Parameter of level service No Parameter 954 Flame intensity 960 Actual flow rate fuel throughput in m h l h ft h gal h...

Page 64: ...irst of whishes P V h min s Bild 43 1107 Press or to select a number or letter P V h min s Bild 44 1207 Press reset to confirm the value The code for logging into service level is found on the plate o...

Page 65: ...a minus sign The next bar starts flashing Complete the rest of the password according to the principle described P V h min s Bild 47 1207 Example Password consisting of 4 characters After entery of th...

Page 66: ...h min s Bild 96 0707 201 appears flashing Press to go to the settings for air fuel ratio control and parameter 201 for selecting the operating mode 9 3 5 Setting an automatic control unit which has no...

Page 67: ...t LoGp 2 stage 12 oil modulating with 2 fuel valves Lo mod 2V 13 oil modulating with gas pilot and 2 fuel valves LoGp mod 2V 14 gas modulating G mod pneu 0 active 15 gas modulating with pilot Gp1 mod...

Page 68: ...SD PWM fan OFF If the parameter is set correctly move directly to the next parameter with Press reset to adjust parameter 542 Select your setting by pressing one of the buttons Press reset to save the...

Page 69: ...0707 Display P0 appears flashing Fuel air settings are not made in the display but on the respective component on the burner see chapter Burner settings Go to P9 with P V h min s Bild 112 0707 Display...

Page 70: ...rge position P V h min s Bild 116 0707 Phase Prepurging P V h min s Bild 117 0707 Phase Traveling to ignition position P V h min s Bild 119 0707 Phase Preignition P V h min s Bild 120 0707 Phase for f...

Page 71: ...s ESC simultaneously If the burner goes into blocking mode when increasing to full load restart the setting procedure and adjust the curvepoints in order to avoid the burner entering blocking mode P V...

Page 72: ...o editing mode enabling you to change the minimum capacity Adjust the setting downwards or upwards using the buttons Press reset to save the setting Press ESC to return to parameter level Completing p...

Page 73: ...ndards and regulations into consideration 9 4 1 3 Active detector flame evaluation 221 Gas Active detector flame evaluation 0 QRB QRC 1 ION QRA Factory settings marked with bold text When replacing de...

Page 74: ...ted extent 9 4 1 8 Continuous fan A burner can be converted into a continuous fan using conversion kit 119 230 01 See the documentation provided with the kit for instructions on how to perform the con...

Page 75: ...et automatic control unit Check that the burner is connected to gas and has gas pressure Check that the burner is connected to an electrical supply Turn the switch X to ON position the display Z will...

Page 76: ...before P9 flashes the burner is turned off and the automatic control unit enters OFF UPr mode P V h min s Bild 126 0707 The maximum capacity is displayed If the display shows the maximum capacity has...

Page 77: ...inimum capacity is displayed If the display shows the minimum capacity has not yet been entered The system can be run down to 20 You can press reset to go to editing mode enabling you to change the mi...

Page 78: ...t is a good idea to make a backup of the settings The backup ensures that the adjusted values are also saved in the display memory This can be useful e g if there are any problems with the LMV The LMV...

Page 79: ...the backup process Display 1 appears After about 5 seconds depending on the duration of the program 0 appears on the display indicating the end of the backup process Display 0 If an errror occurs duri...

Page 80: ...gineer level see X 3 4 Access code for service engineer level After login is complete continue with the setting work as shown below Press or for parameter level 000 Press reset Display Parameter 050 f...

Page 81: ...lue 0 Press reset to select the restore process Press to shift the value in change mode 1 position to the left Display Value 1 flashes To detect potential dispalay errors the value is displayed 1 plac...

Page 82: ...displayed 9 6 Fault status message display of errors and info 9 6 1 Display of errors faults with lockout P V h min s Bild 17 0707 The display shows Loc the bar under the fault status message appears...

Page 83: ...ers see table 5 3 3 reset 8 s P V h min s Bild 22 0707 When the button is released a change to info service mode is made P V h min s Bild 19 0707 When the button is released the basic unit is reset If...

Page 84: ...23 0707 The display shows Err The unit initiates safety shutdown The display shows current error code c alternating with diagnostic code d Press reset 1 3 second to return to the normal display Examp...

Page 85: ...s shown below Press or for parameter level 700 P V h min s Bild 84 0707 HISt 700 for error history Press reset to go to the parameter level P V h min s Bild 85 0707 Display Parameter 701 flashes index...

Page 86: ...r 06 output Example Parameter 701 index 05 for startup counter diagnostic code _ _ Press reset 1 3 second P V h min s Bild 88 0707 Press reset to go to display mode Display Value 56 number of startup...

Page 87: ...istory was deleted max to parameter 725 Example Parameter 725 index 01 error code 111 To the next parameter Back to the previous parameter P V h min s Bild 91 0707 When this display appears you have r...

Page 88: ...min s Bild 26 0707 9 7 2 Start prevention Note For meaning of the error and diagnostic codes refer to chapter Error code list When an error has been acknowledged it can still be read out from the erro...

Page 89: ...ing Press reset to go to the settings for air fuel ratio control and parameter 201 for selecting the operating mode P V h min s Bild 96 0707 Select another burner type than the one already selected by...

Page 90: ...n OFF position it can be set to Manually OFF which means that the burner will not start Manual OFF can be activated by pressing F for at least 1 second then LoAd 0 0 appears flashing LoAd 0 0 means Ma...

Page 91: ...ic operation press ESC for 3 seconds Manually OFF must not be used just to put a burner out of operation when doing mounting work or when the burner is not ready for operation The safety notes contain...

Page 92: ...Preselected parameter set Version 1 Hex_16 read only 0 0xFFFF 1 LMV37 400 V 01 05 LMV37 420 V 01 06 Info Service 107 Software version 1 Hex_16 read only 0x100 0xFFF9 1 V 03 30 Info Service 108 Softwar...

Page 93: ...0 SO 142 Setback time in the event of communication breakdown Setting values 0 inactive 1 7200 s 1 Std_u16 edit 0 s 7200 s 1 s 120 s SO BA 143 Reserved 1 Std_u8 edit 1 8 1 1 Info Service 144 Reserved...

Page 94: ...ching back to pilot switching cycles 1 Std_s32 read only 0 9999999 1 0 Info Service 190 Postpurging in lockout position 0 deactivate no load position 1 active postpurge position When active the Alarm...

Page 95: ...l valves 14 G mod pneu without actuator 15 Gp1 mod pneu without actuator 16 Gp2 mod pneu without actuator 17 Lo 2 stage without actuator 18 Lo 3 stage without actuator 19 G mod only gas actuator 20 Gp...

Page 96: ...37 400 16 LMV37 420 1 SO 221 Gas Active detector flame evaluation 0 QRB QRC 1 ION QRA 1 Selection edit 0 1 1 1 SO 222 Gas Prepurging 0 deactivated 1 activated 1 Selection edit 0 1 1 1 SO 223 Repetitio...

Page 97: ...tive 1 activated 1 Selection edit 0 1 1 1 SO 241 Gas Execution valve proving 0 no valve proving 1 valve proving on startup 2 valve proving on shutdown 3 valve proving on startup and shutdown 1 Selecti...

Page 98: ...ower output limit undefined 20 1 Output edit clear 20 100 0 1 undefined SO BA 546 Upper output limit undefined 100 1 Output edit clear 20 100 0 1 undefined SO BA 600 Actuators 601 Selection of referen...

Page 99: ...safety loop burner flange 1 Std_u8 edit 0 1 1 1 HF 653 VSD standstill supervision in standby mode 0 deactivate 1 active 1 Std_u8 edit 0 1 1 1 HF 700 Error history 701 Error history 701 725 01 Code 25...

Page 100: ...tch valve proving Bit 0 3 8 Pressure switch air pressure switch Bit 0 4 16 Load controller OPEN Bit 0 5 32 Load controller ON Bit 0 6 64 Load controller CLOSE Bit 0 7 128 Safety loop Bit 1 0 1 Safety...

Page 101: ...assword level 951 Mains voltage normalized AC 230 V Voltage value x 1 683 AC 120 V Voltage value x 0 843 1 Std_u8 read only 0 V 255 V 1 V 0 V SO 954 Intensity of flame 1 Std_u8 read only 0 100 1 0 Inf...

Page 102: ...vention 20 Air pressure combustion pressure start prevention 68 Air pressure POC start prevention 84 Air pressure combustion pressure POC start prevention 4 Extraneous light 0 Extraneous light during...

Page 103: ...roving not possible Valve proving activated but no input assigned check parameters 236 and 237 4 Valve proving not possible Valve proving activated but 2 inputs assigned set parameter 237 to pressure...

Page 104: ...Safety loop burner flange extraneous light start prevention 5 Safety loop burner flange air pressure start prevention 17 Safety loop burner flange combustion pressure start prevention 19 Safety loop b...

Page 105: ...reset if error occurs repeatedly replace the unit 66 Internal error Make a reset if error occurs repeatedly replace the unit 67 Internal error Make a reset if error occurs repeatedly replace the unit...

Page 106: ...ut at the VSD must accord with that of the basic unit parameter 645 4 VSD does not follow quickly enough the changes of the basic unit Check settings of the VSD input filter slippage compensation hidi...

Page 107: ...ectly identified 1 Speed sensor does not detect all tappets of the sensor disk check distance 2 As the motor turns other metal parts are detected also in addition to the tappets improve mounting 3 Ele...

Page 108: ...sures refer to error code 80 Bit 2 Valency 4 7 Interrupt shutdown due to electromagnetic interference Speed has not been reached due to too much electromagnetic interference on the sensor line for mea...

Page 109: ...3 ramp 2 Setting of the VSD ramp must be about 20 shorter than the ramps in the basic unit parameters 522 and 523 Bit 1 Valency 2 3 Fuel actuator Curve too steep in terms of ramp rate Check position d...

Page 110: ...ator is locked or overloaded Bit 0 Valency 1 Line interruption Line interruption detected at actuator s terminals check wiring voltage X54 across pin 5 or 6 and pin 2 0 5 V Bit 3 Valency 8 Curve too s...

Page 111: ...ng Actuator was overloaded or mechanically twisted 1 Check the setting of the actuator type parameter 613 1 2 Check to see if the actuator is blocked somewhere along its working range 3 Check to see i...

Page 112: ...dly replace the unit 3 Internal error relay control Make a reset If error occurs repeatedly replace the unit Software version V03 10 If error C 99 D 3 occurs during standardization of the VSD deactiva...

Page 113: ...ly replace the unit 122 Internal error EEPROM access Make a reset repeat last parameterization check Restore the parameter set if error occurs repeatedly replace the unit 123 Internal error EEPROM acc...

Page 114: ...kup in AZL2 241 15 Restore interruption concerning unpassable ASN The Backup has a unpassable ASN and may not restore of the unit 242 14 Backup backup made is inconsistent Backup is faulty and cannot...

Page 115: ...cking by the AZL2 Timeout communication breakdown During a curve adjustment via the AZL2 the timeout for menu operation has elapsed setting via parameter 127 or communication between the LMV37 4 and t...

Page 116: ...am stop Program stop is active no error 205 Internal error Make a reset if error occurs repeatedly replace the unit 206 0 Inadmissible combination of units basic unit AZL2 207 Version compatibility ba...

Page 117: ...at the gas switch switches off at the set value Remove the hose for the air pressure switch to check that the burner locks out Check that all protective covers and measurement nipples are mounted and...

Page 118: ...ing no ignition spark at the end of pre aeration No power in the terminals Check the connector Replace faulty burner controls Ignition electrodes in contact with each other or earth Adjust Ignition el...

Page 119: ...w Gas pressure too low Increase pressure If necessary contact gas supplier Pulsations at start up Ignition electrodes incorrectly set Adjust Gas pressure too high Check and adjust using pressure gauge...

Page 120: ...too high Surplus air when using natural gas and liquefied petroleum propane butane Choke the air supply Poor air supply Open the air supply Check flue gas damper Holes in gas nozzle clogged Clean Poor...

Page 121: ...easure ment C A Before After mbar mbar Small Flame Large Flame Measures Date Nm3 gas h Governor CO2 CO Fluegas temp Ionisation current Pressure Efficiency Fire room Chimney Measure ment C A Before Aft...

Page 122: ...ration described above is in conformity with Gas Appliance Regulation 2016 426 EU Machinery Directive 2006 42 EC EMC 2014 30 EU Restriction of the use of certain hazardous substances RoHS Directive 20...

Page 123: ......

Page 124: ...Enertech AB P O Box 309 SE 341 26 Ljungby www bentone com...

Reviews: