background image

49

Informazioni sul prodotto

6003417_a – 26.09.2017

IT

2. 

Informazioni sul prodotto

2.1 

Principio di funzionamento

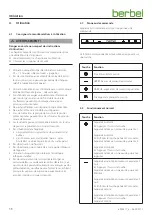
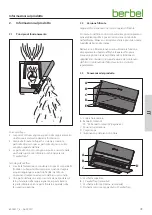
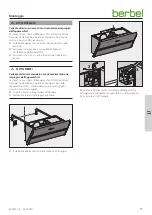
Forza centrifuga


y

 I vapori di cottura vengono aspirati nella cappa attraverso 
una fessura, accelerati e deviati a forma d‘arco. 


y

 Grazie alla forza centrifuga che si viene a creare, le 
particelle di sporco (per es. particelle di grasso e olio) 
vengono separate dall‘aria. 


y

Le particelle di sporco vengono espulse e raccolte nella 
vaschetta superiore e inferiore nonché nel setaccio 
(“Capillar Trap”).

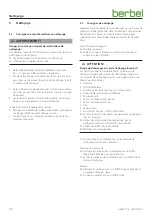
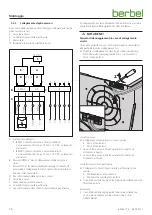
Tecnologia Back-flow


y

Si evita la formazione di condensa o di gocce sul pannello 
frontale o sulla parte inferiore (per es. quando il vapore 
acqueo raggiunge la superficie fredda) tramite un 
dispositivo di aerazione disposto dal basso verso l’alto. 


y

Una parte dell’aria di scarico scaricata viene riportata sul 
lato posteriore della cappa aspirante, aspirata tramite 
la parte inferiore verso la parte frontale e guidata nella 
fessura di aspirazione.

2.2 

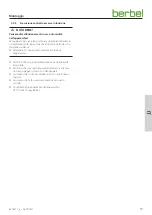
Versione filtrante

L‘apparecchio viene usato nel modo operativo filtrante.

Il contenuto del filtro di ricircolo neutralizza gli odori presenti. 
L‘aria ambiente pulita e priva di odori viene reintrodotta 
nell‘ambiente. Attraverso il ricambio d‘aria è possibile ridurre 
l‘umidità dell‘aria nella stanza.

Nella versione filtrante è necessario utilizzare la funzione 
di spegnimento ritardato affinché l‘apparecchio possa 
rimuovere gli odori restanti. Utilizzando la funzione di 
spegnimento ritardato si allunga la durata del contenuto 
del filtro. Il contenuto del filtro deve essere sostituito 
regolarmente.

2.3 

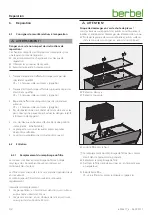
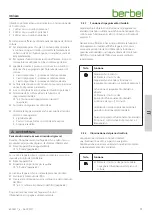
Panoramica del prodotto

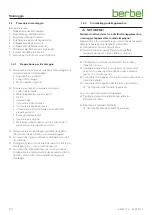
A
B
C
D
E

A  Coperchio anteriore
B  Pannello comandi


D

“4.2 Pannello comandi” (pagina 60).

C  Fessura di aspirazione
D  Corpo cappa
E  Illuminazione del piano di cottura

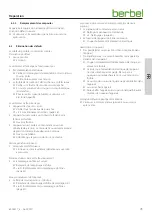
D

A
B

C

A  Vaschetta superiore
B  2 Capillar Trap (removibili)
C  Vaschetta inferiore (interna, removibile)
D   Etichetta sul corpo cappa dietro il Capillar Trap

Summary of Contents for Smartline BKH 80 ST

Page 1: ...DE Gebrauchs und Montageanleitung für die Modelle FR Manuel d utilisation et de montage des modèles IT Istruzioni d uso e di montaggio per i modelli NL Gebruiks en montagehandleiding voor de modellen EN Operating and installation instructions for the models BKH 80 ST BKH 80 ST permalyt BKH 90 ST BKH 90 ST permalyt 6003417_a ...

Page 2: ... die zum Tod oder zu schweren Verletzungen führt D D WARNUNG Hinweise mit dem Wort WARNUNG warnen vor einer gefährlichen Situation die zum Tod oder zu schweren Verletzungen führen kann D D VORSICHT Hinweise mit dem Wort VORSICHT warnen vor einer Situation die zu leichten oder mittleren Verletzungen führen kann D D ACHTUNG Hinweise mit dem Wort ACHTUNG warnen vor einer Situation die zu Sach oder Um...

Page 3: ...hmen 9 3 4 4 Gerät aufhängen 10 3 4 5 Zubehör anschließen 12 3 4 6 Spannungsversorgung herstellen 13 3 4 7 Umluftfilter permalyt einbauen 13 3 4 8 Innenliegende Teile einsetzen 14 3 4 9 Kontrolle und Inbetriebnahme durchführen 15 4 Bedienung 16 4 1 Sicherheitshinweise zur Bedienung 16 4 2 Bedienfeld 16 4 3 Normalbetrieb 16 4 3 1 Nachlauffunktion 17 4 3 2 Kochfeld Beleuchtung 17 5 Reinigung 18 5 1 ...

Page 4: ...gt y y Benutzer wurden bezüglich des sicheren Gebrauchs des Geräts unterwiesen y y Benutzer verstehen Gefahren im Umgang mit dem Gerät y y Kinder dürfen nicht mit dem Gerät spielen 1 3 Allgemeine Sicherheitshinweise D D WARNUNG Gefahr durch Nichtbeachtung der Gebrauchs und Montage anleitung Diese Anleitung enthält wichtige Informationen für den sicheren Umgang mit dem Gerät Auf mögliche Gefahren w...

Page 5: ...be zurückgeführt über die Unterseite zur Front eingeblasen und gezielt in den Ansaugspalt gelenkt 2 2 Umluftbetrieb Das Gerät wird in der Betriebsart Umluftbetrieb verwendet Die Filter Füllung im Umluftfilter neutralisiert die vorhandenen Geruchsanteile Die geruchsfreie gereinigte Raumluft wird dem Raum wieder zugeführt Durch Frischluftzufuhr kann die Luftfeuchtigkeit im Raum reduziert werden Beim...

Page 6: ...ant Holzschrauben 6 x 60 mm verzinkt F Gebrauchs und Montageanleitung Das Befestigungsmaterial ist nur für Massivbau geeignet 2 5 Technische Daten BKH 80 ST BKH 80 ST permalyt BKH 90 ST BKH 90 ST permalyt Anschluss spannung 230V 50 Hz 230V 50 Hz Gesamtleistung 186W 311W1 186W 311W1 Leistungs aufnahme Lüfter 170W 170W Leuchtmittel LED 15 6W LED 15 6W Beleuchtungsstärke auf der Kochfeld Oberfläche 3...

Page 7: ...ARNUNG Lebensgefahr durch unsachgemäße Montage Die Nichtbeachtung der Umgebungsbedingungen kann zu gefährlichen Situationen führen z B im Umgang mit Strom oder Gas Stellen Sie sicher dass die Anforderungen an den Montageort unbedingt eingehalten werden y y Keine Montage in explosionsgefährdeten Umgebungen y y Bei gleichzeitiger Verwendung einer raumluftabhängigen Brennstelle z B Kamin im selben Lu...

Page 8: ... sicher dass das Kochfeld und andere berührbare Teile abgekühlt sind Schützen Sie das Kochfeld und andere Flächen im Montagebereich z B mit dicker Pappe Stellen Sie sicher dass die Spannungsversorgung unterbrochen ist und bleibt Die Spannungsversorgung erfolgt erst nach Aufforderung im entsprechenden Montageschritt 3 4 2 Gerät auspacken D D ACHTUNG Gefahr von Glasbruch oder anderen Beschädigungen ...

Page 9: ...age Öffnen Sie die Frontblende Heben Sie die Unterschale an der Hinterkante an Greifen Sie die Unterschale seitlich um sie zu entnehmen Die Capillar Traps sind eingesteckt und werden durch Magnete im Gerät gehalten Fassen Sie die Capillar Traps seitlich mit beiden Händen an Ziehen Sie die Capillar Traps heraus Entfernen Sie die beiden Schrauben Nehmen Sie den Deckel ab Entnehmen Sie den Filter Wen...

Page 10: ...r Steckdosenöffnung auf der Geräterückseite y y Oben 105 mm vom linken Befestigungspunkt y y Seitlich 245 mm von der Haubenmittelachse Ermitteln Sie die Aufhängeposition Stellen Sie sicher dass der Sicherheits abstand einge halten wird D D WARNUNG Lebensgefahr durch Explosionen oder elektrischen Schlag Das Anbohren von Gas Wasser oder elektrischen Leitungen kann zu gefährlichen Situationen führen ...

Page 11: ...e weiteren Personen im Arbeitsbereich aufhalten D D ACHTUNG Gefahr von Sachschäden durch unsachgemäße Handhabung Größe und Gewicht des Geräts verlangen beim Aufhängen viel Kraft Wenn das Gerät herunterfällt können Gerät Küchenmöbel und andere Gegenstände beschädigt werden Decken Sie das abgekühlte Kochfeld ab Halten Sie den Montagebereich frei Hängen Sie das Gerät an den Befestigungspunkten auf 1 ...

Page 12: ...ungsleitung vom Fensterkontaktschalter I Bus Anbindung Der Anschluss erfolgt über Kabelklemmen an einem abnehm baren Stecker am Lüftergehäuse D D ACHTUNG Gefahr von Beschädigungen durch falschen Anschluss Eine falsche Polung der Steuerungsleitung kann zu Beschädigungen der Elektronik führen Achten Sie beim Anschluss der Steuerungsleitung auf die korrekte Polung Ader 1 an Klemme 1 Ader 2 an Klemme ...

Page 13: ...nungsversorgung zu trennen 3 4 7 Umluftfilter permalyt einbauen Schließen Sie den Umluft filter permalyt wie folgt an y y Ader 1 an Klemme 1 y y Ader 2 an Klemme 2 Stecken Sie den Kaltgerätestecker in die Anschlussbuchse am Lüftergehäuse Es erfolgt eine automatische Anschlusskontrolle y y Wenn das Gerät nicht korrekt angeschlossen ist ertönen fünf Pieptöne Korrigieren Sie den Anschluss der Adern a...

Page 14: ...ündig in die Klappe der Frontblende Schließen Sie die Frontblende D D ACHTUNG Gefahr von Sachschäden durch unsachgemäße Handhabung Beim Einsetzen des Filters in das Gerät können Kabel beschädigt werden Setzen Sie den Filter vorsichtig in das Gerät ein Achten Sie darauf dass der Filter nicht auf einem Kabel abgestellt wird Setzen Sie den Filter wieder ein Wenn der Umluftfilter permalyt verwendet wi...

Page 15: ...igkeit nieder schlagen Warten Sie 2 3 Stunden bevor Sie das Gerät in Betrieb nehmen Prüfen Sie dass der Netzstecker frei zugänglich ist Prüfen Sie dass Netz und Elektro Anschlusskabel nicht geknickt gequetscht oder beschädigt sind Stellen Sie sicher dass Lüftungsausgänge nicht geschlossen oder abgedeckt sind Stellen Sie sicher dass die Lüftungsschlitze frei sind Kontrollieren Sie die Funktionsfähi...

Page 16: ...B Vasen Flaschen dürfen nicht auf dem Gerät abgestellt werden y y Keine Behinderung des Luftstroms y y Keine Behinderung des Luftkanals an der Unterseite des Geräts y y Verwendung nur mit eingesetzter Unterschale y y Keine Abdeckung der Lüftungs ausgänge z B Gläser Teller auf oder vor die Lüftungs schlitze Ausströmende Luft muss ungehindert durch die Lüftungsschlitze entweichen können andernfalls ...

Page 17: ...e das Gerät ordnungsgemäß D D 5 Reinigung Seite 18 Wenn Sie das Gerät einschalten und ein ungewöhnlich hohes Lüftergeräusch feststellen Reinigen Sie das Gerät Beachten Sie die Vorgaben für die Reinigung D D 5 Reinigung Seite 18 Wenn Sie das Gerät einschalten und Geruch feststellen Wechseln Sie die Filter Füllung Beachten Sie die Vorgaben für den Wechsel der Filter Füllung D D 6 2 1 Filter Füllung ...

Page 18: ...utzpartikel abgeschieden und gesammelt Vor jeder Reinigung Schalten Sie das Gerät aus Stellen Sie sicher dass das Kochfeld und andere berührbare Teile abgekühlt sind D D ACHTUNG Gefahr von Beschädigungen durch unsachgemäße Reinigung Scharfkantige Gegenstände Scheuermittel oder ungeeignete Reinigungsmittel können das Gerät beschädigen Folgende Reinigungsmittel sind ungeeignet und dürfen nicht verwe...

Page 19: ...terschale mit einem weichen Tuch trocken Setzen Sie die Unterschale wieder ein D D 3 4 8 Innenliegende Teile einsetzen Seite 14 Capillar Trap Die Capillar Traps sind eingesteckt und werden durch Magnete im Gerät gehalten Fassen Sie die Capillar Traps seitlich mit beiden Händen an Ziehen Sie die Capillar Traps heraus Reinigen Sie die Capillar Traps z B in der Spülmaschine Reinigen Sie Flächen und K...

Page 20: ...gekühlt sein y y Das Lüftergehäuse darf niemals geöffnet werden 6 2 Wartung 6 2 1 Filter Füllung wechseln Geruchsanteile werden durch die Filter Füllung im Umluftfilter gebunden Die geruchsfreie gereinigte Raumluft wird dem Raum wieder zugeführt Umluftfilter sind bis zu zwei Jahren wartungsfrei Danach muss die Filter Füllung regelmäßig erneuert werden Wechselintervalle y y Täglicher Gebrauch bei G...

Page 21: ... Beleuchtung funktioniert nicht y y Das Leuchtmittel ist defekt Wenden Sie sich an Ihren Fachhändler oder an den Kundendienst Geruchsbildung während des Betriebs y y Die Filter Füllung ist verbraucht Wechseln Sie die Filter Füllung D D 6 2 1 Filter Füllung wechseln Seite 20 Schlechte Leistung des Geräts y y Der Umluftfilter hat sich zugesetzt Erneuern Sie die Filter Füllung des Umluftfilters D D 6...

Page 22: ...n Heben Sie das Gerät nach vorne ab Stellen Sie das Gerät auf eine feste und schützende Unterlage 8 Entsorgung 8 1 Verpackung entsorgen D D ACHTUNG Gefahr von Umweltschäden durch nicht sachgerechte Entsorgung der Verpackung Geben Sie die Verpackung nicht in den normalen Hausmüll Führen Sie die Verpackung der umwelt und sachgerechten Wiederverwertung Recycling zu Die Verpackung dient zum Schutz vor...

Page 23: ...s spannungslosen Netzkabels Entsorgen Sie das Gerät nach den gesetzlichen Bestimmungen über einen Entsorgungsfachbetrieb oder über Ihre kommunale Entsorgungseinrichtung 9 Anhang 9 1 Kontakt Wenn Sie Anregungen oder Fragen haben wählen Sie aus folgenden Möglichkeiten Post berbel Ablufttechnik GmbH Sandkampstraße 100 D 48432 Rheine Telefon 49 0 5971 80 80 9 0 Mo bis Do 8 00 17 30 Uhr und Fr 8 00 16 ...

Page 24: ...se qui peut entraîner la mort ou des blessures graves D D AVERTISSEMENT Les indications suivies du mot AVERTISSEMENT signalent une situation dangereuse qui peut entraîner la mort ou des blessures graves D D PRUDENCE Les indications suivies du mot PRUDENCE signalent une situation dangereuse qui peut entraîner des blessures légères ou modérées D D ATTENTION Les indications suivies du mot ATTENTION s...

Page 25: ...il 32 3 4 5 Raccordement des accessoires 34 3 4 6 Exécution du raccordement de l alimentation électrique 35 3 4 7 Montage du filtre de recyclage d air permalyt 35 3 4 8 Placer les pièces intérieures 36 3 4 9 Exécution du contrôle et de la mise en service 37 4 Utilisation 38 4 1 Consignes de sécurité relatives à l utilisation 38 4 2 Panneau de commande 38 4 3 Fonctionnement normal 38 4 3 1 Fonction...

Page 26: ...l appareil y y Les utilisateurs comprennent les dangers liés à l appareil y y Les enfants ne doivent pas jouer avec l appareil 1 3 Consignes de sécurité générales D D AVERTISSEMENT Danger en cas de non respect du manuel d utilisation et de montage Ce manuel comporte des informations importantes pour une utilisation sûre de l appareil Les éventuels dangers font l objet d une mention particulière Ve...

Page 27: ...ieure vers l avant puis dirigée de manière ciblée sur la fente d aspiration 2 2 Mode recyclage d air L appareil est utilisé en mode recyclage d air Le contenu du filtre à recyclage d air neutralise les odeurs présentes L air ambiant épuré sans odeurs est réintroduit dans la pièce L humidité de l air dans la pièce peut être réduite par une alimentation en air frais En mode recyclage d air l utilisa...

Page 28: ...m E 2 vis Torx TX30 avec rondelle intégrée F Manuel d utilisation et de montage Le matériel de fixation est uniquement adapté pour une construction massive 2 5 Caractéristiques techniques BKH 80 ST BKH 90 ST Tension de raccordement 230V 50 Hz 230V 50 Hz Puissance nominale 186W 311W1 186W 311W1 Consommation électrique du ventilateur 170W 170W Ampoule LED 15 6W LED 15 6W Intensité lumineuse sur la s...

Page 29: ...ncorrect Le non respect des conditions ambiantes peut entraîner des situations dangereuses par ex lors de la manipulation de courant ou de gaz S assurer que les exigences relatives au lieu de montage sont bien respectées y y Pas de montage dans les environnements explosifs y y En cas d utilisation simultanée d un lieu de combustion à air ambiant par ex cheminée dans la même composition d air y y U...

Page 30: ...laque de cuisson et autres pièces exposées soient refroidies Protéger la plaque de cuisson et autres surfaces dans la zone de montage par ex avec du carton épais S assurer que l alimentation électrique est coupée et protégée contre tout démarrage intempestif L alimentation électrique a uniquement lieu lorsque cela est indiqué dans l étape de montage correspondante 3 4 2 Déballage de l appareil D D...

Page 31: ...ieures avant le montage Ouvrir le panneau frontal Soulever l enveloppe inférieure au niveau du bord arrière Attraper l enveloppe inférieure pour la retirer Les Capillar Traps sont insérés et maintenus dans l appareil par des aimants Saisir latéralement les Capillar Traps des deux mains Enlever les Capillar Traps Retirer les deux vis Retirer le couvercle Retirer le filtre En cas d utilisation du fi...

Page 32: ...e l ouverture de la prise sur l arrière de l appareil y y en haut 105 mm à partir du point de fixation gauche y y latéralement 245 mm à partir de l axe central de la hotte Déterminer la position de suspension S assurer que la distance de sécurité est respectée D D AVERTISSEMENT Danger mortel d explosions ou de choc électrique Le perçage de conduites de gaz d eau ou électriques peut entraîner des s...

Page 33: ...r que personne d autre ne se trouve dans la zone de travail D D ATTENTION Risque de dommages en cas de manipulation incorrecte La taille et le poids de l appareil nécessitent beaucoup de force lors de l accrochage Si l appareil tombe ceci peut endommager l appareil le mobilier de cuisine et autres objets Recouvrir la plaque de cuisson refroidie Libérer la zone de montage Accrocher l appareil aux p...

Page 34: ...act de fenêtre H Câble de commande de l interrupteur de contact de fenêtre Le raccordement a lieu au moyen de bornes de câble sur un connecteur amovible sur le carter de ventilateur D D ATTENTION Risque de dommages en cas de raccordement incorrect Une polarité incorrecte du câble de commande peut entraîner des dommages de l électronique Lors du raccordement du câble de commande veiller à une polar...

Page 35: ...électrique 3 4 7 Montage du filtre de recyclage d air permalyt Raccorder le filtre de recyclage d air permalyt comme suit y y Fil 1 sur la borne 1 y y Fil 2 sur la borne 2 Insérer la fiche mâle du refroidisseur dans la prise de raccordement sur le carter de ventilateur Un contrôle automatique de raccordement est réalisé y y Cinq bips sonores retentissent si l appareil n est pas branché correctemen...

Page 36: ...ure de manière affleurante dans le volet du panneau frontal Fermer le panneau frontal D D ATTENTION Risque de dommages en cas de manipulation incorrecte Des câbles peuvent être endommagés lors de la mise en place du filtre dans l appareil Insérer le filtre avec précaution dans l appareil Assurez vous que le filtre ne repose pas sur un câble Réinstaller le filtre En cas d utilisation du filtre de r...

Page 37: ...midité peut se condenser à l intérieur de l appareil Attendre 2 à 3 heures avant de mettre l appareil en marche Vérifier que la fiche secteur est facilement accessible Vérifier que le câble de raccordement électrique n est pas coudé coincé ou endommagé S assurer que les sorties d aération ne sont pas fermées ou recouvertes S assurer que les grilles d aération sont libres Vérifier le fonctionnement...

Page 38: ... par ex vases bouteilles ne doivent pas être posés sur l appareil y y Pas d obstruction du flux d air y y Pas d obstruction du conduit d air sur la partie inférieure de l appareil y y Utilisation uniquement possible avec l enveloppe inférieure installée y y Pas de recouvrement des sorties d aération par ex verres assiettes sur ou devant les grilles d aération L air qui circule doit pouvoir être év...

Page 39: ...mmables Nettoyer correctement l appareil D D 5 Nettoyage page 40 Lorsque vous démarrez l appareil et observez un bruit de ventilateur anormalement élevé Nettoyer l appareil Observer les instructions de nettoyage D D 5 Nettoyage page 40 Lorsque vous démarrez l appareil et observez une odeur Remplacer le remplissage de filtre Observer les instructions de remplacement du remplissage de filtre D D 6 2...

Page 40: ...e saleté sont séparées et collectées dans l enveloppe supérieure dans l enveloppe inférieure et dans les Capillar Traps Avant chaque nettoyage Éteindre l appareil Veiller à ce que la plaque de cuisson et autres pièces exposées soient refroidies D D ATTENTION Risque de dommages en cas de nettoyage incorrect Les objets tranchants produits abrasifs ou produits de nettoyage inappropriés peuvent endomm...

Page 41: ...e Sécher l enveloppe supérieure et l enveloppe inférieure avec un chiffon doux Remettre en place l enveloppe inférieure D D 3 4 8 Placer les pièces intérieures page 36 Capillar Trap Les Capillar Traps sont insérés et maintenus dans l appareil par des aimants Saisir latéralement les Capillar Traps des deux mains Enlever les Capillar Traps Nettoyer les Capillar Traps par ex dans le lave vaisselle Ne...

Page 42: ...nt être refroidies y y Le carter du ventilateur ne doit jamais être ouvert 6 2 Entretien 6 2 1 Remplacement du remplissage du filtre Les odeurs sont liées au remplissage du filtre en mode recyclage d air L air ambiant épuré sans odeurs est réintroduit dans la pièce Les filtres de recyclage d air sont sans entretien pendant deux ans maximum Le remplissage du filtre doit ensuite être renouvelé régul...

Page 43: ...se L éclairage ne fonctionne pas y y L ampoule est défectueuse S adresser à votre revendeur spécialisé ou au service après vente Présence d odeurs pendant le fonctionnement y y Le remplissage du filtre est saturé Remplacer le remplissage de filtre D D 6 2 1 Remplacement du remplissage du filtre page 42 Mauvais rendement de l appareil y y Le filtre de recyclage d air est obstrué Remplacer le rempli...

Page 44: ... appareil vers l avant Placer l appareil sur une surface solide et protectrice 8 Élimination 8 1 Élimination de l emballage D D ATTENTION Risque d atteintes environnementales en cas d élimination incorrecte de l emballage Ne pas éliminer l emballage avec les ordures ménagères Retourner l emballage pour un recyclage approprié et écologique L emballage sert de protection contre les dommages causés p...

Page 45: ...ble d alimentation hors tension Éliminer l appareil conformément aux dispositions légales par l intermédiaire d une entreprise spécialisée ou de votre service d évacuation des appareils usagés de votre commune 9 Annexe 9 1 Contact En cas de doute ou de question nous contacter de la manière suivante Courrier berbel Ablufttechnik GmbH Sandkampstraße 100 D 48432 Rheine Téléphone 49 0 5971 80 80 9 0 L...

Page 46: ...no situazioni di pericolo che causano morte o lesioni fisiche gravi D D AVVERTENZA Indicazioni contrassegnate dalla parola AVVERTENZA indicano situazioni di pericolo che potrebbero causare morte o lesioni fisiche gravi D D ATTENZIONE Indicazioni contrassegnate dalla parola ATTENZIONE indicano situazioni che potrebbero causare lesioni di bassa o media entità D D NOTA BENE Indicazioni contrassegnate...

Page 47: ... dell apparecchio 54 3 4 5 Collegamento degli accessori 56 3 4 6 Collegamento dell alimentazione 57 3 4 7 Montaggio del filtro di ricircolo permalyt 57 3 4 8 Inserimento delle parti interne 58 3 4 9 Esecuzione controllo e messa in funzione 59 4 Utilizzo 60 4 1 Indicazioni di sicurezza per l utilizzo 60 4 2 Pannello comandi 60 4 3 Funzionamento normale 60 4 3 1 Funzione di spegnimento ritardato 61 ...

Page 48: ...ssere stati istruiti sull uso sicuro dell apparecchio y y Questi utilizzatori comprendono i pericoli insiti nell uso dell apparecchio y y Non lasciare che i bambini giochino con l apparecchio 1 3 Indicazioni generali di sicurezza D D AVVERTENZA Pericolo in caso di inosservanza delle istruzioni d uso e di montaggio Le presenti istruzioni contengono importanti informazioni per l uso sicuro dell appa...

Page 49: ...aspirante aspirata tramite la parte inferiore verso la parte frontale e guidata nella fessura di aspirazione 2 2 Versione filtrante L apparecchio viene usato nel modo operativo filtrante Il contenuto del filtro di ricircolo neutralizza gli odori presenti L aria ambiente pulita e priva di odori viene reintrodotta nell ambiente Attraverso il ricambio d aria è possibile ridurre l umidità dell aria ne...

Page 50: ...E 2 viti Torx TX30 rondella integrata F Istruzioni d uso e di montaggio Il materiale di fissaggio è adatto esclusivamente per l uso su costruzioni massicce 2 5 Dati tecnici BKH 80 ST BKH 90 ST Tensione di collegamento 230V 50 Hz 230V 50 Hz Potenza complessiva 186W 311W1 186W 311W1 Potenza assorbita ventilatore 170W 170W Lampadine LED 15 6W LED 15 6W Intensità luminosa sulla superficie del piano di...

Page 51: ...RTENZA Pericolo di vita in caso di montaggio improprio L inosservanza delle condizioni ambientali può portare a situazioni pericolose per es in relazione alla corrente e al gas Assicurarsi di rispettare obbligatoriamente i requisiti per il luogo di montaggio y y Non eseguire il montaggio in atmosfere potenzialmente esplosive y y In caso di contemporaneo utilizzo di una fiamma libera dipendente dal...

Page 52: ...ggiati Assicurarsi che il piano cottura e le altre parti accessibili siano fredde Proteggere il piano cottura e le altre superfici nell area di montaggio per es con un cartone spesso Assicurarsi che l alimentazione sia e resti disconnessa Il collegamento alla rete elettrica deve avvenire soltanto quando richiesto nel corrispondente passaggio di montaggio 3 4 2 Disimballaggio dell apparecchio D D N...

Page 53: ...liere le parti che si trovano all interno Aprire il pannello frontale Sollevare la vaschetta inferiore per il bordo posteriore Afferrare la vaschetta inferiore lateralmente per rimuoverla I Capillar Trap sono inseriti e vengono bloccati da magneti Afferrare con entrambe le mani i lati dei Capillar Trap Estrarre i Capillar Trap Rimuovere entrambe le viti Rimuovere la copertura Rimuovere il filtro S...

Page 54: ...stanze dal centro dell apertura della presa sul lato posteriore dell apparecchio y y In alto 105 millimetri dal punto di fissaggio sinistro y y Di lato 245 mm dalla linea mediana della cappa Stabilire la posizione di aggancio Accertarsi che la distanza di sicurezza venga rispettata D D AVVERTENZA Pericolo di morte a causa di esplosioni o scossa elettrica La foratura di condutture del gas dell acqu...

Page 55: ...si che non vi siano altre persone nell area di lavoro D D NOTA BENE Pericolo di danni materiali in caso di movimentazione impropria dell apparecchio Le dimensioni e il peso dell apparecchio richiedono molta forza per l installazione a parete Se l apparecchio cade l apparecchio stesso i mobili della cucina e altri oggetti possono venire danneggiati Coprire il piano cottura lasciato raffreddare Mant...

Page 56: ...er finestra H Cavi di comando del contatto di prossimità per finestra Il collegamento avviene mediante i morsetti per cavi ad una spina rimovibile sull alloggiamento del ventilatore D D NOTA BENE Pericolo di danneggiamenti in caso di collegamento errato Una errata polarità dei cavi di comando può causare danni alla parte elettronica dell apparecchio Durante il collegamento dei cavi di comando pres...

Page 57: ...recchio dalla rete 3 4 7 Montaggio del filtro di ricircolo permalyt Collegare il filtro di ricircolo permalyt come segue y y Filo 1 al morsetto 1 y y Filo 2 al morsetto 2 Inserire la spina dell apparecchio nella presa di collegamento sull alloggiamento del ventilatore Viene eseguito un controllo del collegamento automatico y y Se l apparecchio non è collegato correttamente si sentono cinque bip Co...

Page 58: ...re a filo nello sportellino del pannello frontale Chiudere il pannello frontale D D NOTA BENE Pericolo di danni materiali in caso di movimentazione impropria dell apparecchio Durante l inserimento del filtro nell apparecchio il cavo potrebbe venire danneggiato Inserire il filtro con cautela nell apparecchio Prestare attenzione che il filtro non venga appoggiato su un cavo Rimontare il filtro Se si...

Page 59: ... dello stesso si crei della condensa Attendere 2 3 ore prima di mettere in funzione l apparecchio Verificare che la spina di alimentazione sia liberamente accessibile Verificare che i cavi di collegamento elettrico e alla rete non siano piegati schiacciati o danneggiati Assicurarsi che uscite di ventilazione non siano chiuse o coperte Assicurarsi che le fessure di ventilazione non siano ostruite C...

Page 60: ...iquidi per es vasi bottiglie non devono essere posti sull apparecchio y y Non ostacolare il flusso dell aria y y Non ostruire il canale d aria sul lato inferiore dell apparecchio y y Utilizzare solamente con la vaschetta inferiore inserita y y Non coprire le uscite di ventilazione per es non porre bicchieri piatti su o davanti alle fessure di ventilazione L aria che fuoriesce deve poter fluire lib...

Page 61: ...agina 62 Se si aziona l apparecchio e si sente un rumore eccessivo e inusuale prodotto dal ventilatore Pulire l apparecchio Rispettare le disposizioni per la pulizia D D 5 Pulizia pagina 62 Se si aziona l apparecchio e si rileva la presenza di odore Sostituire il contenuto del filtro Osservare le disposizioni per la sostituzione del contenuto del filtro D D 6 2 1 Sostituire il contenuto del filtro...

Page 62: ...aria ambiente Nella vaschetta superiore nella vaschetta inferiore e nei Capillar Trap le particelle di sporco vengono separate e raccolte Prima di ogni pulizia Spegnere l apparecchio Assicurarsi che il piano cottura e le altre parti accessibili siano fredde D D NOTA BENE Pericolo di danneggiamenti in caso di pulizia impropria Oggetti taglienti abrasivi o detersivi non idonei possono danneggiare l ...

Page 63: ... e morbido o in lavastoviglie Asciugare la vaschetta superiore e quella inferiore con un panno morbido Rimontare la vaschetta inferiore D D 3 4 8 Inserimento delle parti interne pagina 58 Capillar Trap I Capillar Trap sono inseriti e vengono bloccati da magneti Afferrare con entrambe le mani i lati dei Capillar Trap Estrarre i Capillar Trap Pulire i Capillar Trap per es in lavastoviglie Pulire le ...

Page 64: ...essere lasciate raffreddare y y L alloggiamento del ventilatore non deve mai essere aperto 6 2 Manutenzione 6 2 1 Sostituire il contenuto del filtro Gli odori vengono bloccati dal contenuto del filtro nel filtro di ricircolo L aria ambiente pulita e priva di odori viene reintrodotta nell ambiente I filtri di ricircolo non richiedono manutenzione per un periodo fino a due anni In seguito il contenu...

Page 65: ...nziona y y La lampadina è difettata Rivolgersi al proprio rivenditore specializzato o all assistenza clienti Formazione di cattivi odori durante l utilizzo y y Il contenuto del filtro è consumato Sostituire il contenuto del filtro D D 6 2 1 Sostituire il contenuto del filtro pagina 64 Cattiva resa dell apparecchio y y Il filtro di ricircolo si è consumato Cambiare il contenuto del filtro di ricirc...

Page 66: ...ggio di ca un giro Sollevare l apparecchio lavorando in due persone Sollevare l apparecchio in avanti Posizionare l apparecchio su un supporto di protezione solido 8 Smaltimento 8 1 Smaltimento dell imballo D D NOTA BENE Pericolo di danni all ambiente in caso di smaltimento improprio dell imballo Non smaltire l imballo come normale rifiuto domestico Fare in modo che l imballo venga riciclato recyc...

Page 67: ... il cavo di alimentazione quando non è soggetto a tensione elettrica Smaltire l apparecchio in conformità con le disposizioni di legge incaricando un azienda specializzata per lo smaltimento oppure tramite il servizio di smaltimento rifiuti comunale 9 Appendice 9 1 Contatti In caso di domande o commenti selezionare una delle seguenti opzioni Posta berbel Ablufttechnik GmbH Sandkampstraße 100 D 484...

Page 68: ...lijk letsel tot gevolg zal hebben D D WAARSCHUWING Aanwijzingen met het woord WAARSCHUWING waarschuwen voor een gevaarlijke situatie die ernstig of dodelijk letsel tot gevolg kan hebben D D VOORZICHTIG Aanwijzingen met het woord VOORZICHTIG waarschuwen voor een situatie die licht of middelzwaar letsel tot gevolg kan hebben D D ATTENTIE Aanwijzingen met het woord ATTENTIE waarschuwen voor een situa...

Page 69: ... ophangen 76 3 4 5 Accessoires aansluiten 78 3 4 6 Elektrische voeding aansluiten 79 3 4 7 Circulatiefilter permalyt monteren 79 3 4 8 Interne onderdelen plaatsen 80 3 4 9 Controle en inbedrijfstelling uitvoeren 81 4 Bediening 82 4 1 Veiligheidsinstructies voor de bediening 82 4 2 Bedieningspaneel 82 4 3 Normaal bedrijf 82 4 3 1 Naloopfunctie 83 4 3 2 Kookplaatverlichting 83 5 Reiniging 84 5 1 Vei...

Page 70: ...raat y y Gebruikers begrijpen de gevaren bij het omgaan met het apparaat y y Kinderen mogen niet met het apparaat spelen 1 3 Algemene veiligheidsinstructies D D WAARSCHUWING Gevaar door het niet opvolgen van de gebruiks en montagehandleiding Deze handleiding bevat belangrijke informatie voor een veilige omgang met het apparaat Er wordt apart op mogelijke gevaren gewezen Lees deze handleiding zorgv...

Page 71: ... frontplaat ingeblazen en gericht de aanzuigspleet in gestuurd 2 2 Luchtcirculatiemodus Het apparaat wordt gebruikt in de bedrijfsmodus Luchtcirculatiemodus De filtervulling in het circulatiefilter neutraliseert de aanwezige geurtjes De geurloze gereinigde lucht wordt weer naar de ruimte geleid Door toevoer van frisse lucht kan de luchtvochtigheid in de ruimte gereduceerd worden Bij de luchtcircul...

Page 72: ...m E 2 torxschroeven TX30 met geïntegreerde onderlegring F Gebruiks en montagehandleiding Het bevestigingsmateriaal is alleen geschikt voor een massieve bouwwijze 2 5 Technische gegevens BKH 80 ST BKH 90 ST Aansluitspanning 230V 50 Hz 230V 50 Hz Totaal vermogen 186W 311W1 186W 311W1 Vermogensverbruik ventilator 170W 170W Lampen LED 15 6W LED 15 6W Lichtsterkte op het oppervlak van de kookplaat 387 ...

Page 73: ...or ondeskundige montage Het niet opvolgen van de omgevingscondities kan tot gevaarlijke situaties leiden b v in de omgang met stroom of gas Zorg ervoor dat de eisen aan de montageplaats absoluut in acht genomen worden y y Geen montage in omgevingen met explosiegevaar y y Bij gelijktijdig gebruik van een ruimteluchtafhankelijke brander b v rookkanaal binnen één en dezelfde luchtmassa y y Een veilig...

Page 74: ...g ervoor dat de kookplaat en andere delen die aangeraakt kunnen worden zijn afgekoeld Bescherm de kookplaat en andere vlakken in het montagegedeelte b v met dik karton Zorg ervoor dat de elektrische voeding onderbroken is en blijft De elektrische voeding wordt pas ingeschakeld na de vraag hiertoe in de betreffende montagestap 3 4 2 Apparaat uitpakken D D ATTENTIE Risico op glasbreuk of andere besc...

Page 75: ...de montage uit Doe de frontplaat open Til de onderste schaal aan de achterkant op Pak de onderste schaal met beide handen aan de zijkant vast om deze weg te nemen De Capillar Traps zijn geplaatst en worden door magneten in het apparaat gehouden Pak de Capillar Traps met beide handen aan de zijkanten vast Trek de Capillar Traps eruit Verwijder de beiden bouten Verwijder de kap Verwijder het filter ...

Page 76: ...n tot het midden van de contactdoosopening aan de achterkant van het apparaat y y Boven 105 mm vanaf het linker bevestigingspunt y y Zijkant 245 mm van de middenas van de kap Bepaal de ophangpositie Zorg ervoor of de veiligheidsafstand in acht wordt genomen D D WAARSCHUWING Levensgevaar door explosies of elektrische schok Het aanboren van gas water of elektrische leidingen kan tot gevaarlijke situ...

Page 77: ...r geen personen in de werkzone aanwezig zijn D D ATTENTIE Gevaar voor materiële schade door ondeskundig gebruik De grootte en het gewicht van het apparaat vergen bij het ophangen veel kracht Wanneer het apparaat valt kunnen het apparaat keukenmeubels en andere voorwerpen beschadigd raken Dek de afgekoelde kookplaat af Houd het montagegedeelte vrij Hang het apparaat aan de bevestigingspunten op 1 2...

Page 78: ...elaar H Besturingsleiding van de raamcontactschakelaar De aansluiting wordt uitgevoerd met kabelklemmen aan een verwijderbare stekker op de ventilatorbehuizing D D ATTENTIE Gevaar voor beschadigingen door verkeerde aansluiting Een verkeerde poling van de besturingsleiding kan tot beschadigingen van de elektronica leiden Let bij het aansluiten van de besturingsleiding op een correcte poling ader 1 ...

Page 79: ...raat van de elektrische voeding te scheiden 3 4 7 Circulatiefilter permalyt monteren Sluit het permalyt circulatiefilter als volgt aan y y Ader 1 op klem 1 y y Ader 2 op klem 2 Steek de koelapparaatstekker in de aansluitbus op het ventilatorhuis Er vindt een automatische aansluitingscontrole plaats y y Als het apparaat niet goed is aangesloten hoort u vijf piepjes Corrigeer de aansluiting van de a...

Page 80: ...erste schaal goed in de klep van de frontplaat Sluit de frontplaat D D ATTENTIE Gevaar voor materiële schade door ondeskundig gebruik Bij het inzetten van het filter in het apparaat kunnen kabels beschadigd raken Plaats het filter voorzichtig in het apparaat Let op dat het filter niet op een kabel wordt geplaatst Plaats het filter terug Als het permalyt circulatiefilter wordt gebruikt Sluit de ver...

Page 81: ...n er aan de binnenkant vocht neerslaan Wacht 2 3 uur voordat u het apparaat in bedrijf neemt Controleer of de stekker vrij toegankelijk is Controleer of de net en elektroaansluitkabel niet geknikt bekneld geraakt of beschadigd zijn Controleer of de ventilatie uitgangen niet gesloten of afgedekt zijn Zorg ervoor dat de ventilatiesleuven vrij zijn Controleer de correcte werking van het apparaat D D ...

Page 82: ...essen mogen niet op het apparaat gezet worden y y Geen hindering van de luchtstroom y y Geen hindering van het luchtkanaal aan de onderkant van het apparaat y y Uitsluitend gebruiken met een aangebrachte onderste schaal y y Geen afdekking van de ventilatie uitgangen b v glazen borden op of voor de ventilatiesleuven Uitstromende lucht moet ongehinderd door de ventilatiesleuven kunnen ontsnappen and...

Page 83: ...baar zijn Reinig het apparaat deugdelijk D D 5 Reiniging pagina 84 Wanneer u het apparaat inschakelt en een ongewoon hoog ventilatorgeruis hoorbaar is Reinig het apparaat Let op de richtlijnen voor de reiniging D D 5 Reiniging pagina 84 Wanneer u het apparaat inschakelt en een geur ruikbaar is Vervang de filtervulling Let op de richtlijnen voor het vervangen van de filtervulling D D 6 2 1 Filtervu...

Page 84: ...pillar Traps worden de vuildeeltjes afgescheiden en verzameld Voor elke reiniging Schakel het apparaat uit Zorg ervoor dat de kookplaat en andere delen die aangeraakt kunnen worden zijn afgekoeld D D ATTENTIE Gevaar voor beschadigingen door ondeskundige reiniging Voorwerpen met scherpe randen schuurmiddelen of ongeschikte reinigingsmiddelen kunnen het apparaat beschadigen De volgende reinigingsmid...

Page 85: ...rijf de bovenste en onderste schaal met een zachte doek droog Zet de onderste schaal er weer in D D 3 4 8 Interne onderdelen plaatsen pagina 80 Capillar Trap De Capillar Traps zijn geplaatst en worden door magneten in het apparaat gehouden Pak de Capillar Traps met beide handen aan de zijkanten vast Trek de Capillar Traps eruit Reinig de Capillar Traps bijv in de afwasmachine Reinig de oppervlakke...

Page 86: ...n andere delen die aangeraakt kunnen worden moeten afgekoeld zijn y y De ventilatorbehuizing mag nooit geopend worden 6 2 Onderhoud 6 2 1 Filtervulling vervangen Geurtjes worden door de filtervulling in het circulatiefilter gebonden De geurloze gereinigde lucht wordt weer naar de ruimte geleid Circulatiefilters zijn maximaal twee jaar onderhoudsvrij Daarna moet de filtervulling regelmatig vernieuw...

Page 87: ...chting werkt niet y y Lamp is defect Neem contact op met uw dealer of de klantenservice Geurvorming tijdens het bedrijf y y De filtervulling is opgebruikt Vervang de filtervulling D D 6 2 1 Filtervulling vervangen pagina 86 Slecht vermogen van het apparaat y y Het circulatiefilter is dichtgeslibd Vervang de filtervulling van het circulatiefilter D D 6 2 1 Filtervulling vervangen pagina 86 Het bedi...

Page 88: ...rsonen op Haal het apparaat er naar voren toe af Zet het apparaat op een stevige en beschermende ondergrond 8 Verwerking van afvalstoffen 8 1 Verpakking afvoeren D D ATTENTIE Gevaar voor milieuschade door niet vakkundig afvoeren van de verpakking Geef de verpakking niet met het normale huisvuil mee Voer de verpakking af voor een vakkundige milieuvriendelijke recycling De verpakking dient als besch...

Page 89: ...tkabel eraf te knippen Het apparaat volgens de wettelijke bepalingen via een deskundig afvalverwerkingsbedrijf of uw lokale inzamelpunt recyclen 9 Bijlage 9 1 Contact Wanneer u suggesties of vragen heeft kiest u uit de volgende mogelijkheden Post berbel Ablufttechnik GmbH Sandkampstraße 100 D 48432 Rheine Telefoon 49 0 5971 80 80 9 0 Ma t m do 8 00 17 30 uur en vr 8 00 16 30 uur Fax 49 0 5971 80 8...

Page 90: ...sults in serious injuries or death D D WARNING Notes with the word WARNING warn of a hazardous situation that could result in serious injuries or death D D CAUTION Notes with the word CAUTION warn of a situation that could result in minor injuries D D ATTENTION Notes with the word ATTENTION warn of a situation that could result in damage to property or to the environment Symbol clarification text ...

Page 91: ...nside parts 97 3 4 4 Hang the device in place 98 3 4 5 Connect accessories 100 3 4 6 Establish electrical power supply 101 3 4 7 Installing the recirculated air filter permalyt 101 3 4 8 Insert inside parts 102 3 4 9 Check and carry out commissioning 103 4 Operation 104 4 1 Safety information for operation 104 4 2 Control panel 104 4 3 Normal operation 104 4 3 1 Run on function 105 4 3 2 Hob light...

Page 92: ... to safe use of the device y y Users understand the hazards involved with the device y y Children may not play with the device 1 3 General safety instructions D D WARNING Hazard through a disregard of the operating and installation instructions This manual contains important information for the safe handling of the device Separate reference is made to possible hazards Read through this manual thor...

Page 93: ...o the back of the extractor hood blown over the underside to the front and directed into the suction gap 2 2 Recirculated air mode The device is used in recirculated air mode The filter filling in the recirculated air filter neutralises any smelly odours present The odour free cleaned room air is fed back into the room The humidity in the room can be reduced with the fresh air feed In recirculated...

Page 94: ...lon wall plugs 8 mm E 2 Torx screws TX30 with integrated washers F Operating and installation instructions The fastening materials are only suitable for solid walls 2 5 Technical data BKH 80 ST BKH 90 ST Connection voltage 230V 50 Hz 230V 50 Hz Total power 186W 311W1 186W 311W1 Fan power consumption 170W 170W Lighting LED 15 6W LED 15 6W Illumination on the hob surface 387 lx 387 lx Width 800 mm 9...

Page 95: ...llation Disregard of the ambient conditions can lead to hazardous situations e g in the handling of electrical power or gas Make sure that the requirements for the installation location are complied with y y Do not install in potentially explosive atmospheres y y With simultaneous use of a heating point which uses air from the room as its oxygen supply e g chimneys y y A safety device is absolutel...

Page 96: ...n area free of objects that could be in the way or that could be damaged Make sure that the hob and other parts that could be touched have cooled down Protect the hob and other surfaces in the installation area e g with thick cardboard Ensure that the power supply is switched off and remains so Connect the power supply only when instructed to do so in the installation instructions 3 4 2 Unpack the...

Page 97: ...inside before installation Open the front panel Lift the lower section out at the rear edge Take hold of the lower section at the sides to remove it The Capillar Traps are inserted and held in place in the device by magnets Grasp the Capillar Traps on the sides with both hands Pull the Capillar Traps out Remove the two screws Remove the cover Remove the filter If the recirculated air filter permal...

Page 98: ...m Distances from the centre point of the socket opening on the device rear y y Top 105 mm from the left fastening point y y Side 245 mm from the hood centre axis Determine the hanging position Make sure that the safety distance is complied with D D WARNING Risk of death due to explosions or electric shock Drilling through gas water or electrical lines can lead to hazardous situations Ensure that t...

Page 99: ...g the device Ensure that no other people are in the working area D D ATTENTION Danger of property damage through improper handling Hanging the device requires a great deal of physical exertion due to its size and weight If the device falls the device kitchen furnishings and other objects could be damaged Cover the cooled hob Keep the installation area clear Hang the device on the mounting points 1...

Page 100: ...ll box power unit G Window contact switch H Control line from the window contact switch Connection is implemented via cable terminals on a detachable connector on the fan housing D D ATTENTION Risk of damage through incorrect connection A mix up of the control wires can result in damage to the electronics Be careful not to mix up connections when connecting the control wires Core 1 on terminal 1 c...

Page 101: ...ter installation 3 4 7 Installing the recirculated air filter permalyt Connect the recirculated air filter permalyt as follows y y Wire 1 on terminal 1 y y Wire 2 on terminal 2 Plug the cold device plug into the socket on the fan housing A connection check takes place automatically y y If the device is not connected correctly five beeps will sound Correct the connection of the wires to terminals 1...

Page 102: ... Insert the lower section flush in the flap of the front cover Close the front panel D D ATTENTION Danger of property damage through improper handling When inserting the filter in the device the cables may become damaged Carefully insert the filter in the device Make sure that the filter is not placed on a cable Insert the filer again If the recirculated air filter permalyt is used Plug the connec...

Page 103: ... one condensation may form inside Wait about 2 3 hours before bringing the device into service Check that the mains plug is freely accessible Check that the mains cable and the electrical connection cable are not kinked crushed or damaged Ensure that air outlets are not closed or covered Make sure that the ventilation slots are free Check the correct functioning of the device D D 4 Operation page ...

Page 104: ... splashing water y y Containers with liquids e g vases bottles must not be placed on the device y y Do not impede the air flow y y Do not impede the air channel on the underside of the device y y Only use with the lower section fitted y y Do not cover the air outlets e g glasses plates on or in front of the ventilation slots Out flowing air must be able to escape through the ventilation slots with...

Page 105: ...llects in and on the device Clean the device properly D D 5 Cleaning page 106 If you switch the machine on and hear an unusually loud fan noise Clean the device Observe the stipulations for cleaning D D 5 Cleaning page 106 If you switch the machine on and notice a smell Change the filter filling Observe the stipulations for changing the filter filling D D 6 2 1 Replacing filter filling page 108 Af...

Page 106: ...om the room The dirt particles are separated off and collected in the upper section the lower section and in the Capillar Traps Before every cleaning Turn off the device Make sure that the hob and other parts that could be touched have cooled down D D ATTENTION Danger of damage through improper cleaning Sharp edged objects abrasive or unsuitable cleaning agents can damage the device The following ...

Page 107: ...washer Dry the upper and lower sections with a soft cloth Re attach the lower section D D 3 4 8 Insert inside parts page 102 Capillar Trap The Capillar Traps are inserted and held in place in the device by magnets Grasp the Capillar Traps on the sides with both hands Pull the Capillar Traps out Clean the Capillar Traps e g in a dishwasher Clean the surfaces and edges on the mounting slot for the C...

Page 108: ... other parts that can be touched must be cooled down y y Never open the fan housing 6 2 Maintenance 6 2 1 Replacing filter filling Odours are trapped in the filter filling in the recirculated air filter The odour free cleaned room air is fed back into the room Recirculated air filters are maintenance free for up to two years Then filter filling must be replaced at regular intervals Maintenance int...

Page 109: ...ting does not work y y The lamp has blown Please consult your dealer or customer services Smells occur during operation y y The filter filling is used up Change the filter filling D D 6 2 1 Replacing filter filling page 108 Poor device performance y y The recirculated air filter is clogged Replace the filter filling of the recirculated air filter D D 6 2 1 Replacing filter filling page 108 Control...

Page 110: ...two persons Lift the device off forwards Set the device down on a firm and protective surface 8 Disposal 8 1 Dispose of packaging D D ATTENTION Risk of environmental damage due to improper disposal of the packaging Do not put the packaging into the normal household waste Take the packaging for environmentally friendly and proper recycling The packaging provides protection from transport damage Onl...

Page 111: ...ergised mains cable Dispose of the device in accordance with the legal provisions via a professional disposal centre or your local disposal facility 9 Annex 9 1 Contact If you have any questions or suggestions please select from the following options Post berbel Ablufttechnik GmbH Sandkampstraße 100 D 48432 Rheine Telephone 49 0 5971 80 80 9 0 Mon to Thu 8 00 17 30 hrs and Fri 8 00 16 30 hrs Fax 4...

Page 112: ...6003417_a 26 09 2017 ...
Reviews: