background image

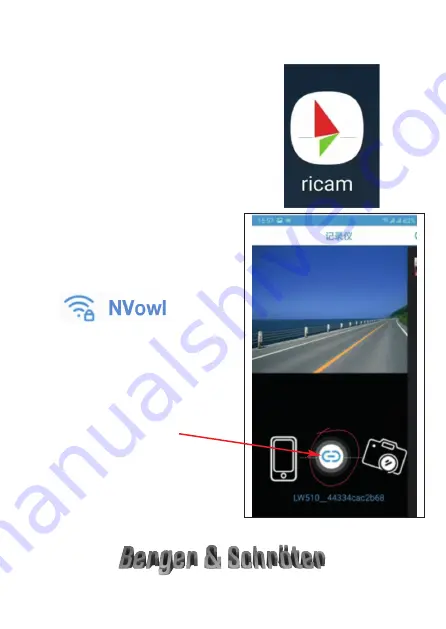
1. Suche die App „ricam” 

im 

App Store

für die

IOS Version

und

im 

Play Stor

e für die

Android Version:

2. Installieren Sie die App „ricam”
auf  Ihrem  Smartphone  und  drü-
cken  Sie  lange  die  Nachtsicht-
taste 

"-", 

um 

das 

WLAN

einzuschalten.

3.  Öffnen  Sie  die  WLAN-Liste
Ihres Telefons, suchen Sie unten

diese Anzeige und verbinden Sie
sie.

4. Öffnen Sie dann die App. Das
Schlüsselwort lautet 12345678.

5.  Klicken  Sie  abschließend  auf
die mittlere Schaltfläche.

6. Nach erfolgreicher WIFI-Verbin-
dung kehren Sie zur APP-Schnitt-
stelle  zurück.  Sie  können  die
APP-Funktionen jetzt ausführen.

9

Laden und Installation der WIFI App auf ein Smartphone

und Einstellung der Kamera nach Ihren Wünschen.

Berger & Schröter GmbH  -  Am Hofe 9 - 58640 Iserlohn

Summary of Contents for 32156

Page 1: ...chsatzgerät LW 510 per Bajonett abnehmbar Art Nr 32156 Bitte lesen Sie diese Bedienungsanleitung vor der In betriebnahme komplett und aufmerksam und bewah ren Sie sie für späteres Nachlesen bzw Weitergabe des Nachtsichgerätes an andere Personen auf ...

Page 2: ...n Ruhemodus 3 Benutzen Sie wiederaufladbare Batterien mit 3 7 V 18650 3200 mAh 4 Wenn das Produkt defekt ist wenden Sie sich an Ihren Verkäufer Bei Reparatur in Eigenregie besteht kein Anspruch auf Garantie Okular Montagering Schiebeschalter Bajonettver schluß Öffner Fokussier Einstellung bis 0 Batterie fach Tastatur Bedienung siehe Seite 3 Sichtschutz blende Okular Einstellung IR Lampe manuell fo...

Page 3: ...us Ein Aus Kurzes Drücken IR Modus einstellen HDMI Anschluss USB Anschluss TF Karte Lieferumfang 1 x Clip on digitales Nachtsichtgerät 1 x Sechskant Schraubenschlüssel 1 x USB C Kabel zum Laden 1 x Lichtschutzblende 1 x 45 mm Okularmontagering mit Bajonettverschluß 7 x Adapterringe für 38 44 mm Okulare Speicherkarte ist nicht im Lieferumfang enthalten Kurzes Drücken Zoom Verkleinerung Langes Drück...

Page 4: ...nfrarotlicht 3 Objektivmontagering befestigen Klicken Sie den Objektivmon tagering an der Vorderseite des Geräts ein Befestigen Sie den Montagering mit den Schrauben an der Optik Sollte Ihre Optik schmaler sein als der Montagering können Sie diesen mit einem der mitgelieferten Adapterringe ausgleichen und fixieren 1 An Ausschalten Drücken Sie zum Anschalten des Geräts den An Ausschalter Zum Aussch...

Page 5: ...auszuwählen drücken Sie kurz die OK Taste Um das Menü zu verlassen drücken Sie die Menü Taste kurz 1 Farbe Gehen Sie in das Untermenü Farbe und drücken Sie OK Wählen Sie mit den Pfeiltasten normal s w aus Bestätigen Sie die Eingabe mit OK 2 IR LED Brightness Gehen Sie in das Untermenü IR LED Brightness und drücken Sie OK Wählen Sie mit den Pfeiltasten aus 1 2 3 aus Bestätigen Sie die Eingabe mit O...

Page 6: ... Pfeiltasten An Aus aus Bestätigen Sie die Eingabe mit OK 8 Record Audio Gehen Sie in das Untermenü Record Audio und drücken Sie OK Wählen Sie mit den Pfeiltasten An Aus aus Bestätigen Sie die Ein gabe mit OK 9 WiFi Gehen Sie in das Untermenü WiFi und drücken Sie OK Wählen Sie mit den Pfeiltasten An Aus aus das Wifi Kennwort lautet 12345678 Bestätigen Sie die Eingabe mit OK Schalten Sie das WiFi a...

Page 7: ...her formatieren alle Daten löschen aus Abbrechen oder mit OK bestätigen Beachten Sie dass die Daten nicht wiederhergestellt werden können nachdem das Gerät formatiert wurde 13 Standard Einstellungen Gehen Sie in das Untermenü auf Standard Einstellungen zurück setzen und drücken Sie OK Wählen Sie mit den Pfeiltasten Ab brechen oder mit OK bestätigen aus Bestätigen Sie die Eingabe mit OK 14 Sprache ...

Page 8: ...hältnissen können Sie das Wild sicher erkennen und ansprechen Betrieb über auswechselbarem 18650 Li Ion Akku 3 7V die Betriebszeit be trägt bis zu 8h 3200 mAh nicht im Lieferumfang Gewicht ca 370 Gramm Maße LxBxH 102x112x78mm Speicherung von Foto und Videos auf eine Micro SD Karte TF card nicht enthalten oder mittels WiFi app im play store oder app im ios app store di rekt aufs Handy übertragen Fo...

Page 9: ...s Telefons suchen Sie unten diese Anzeige und verbinden Sie sie 4 Öffnen Sie dann die App Das Schlüsselwort lautet 12345678 5 Klicken Sie abschließend auf die mittlere Schaltfläche 6 Nach erfolgreicher WIFI Verbin dung kehren Sie zur APP Schnitt stelle zurück Sie können die APP Funktionen jetzt ausführen 9 Laden und Installation der WIFI App auf ein Smartphone und Einstellung der Kamera nach Ihren...

Page 10: ...nual completely and ca refully before commissioning and keep them for later reading or passing on the Night Vision Device to other people GB User s Manual Digital night vision add on device LW 510 removable by bayonet Item no 32156 ...

Page 11: ... turn it on sleep mode 3 Use 3 7V 18650 3200 mAh rechargeable batteries 4 If the product is defective contact your seller In the case of repairs on your own there is no guarantee Eyepiece Mounting ring Slide switch bayo net connection closing opener Focus attitude to 0 Battery subject Keyboard service see page 3 Privacy screencover Eyepiece attitude Focus the IR lamp manually pull out or push in E...

Page 12: ...e on off Short press Set IR mode HDMI connection USB connection TF card Scope of delivery 1 x clip on digital night vision device 1 x hex wrench 1 x USB C cable for charging 1 x light protection screen 1 x 45 mm eyepiece mounting ring with bayonet lock 7 x adapter rings for 38 44 mm Eyepieces Memory card is not in Included in delivery Short press Zoom reduce Long press Wifi on off ...

Page 13: ...rent modes and that IR in frared light 3 Attach the lens mounting ring Click the lens mount tag ring on the front of the device Attach the mounting ring with the screws on the optics Should be your optics be narrower than the mounting ring you can use a with the adapter rings supplied level out and fix 1 Switch on off To turn on the device press the on off button To switch off press the on off swi...

Page 14: ... menu To select a submenu briefly press the OK button To exit the menu briefly press the menu button 1 Color Go to the Color submenu and press OK Use the arrow keys to select normal b w Confirm the entry with OK 2 IR LED brightness Go to the IR LED Brightness submenu and press OK Use the arrow buttons to select from 1 2 3 Confirm the entry with OK If you press the IR button in black and white mode...

Page 15: ... Use the arrow keys to select On Off Confirm the entry with OK 8 Record Audio Go to the Record Audio submenu and press OK Use the arrow buttons to select On Off Confirm the entry with OK 9 WiFi Go to the WiFi submenu and press OK Use the arrow buttons to select On Off the WiFi password is 12345678 Confirm your entry with OK Turn off the WiFi by pressing and holding the menu button 10 Exposure Go t...

Page 16: ...K Use the arrow keys to select Format memory delete all data Cancel or confirm with OK Note that the data cannot be recovered after the device has been formatted 13 Standard settings Go to the submenu on Reset default settings and press OK Use the arrow buttons to select Cancel or confirm with OK Confirm the entry with OK 14 Language Go to the Language submenu and press OK Use the arrow but tons t...

Page 17: ...ou can safely recognize and address the game Operation via exchangeable 18650 Li Ion battery 3 7V the operating time is up to 8h 3200 mAh not included Weight approx 370 grams Dimensions LxWxH 102x112x78mm Storage of photos and videos on a micro SD card TF card not included or transferred directly to the mobile phone via WiFi app in the play store or app in the ios app store Photos and videos in 19...

Page 18: ... night vision button to switch on the WLAN 3 Open your phone s Wi Fi list look below this ad and join them 4 Then open the app The key word is 12345678 5 Then click the middle button 6 After successful WIFI con nection return to the APP inter face You can now run the app functions Loading and installing the WIFI app on a smartphone and setting the camera to your liking ...

Reviews: