background image


 HIFI Stacking System                 J023              Instructions for Use 

  Please read and retain these instructions for future reference                                                                                    v002: 20/05/22


The Enterprise 
Department 

 UK Head 

Office, 11 Bridge Street, Bishop’s Stortford, CM23 2JU 

 Tel: 0844 4824400*,    Fax: 01279 756595 
 www.coopersofstortford.co.uk 
 EU address: D.S.B. LD, 160 Bd. de Fourmies, 59100 Roubaix, France 
 Tel: (+44) 1279 701269 


*UK Calls cost around 7 pence per minute plus your telephone company’s network access.  

  Please check with your telephone supplier. 


Page No. 8 

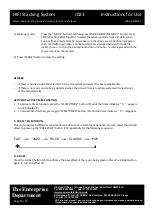
PLAY / PAUSE MODE


1.


P

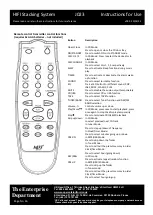
ress the “

PLAY/PAUSE

” button (21) to start playback, the first track of the first disc will be played and 

the play indicator will appear on the LCD display. 

2.


Or press either the 

“DISC 1” ,  “DISC 2” , “DISC 3” button (17), 

for the the disc inside the desired tray to 

be played directly. 

3.


T

o  interrupt,  press  the “

PLAY/PAUSE

”  button once  (21), and  information on 

LCD  display  (2)  will start 

flashing. Press again to release and resume normal playback. 


STOP MODE  

1.


I

f “

STOP

” button (20) is pressed during play or pause mode, system will go to stop mode.


SKIP MODE (SKIP UP

/SKIP DOWN

1.


D

uring play or pause mode, if “SKIP +” button (23) is pressed it will go to next track and display the 

track 

number and then remain in play or pause mode. 

2.


D

uring play or pause mode, if “

SKIP -

” button (24) is pressed it will go to the 

previous track and remain 

in play or pause mode. 


SEARCH MODE (SEARCH UP

/SEARCH DOWN

1.


During play mode, if “S

EARCH +

” button (23) is pressed 

and held for few seconds, it will start searching 

forward. 

2.


D

uring play mode, if “

SEARCH -

” button (24) is pressed 

and held for few seconds, it will start searching 

backwards.  


FOR MP3 DISC 

1.


Insert  MP3  disc  into CD  player.  After  focus  search  has  completed,  the  total  number of  tracks  will  be 
shown on the LCD display (2). 

2.


Press  “S

KIP  UP


“  (23)  or  “S

KIP  DOWN 


(24) 

or  “+10/  PRE

-

UP”  (13) 

button  to  select  the  track 

number. 

3.


W

hen the desired track and folder is selected, press the CD “

PLAY/PAUSE

” button (21) to start playback.


Remarks:- 

Bit rate : 32 kbps~320kbps, sampling rate : 32khz, 44.1khz and 48 khz decodable 

The performance of playing MP3 disc varies depending on the quality of the recording disc and the 
method of recording. Furthermore, the searching lead-time for MP3-CDs is longer than for normal CDs 
due to different formats. 

When over the 100

th

 tracks in a single disc is being selected for 

playback

, the track number keeps 

flashing while the playback time keeps showing on display during CD

 play mode

When over the 100

th

 tracks in a single disc is being selected but put in 

pause mode

, the track number 

keeps showing while the playback time keeps flashing on display. 

Summary of Contents for J023

Page 1: ...thoroughly before starting and ensure you are familiar with the operation of your new HIFI Stacking System CAUTION USE OF CONTROLS OR ADJUSTMENTS OR PERFORMANCE OF PROCEDURES OTHER THAN THOSE SPECIFIE...

Page 2: ...N THE DISC IS NO LONGER PLAYING AND THE SCREEN SHOWS NO DISC OR THE DISC IS NOT PLAYING 2 DO NOT OPEN OR CLOSE THE CD DOOR TRAY BY HAND OR FORCE AS THIS MAY CAUSE THE SYSTEM TO MALFUNCTION ONLY OPEN T...

Page 3: ...s Please check with your telephone supplier Page No 3 STOP MODE 8 SKIP MODE SKIP UP SKIP DOWN 8 SEARCH MODE SEARCH UP SEARCH DOWN 8 FOR MP3 DISC 8 REPEAT RANDOM MODE 9 FOR CD MP3 DISC 9 REPEAT PLAY 9...

Page 4: ...andby LED indicator 5 Power on Standby button 6 Record button 7 FM Mode Mono ST High Speed dubbing button 8 Memory Clock adjustment button 9 Sleep Timer button 10 Disc change button 11 Repeat Random P...

Page 5: ...tely unravel and extended for best reception 35 4 Now connect the power cable 29 to the mains socket and switch on the power switch at the front of the unit 5 When you first plug the unit into the mai...

Page 6: ...ing either manual or auto tuning method Press MEMORY button 8 to enable programming Press PRE UP or PRE DN button 11 13 to select the desired station memory for storage Press MEMORY button 8 again to...

Page 7: ...ically stop rotating Lift the tone arm from the record and return it to the tone arm rest 8 To stop manually lift the tone arm from the record and return it to the tone arm rest 9 On some records the...

Page 8: ...remain in play or pause mode 2 During play or pause mode if SKIP button 24 is pressed it will go to the previous track and remain in play or pause mode SEARCH MODE SEARCH UP SEARCH DOWN 1 During play...

Page 9: ...ilable in normal playback RANDOM PLAY You can listen to all the tracks or folder in a random order using this function 1 Press and hold the REPEAT RANDOM button 11 the unit will play all discs randoml...

Page 10: ...ystem will start reading the storage media automatically after connecting and LCD display 2 will show the total number of MP3 files being detected Repeat the same playback procedure as playing CD MP3...

Page 11: ...ogram play IV COPYING OF MP3 FILE If inserting a MP3 disc instead of a CD disc the system will copy the files to the USB if the REC button 6 is pressed The operation procedures is the same as for CD e...

Page 12: ...a while and then change back to REC USB and flashing meaning a new track has been generated and recording REMOVING THE USB To remove the USB turn off the power or switch the function mode to either C...

Page 13: ...nd then press the RECORD and PLAY key on deck 1 Press the PLAY key to start playback on deck 2 and then press PAUSE key on deck 1 to start dubbing Press PAUSE key on deck 1 and STOP key on deck 2 when...

Page 14: ...l show the time from 90 80 70 60 50 10 minutes gradually Release the SLEEP TIMER button 9 when the display shows the minutes you want the system to be switched to standby mode 2 SLEEP indicator will s...

Page 15: ...file inside tuner turn to the desired radio station Phono record is placed with the tone arm put on the record 3 Press MODE button to store the setting REMARK If there is no disc inside the selected C...

Page 16: ...ER Press to activate or deactivate the alarm wake up function PHONO Press to select turntable function EQ Pre Set EQ button for different sound POP JAZZ ROCK CLASSIC FLAT MUTE Press to disable the aud...

Page 17: ...GE BEFORE CONNECTING THE APPLIANCE CHECK IF THE VOLTAGE INDICATED ON THE BOTTOM OF THE APPLIANCE IS IN ACCORDANCE WITH THE MAINS VOLTAGE IN YOUR HOME CHECK THE APPLIANCE AND POWER CABLE CAREFULLY FOR...

Page 18: ...63 3 amp plug If you have to replace the fuse only those that are ASTA or BSI approved to BS1362 and with a rated current of 3 amps should be used If there is a fuse cover fitted this cover must be re...

Page 19: ...y from children and pets Battery disposal spent or expired batteries must be properly disposed of and recycled in compliance with local regulations For detailed information contact your local authorit...

Reviews: