background image


600-C601 RevB_EN                                                                                                                                            3 / 15 


® 


Before using your new equipment, read and understand all the instructions and labels associated with the unit 

prior to putting it into operation. Make sure all people associated with its use understand the unit’s operation 

and safety before they use the unit. 


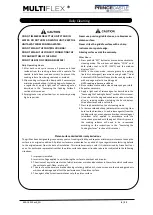
1. All shipping containers should be checked for freight damage both visible and concealed. This unit has been 

tested  and  carefully  packaged  to  insure  delivery  of  your  unit  in  perfect  condition.  If  equipment  is  received  in 

damaged condition, either apparent or concealed, a claim must be made with the delivering carrier. 

NOTE:

 Concealed damage or loss – if damage or loss is not apparent until after equipment is unpacked, a request 

for inspection of concealed damage must be made with carrier within 15 days. Be certain to retain all contents plus 

external  and  internal  packaging  materials  for  inspection.  The  carrier  will  make  an  inspection  and  will  supply 

necessary claim forms. 

2.  This  grill  is  equipped  for  the  voltage  shown  on  the  nameplate.  It  will  operate  on  alternating  current  only, 

however the specified voltage must be applied. 


DO NOT CONNECT THE UNIT TO ANY TYPE OF VOLTAGE OTHER THAN THAT ON THE NAMEPLATE. DOING SO 

WILL DAMAGE THE UNIT AND VOID THE WARRANTY. 

DAMAGED POWER CORDS MUST BE REPLACED BY THE MANUFACTURER, ITS SERVICE AGENT OR SIMILARLY 

QUALIFIEDPERSONS IN ORDER TO AVOID A HAZARD. 


All electrical connections must be in accordance with local electrical codes and any other applicable codes. 

Plug the unit into an applicable electrical receptacle. 

To  prevent  an  electric  shock  hazard  this  device  must  be  bonded  to  equipment  in  close  proximity  with  an 

equipotential bonding conductor. This device is equipped with a grounding lug for this purpose and is marked 

with the following symbol. 

Installation 


Installation 

Prince Castle reserves the right to change specifications and product design without notice. 

Such revisions do not entitle the buyer to corresponding changes, improvements, additions 

or replacements for previously purchased equipment.


Summary of Contents for MARMON FOODSERVICE TECHNOLOGIES PRINCECASTLE NCG8 Series

Page 1: ...rince Castle parts voids this warranty All labor shall be performed during regular work hours Overtime premium the incremental amount will be charged to the customer Damage caused by carelessness neglect and or abuse e g dropping tampering or altering parts equipment damaged in shipment by fire flood or an act of God is not covered under this warranty All problems due to operation at voltages othe...

Page 2: ...connect unit to rated power supply may cause damage to the unit and voids the warranty WARNING This warning is not for EUROPEAN market This appliance is not intended for use by persons including children with reduced physical sensory or mental capabilities or lack of experience and knowledge unless they have been given supervision or instruction concerning use of the appliance by a person responsi...

Page 3: ...and will supply necessary claim forms 2 This grill is equipped for the voltage shown on the nameplate It will operate on alternating current only however the specified voltage must be applied DO NOT CONNECT THE UNIT TO ANY TYPE OF VOLTAGE OTHER THAN THAT ON THE NAMEPLATE DOING SO WILL DAMAGE THE UNIT AND VOID THE WARRANTY DAMAGED POWER CORDS MUST BE REPLACED BY THE MANUFACTURER ITS SERVICE AGENT O...

Page 4: ... proper position and remove the food Using a spatula scrape residue into the grease tray 5 Turn the unit off when it is not in use NOTE When not in use it is recommended that the lids be closed to save energy Initial Start Up 1 Place unit on table 2 Before using the unit for the first time wipe down the exterior and toasting area with a damp cloth 3 Take to a well ventilated area and heat for appr...

Page 5: ...ess is necessary only when a platen temperature reading on the grill display varies more than a few degrees from the reading of a calibrated pyrometer used to measure the temperature of the same platen The grill is calibrated before leaving the factory so this process should only be necessary on rare occasions 5 Set the desired offset value with the 1 increase or 2 decrease buttons in the front of...

Page 6: ...e agent as described in the Seasoning the Cooking Surfaces section of this manual 6 Use a clean cloth and good nonabrasive cleaner to clean all non cooking surfaces including the front displays Wipe all surfaces with a soft cloth 7 Press top heater button to exit cleaning mode 8 To remove carbon buildup a black matter resulting from burnt on food residue oils and release agents from the cooking su...

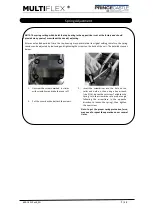
Page 7: ...e screws on the back of the unit The detailed steps as below 1 Unscrew the screws marked in circles with screwdriver and take the cover off 2 Insert the screwdriver into the hole on the collar and hold on then using a hex wrench size 3 16 loosen the set screw To tighten the spring turn the screwdriver at a proper angle following the arrow turn in the opposite direction to loosen the spring then ti...

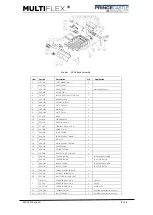
Page 8: ...N TOP 1 19 600 217 BRKT HEATER TOP 2 20 600 C305 PROBE BOT 1 21 600 200 HEATER TOP 1400W 1 220V 1400W 600 C052 HEATER TOP 1100W 1 220V 1100W 22 600 204 PLATEN TOP ST FLAT 1 ST FLAT 600 C043 PLATEN TOP ST GROOVED ST GROOVED 600 207 PLATEN TOP AL FLAT AL FLAT 600 C044 PLATEN TOP AL GROOVED AL GROOVED 23 600 035 WMT PLATEN BOT ST F 1 ST FLAT 600 C041 WMT PLATEN BOT ST GROOVED ST GROOVED 600 043 WMT P...

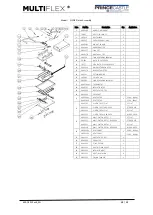
Page 9: ... 308 SHAFT SPRING 1 16 600 314 SHOULDER BOLT MOUNT 1 17 600 311 STOP LIFT 1 18 600 303 BLOCK MOUNT TORSION 2 19 600 302 COVER SPRING 1 20 600 305 COLLAR TORSION 1 21 10 C004 SSCUPSKT 0 375 16x1 HX S 1 22 600 316 TORSION SPRING 1 FOR ALUMIUM PLATEN 600 306 TORSION SPRING FOR STEEL PLATEN 23 600 C402 SPACER SPRING 2 FOR ALUMIUM PLATEN 600 307 SPACER SPRING FOR STEEL PLATEN 24 600 304 FLANGE BEARING ...

Page 10: ...HERMOSTAT 1 18 600 C207 INSULATION TOP 1 19 600 C203 BRKT HEATER TOP 2 20 600 C305 PROBE BOT 1 21 600 C204 1 HEATER TOP 1 220V 1300W 600 C204 3 HEATER TOP 120V 800W 22 600 C202 PLATEN TOP ST FLAT 1 ST FLAT 600 C214 PLATEN TOP ST GROOVED ST GROOVED 600 C216 PLATEN TOP AL FLAT AL FLAT 600 C215 PLATEN TOP AL GROOVED AL GROOVED 23 600 C196 WMT PLATEN BOT ST F 1 ST FLAT 600 C217 WMT PLATEN BOT ST GROOV...

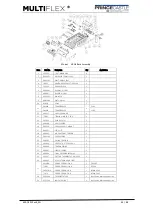
Page 11: ...1 14 10 C003 E RING 15 mm 15 2 15 600 308 SHAFT SPRING 1 16 600 314 SHOULDER BOLT MOUNT 1 17 600 311 STOP LIFT 1 18 600 303 BLOCK MOUNT TORSION 2 19 600 C200 COVER SPRING 1 20 600 305 COLLAR TORSION 1 21 10 C004 SSCUPSKT 0 375 16x1 HX S 1 22 600 306 TORSION SPRING 1 23 600 307 SPACER SPRING 2 24 600 304 FLANGE BEARING 20MM 2 25 301 117 ELECTRIC THERMOSTAT DBL POLE 1 26 066 045 RELIEF STRAIN LIQUID...

Page 12: ...00 C107 BRACKET 2 4 600 C114 TOP CLAMP 1 NCG9 600 C101 TOP CLAMP 1 NCG8 5 600 C404 TEFLON SHEET BLACK 390 300 1 NCG9 600 C406 TEFLON SHEET BLACK 430 365 1 NCG8 6 600 C403 TEFLON SHEET BROWN 350 238 1 NCG9 600 C405 TEFLON SHEET BROWN 470 211 1 NCG8 Item Part No Description Qty Application 1 PM 125 SCREW PNPH SS 8 32 X3 8 2 2 79 031 WSHR SPLIT LOCK S S 2 3 600 C048 HEAT SHIELD NCG9 1 NCG9 600 C049 H...

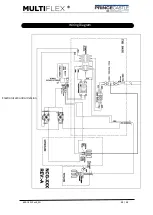
Page 13: ...600 C601 RevB_EN 13 15 Wiring Diagram am Electronical Control Version ...

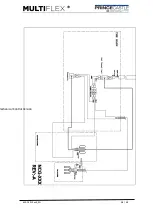
Page 14: ...600 C601 RevB_EN 14 15 Mechanical Control Version ...

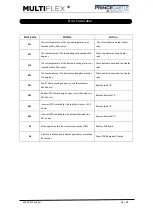
Page 15: ... temperature of the bottom heating plate exceeds 315 degrees Check bottom heater and top Heater relay E31 Top RTD fails causing an open circuit Resistance 2810 ohms Replace top RTD E32 Bottom RTD fails causing an open circuit Resistance 2810 ohms Replace bottom RTD E41 Incorrect RTD installed for the top Resistance 922 ohms Replace top RTD E42 Incorrect RTD installed for the bottom Resistance 922 ...

Reviews: