background image

VERAS 9

VERAS 7

VERAS 5

Nano BTE

Behind-the-ear hearing instruments

INSTRUCTIONS

FOR USE


Summary of Contents for Nano BTE

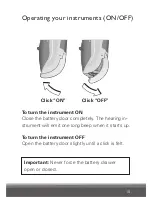
Page 1: ...VERAS 9 VERAS 7 VERAS 5 Nano BTE Behind the ear hearing instruments INSTRUCTIONS FOR USE...

Page 2: ......

Page 3: ...2 Inserting instruments with a Spira Flex sound tube 13 Removing your instruments and Spira Flex sound tube 14 Operating your instruments ON OFF 15 Changing the volume level 16 Changing programs 17 Ch...

Page 4: ...4 4...

Page 5: ...Cell phone and hearing instrument compatibility 37 International warranty 39 Your hearing instrument configuration 40 Accessories 41 General warnings and safety guidelines 42 Common problems and solut...

Page 6: ...With a little practice you will soon be on your way to better hearing Please read the entire contents of this booklet before using your hearing instruments It contains instructions and important infor...

Page 7: ...ruments are covered in these instructions Veras Nano BTE VR9 N VR7 N VR5 N Bernafon nano BTE IFU VR_ILU_nanoBTEwithSpira_BW_HI Introduction Note The instruments are available either with earhook or Sp...

Page 8: ...3 Adapter 4 Spira Flex sound tube 5 Sound outlet 6 Dome 7 Concha clip 8 Battery drawer Left Right ear marking A color marking inside the battery drawer can help you distinguish the left and right ins...

Page 9: ...Hook_BW_HI 2a 1 5 4 2 1 Push button 2 Microphone 2a Second microphone 3 Earhook 4 Sound outlet 5 Battery drawer 1 4 5 3 2 1 Canal 2 Sound outlet 3 Tubing 4 Helix 5 Vent Description of features 3 Earmo...

Page 10: ...elix part is pointing straight up and the canal part is pointing at the ear canal entrance Insert the canal part into your ear canal twisting slightly to ease the helix portion into place It may help...

Page 11: ...inger down the skin just in front of your ear If you can touch the helix part of the earmold it is not inserted correctly Gently push it behind the fold of your ear Lift the hearing instrument into pl...

Page 12: ...r to remove it Grasp the helix part of the earmold and twist it forward Gently pull the earmold straight out of the ear holding on to the helix part of the mold Important Do not remove the earmold by...

Page 13: ...ear canal until the tube rests against the side of your head Push the ear grip into the bowl of your ear If the sound tube is stick ing out from your ear insert the dome further If the ear grip is sti...

Page 14: ...the bend of the sound tube and gently pull the tube and dome out of your ear Lift the instrument from behind your ear Important Do not remove the sound tube and dome by pulling on the hearing instrum...

Page 15: ...ument ON Close the battery door completely The hearing in strument will emit one long beep when it starts up To turn the instrument OFF Open the battery door slightly until a click is felt Operating y...

Page 16: ...for this purpose Please follow the detailed directions in the Instructions for Use included with these devices Note Your instruments automatically return to a preset loudness level when the instrumen...

Page 17: ...s You can change programs as follows Push button A press on the button will cause the program to change This will take some seconds until you hear the program change The number of beeps you hear will...

Page 18: ...ently swing the battery drawer fully open but do not force it Take out the used battery Remove the sticker from the new battery Place the battery into the drawer with the flat smooth side facing up si...

Page 19: ...teries Any moisture found on a battery should be wiped off immediately with a soft cloth Used batteries should be returned to your battery supplier or hearing professional for safe disposal Never disp...

Page 20: ...active please ask your hearing care professional to turn it off Data learning VR9 and VR7 Nano BTEs only If your instrument is equipped with data learning your hearing professional can activate this...

Page 21: ...a remote control you can use it to change programs adjust the volume level up and down or mute the instruments For complete operating instructions please read the separate RC P remote control instruct...

Page 22: ...ternal sources such as music players cell phones computers etc For complete operating instructions please read the separate SoundGate instructions for use booklet Operating the instrument with the opt...

Page 23: ...f your instruments Every night Check your instruments for ear wax and wipe them clean with a cloth or tissue If necessary use the cleaning tool to remove wax from the canal and vent openings on your e...

Page 24: ...avoid damage in case you drop them Disconnect the earmold from the hearing instrument by grasping the end of the hook firmly with one hand and grasping the tub ing firmly with the other hand Pull the...

Page 25: ...25 Use an air puffer to remove any remaining moisture in the tubing When re attaching the earmold to the instrument it is important to position it correctly as shown above...

Page 26: ...pulling it off Use a soft dry cloth or tis sue to clean the outside of the sound tube and dome To remove wax from the sound tube insert the cleaning floss at the connector end Push the floss all the...

Page 27: ...e changed regularly The fre quency of dome changes will depend on how fast ear wax builds up on the dome Spare domes can be obtained from your hearing care professional Remove the old dome by pulling...

Page 28: ...stiff or brittle it should be replaced Hold the instrument by the adapter and grasp the tube close to the connector Pull firmly to remove the old tube Attach the new sound tube by pushing it firmly i...

Page 29: ...o moisture ie steambaths showers heavy rain etc Never attempt to dry your instruments with a hair dryer microwave oven etc Remove your instruments before applying aftershave hairspray oils perfume mos...

Page 30: ...llowing tips will help you learn to use your instruments If you have trouble adjusting consult your hearing care professional Getting started Wear your instruments at home in a quiet environment Have...

Page 31: ...first because you probably haven t heard them for awhile They will soon fade to the background Dining out Start with a quiet restaurant no music or enter tainment Request a table away from the kitchen...

Page 32: ...tter ear closer to the sound source Become familiar with the program in advance to make it easier to follow At work Inform your co workers about your hearing loss If you hear only part of a conversati...

Page 33: ...hone inlet of your hearing instrument If this causes whistling move the receiver away a small distance Before purchasing a mobile phone test it with your hearing instrument People with a greater degre...

Page 34: ...ctronic equipment Help to protect the environment by not disposing of your hearing instruments or batteries with your unsorted household waste Please recycle your hearing instruments and batteries acc...

Page 35: ...agnetic interference However some products may emit electromagnetic energy causing unforeseen interference with hearing instruments Examples include induction cooking appliances shop alarm systems mob...

Page 36: ...gnetic field strength of the transmitter is 42 dB A m 10 m The electromagnetic emission from the radio system is well below international limits for human exposure By comparison the electromagnetic en...

Page 37: ...he rating for the hearing aid immunity to the rating for the cell phone emissions ANSI C63 19 2006 American National Standard Methods of Measurement of Compatibility between Wireless Communication Dev...

Page 38: ...as hearing instrument is at least M2 T2 The equipment performance measurements categories and system classifica tions are based upon the best information available but Bernafon cannot guarantee that a...

Page 39: ...selves but not accessories such as batteries tubing earmolds etc This warranty is void if a defect is the result of misuse or mistreatment The warranty is also void if the hearing instruments have bee...

Page 40: ...truments are programmed in the following way Program Beeps Function 1 1 2 2 3 3 4 4 Right and left instruments synchronized When this feature is active changes made to one instrument are automatically...

Page 41: ...ng accesso ries are available Remote control SoundGate communication device for wireless connection to cell phones music players etc TV adapter for wireless connection to your television via the Sound...

Page 42: ...sing your hearing instru ments Hearing instruments should be used only as directed and adjusted by your trained hearing care professional Misuse or improper adjust ments can result in sudden and perma...

Page 43: ...e a discharge from the ear or allergic reaction See a physician immediately if these conditions occur An earmold is a custom made product If you experience discomfort or irritation of your ear please...

Page 44: ...ls of the hearing instrument in front of infants small children and persons of mental incapacity Never put your hearing instrument or batteries in your mouth they could easily be swallowed Keep batter...

Page 45: ...ing sounds may also be reduced in level by a directional microphone when these sounds are coming from behind you Never insert cleaning tools into the sound outlet or microphone inlet This could damage...

Page 46: ...se Tubing may be split or improperly connected No volume level too soft or humming noise Instrument may not be turned ON Battery may be dead or inserted upside down Volume level too soft Ear wax accum...

Page 47: ...letely Insert a fresh battery Increase volume level with control on instrument or remote control Consult your hearing care professional or physician Open and close the battery drawer several times or...

Page 48: ...Possible cause Whirring noise fading weak or motor boating sounds Battery contacts may be dirty or corroded Moisture in hearing instrument Low battery Instrument switches from 2ON to OFF periodically...

Page 49: ...he battery drawer several times or clean the battery contacts carefully with a dry Q tip Place instrument in Dry Aid pack Remove battery first Consult your hearing care professional Insert a fresh bat...

Page 50: ...he following marking This device also complies with the essential requirements of the Directive 1999 5 EC of the European Parliament on radio equipment and telecommunications terminal equipment R TTE...

Page 51: ...51 Declaration of conformity is available at Bernafon AG Morgenstrasse 131 3018 Bern Switzerland...

Page 52: ...ration is subject to the following two conditions 1 This device may not cause harmful interference and 2 This device must accept any interference received including interference that may cause undesir...

Page 53: ...will not occur in a particular installation If this equipment does cause harmful interference to radio or television reception which can be de termined by turning the equipment off and on the user is...

Page 54: ...54 Caution Changes or modifications not expressly approved by Bernafon AG could void the user s authority to operate the equipment...

Page 55: ...55 Notes...

Page 56: ...56 Notes...

Page 57: ...57 Notes...

Page 58: ...e of the actions listed on the previous pages solve the problem contact your hearing care professional Do not attempt to repair your hearing instruments yourself Place stamp with dispenser name and ad...

Page 59: ......

Page 60: ...888 748 9158 www bernafon ca New Zealand Bernafon New Zealand Ltd Level 1 Building F 27 29 William Pickering Drive Albany Auckland 0632 Toll Free 0800 44 22 57 Telephone 64 9 415 7917 Fax 64 9 415 791...

Reviews: