26
E N G L I S H
Cable length (m)
7.5 15 25 30 45 60
Voltage Amperes
Cable rating (Amperes)
115 0-2.0 6 6
6
6 6
10
2.1-3.4
6 6 6 6 6 15
3.5-5.0 6
6
10
15
20
20
5.1-7.0
10 10 15 20 20 25
7.1-12.0
15 15 20 25 25 -
12.1-20.0
20
20
25
-
-
-
230 0
-
2.0 6 6
6
6 6
6
2.1 - 3.4
6
6
6
6
6
6
3.5 - 5.0
6
6
6
6
10 15
5.1 - 7.0
10 10 10 10 15 15
7.1 - 12.0
15 15 15 15 20 20
12.1 - 20.0
20 20 20 20 25
-
Voltage drops
In rush currents cause short-time voltage drops. Under
unfavourable power supply conditions, other equipment
may be affected. If the system impedance of the power
supply is lower than 0.25 Ω, disturbances are unlikely
to occur.
ASSEMBLY
WARNING: To reduce the risk of injury, turn
unit off and disconnect machine from power
source
before installing and removing acces-
sories, before adjusting or changing set-ups or
when making repairs. Be sure the trigger switch
is in the OFF position. An accidental start-up
can cause injury.
Unpacking
The motor and guards are already assembled onto the
base.
Cable clamp (fi g. 7)
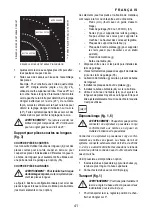
Insert the cable (bb) into the cable clamp (aa). Allow
enough cable for the saw head to travel, then tighten the
clamp by means of the screw.
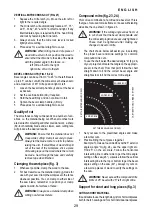
Bench mounting (fi g. 2)
1. Holes (v) are provided in all four feet to facilitate
bench mounting. The holes are provided to accom-
modate different sizes of bolts. Use either hole; it is
not necessary to use both. Always mount your saw
fi rmly to prevent movement.
To enhance the portability, the tool can be mounted
to a piece of 12.5 mm or thicker plywood which can
then be clamped to your work support or moved to
other job sites and reclamped.
2. When mounting your saw to a piece of plywood, make
sure that the mounting screws do not protrude from
the bottom of the wood. The plywood must sit fl ush on
the work support. When clamping the saw to any work
surface, clamp only on the clamping bosses where
the mounting screw holes are located. Clamping at
any other point will interfere with the proper operation
of the saw.
3. To prevent binding and inaccuracy, be sure the
mounting surface is not warped or otherwise uneven.
If the saw rocks on the surface, place a thin piece of
material under one saw foot until the saw is fi rm on
the mounting surface.
Mounting the saw blade (fi g. 8-10)
WARNING: To reduce the risk of injury, turn
unit off and disconnect machine from power
source
before installing and removing acces-
sories, before adjusting or changing set-ups or
when making repairs. Be sure the trigger switch
is in the OFF position. An accidental start-up
can cause injury.
WARNING:
The teeth of a new blade are very
sharp and can be dangerous.
1. Insert the 6 mm Allen key (z) into the opposite location
of the blade shaft and hold it (fi g. 8).
2. Loosen the blade bolt (f) by turning clockwise. Re-
move the blade bolt (f) and the outer fl ange (e).
3. Press the lower guard lock up release lever (b) to
raise the lower blade guard (g) and remove the saw
blade (h).
4. Install the new saw blade onto the shoulder provided
on the inner fl ange (ff) making sure that the teeth at
the bottom edge of the blade are pointing towards
the fence (away from the operator).
5. Replace the outer fl ange (e), making sure that the
location lugs (ss) are engaged correctly, one on each
side of the motor shaft.
6. Tighten the blade bolt (f) by turning anti-clockwise
while holding the 6 mm Allen key (z) engaged with
your other hand (fi g. 10).
ADJUSTMENTS
WARNING: To reduce the risk of injury, turn
unit off and disconnect machine from power
source
before installing and removing acces-
sories, before adjusting or changing set-ups or
when making repairs. Be sure the trigger switch
is in the OFF position. An accidental start-up
can cause injury.
Your mitre saw was accurately adjusted at the factory. If
readjustment due to shipping and handling or any other
reason is required, follow the steps below to adjust your


