background image


4


e

g

a

P

Caution and General Safety 

At all times maintain clearance to combustible materials as further specified in this 

manual. Failure to do so can result in serious fire hazard. 

Never operate heaters in atmosphere containing flammable vapours or combustible 

dusts.

This heater is equipped with an electronic and automatic ignition device. Do not attempt 

to light the burner by hand.  Failure to comply can result in a serious fire and personal 

injury hazard. 

Certain materials, when stored under this heater are subjected to radiant heat can 

soften, distort or otherwise be damaged, special care should be taken of plastic 

materials 

Appliance surfaces, other than the obvious flame and emitter surfaces, attain elevated 

temperatures during operation.  Do not touch the heater head during operation. 

Everyone should be alerted to this hazard to avoid burning. 

Children and adults should be alerted to the hazards of high surface temperatures and 

should stay away to avoid burns or clothing ignition. 

Young children should be strictly supervised when in the area of this heating appliance. 

Playing or running around the structure should be strictly forbidden.  

Clothing or other flammable materials should not be hung on or near this heater. 

Any guard or other protective device removed for servicing the heater must be replaced 

prior to operating the heater. 

Installation and repair should be done by a qualified service person. The heater should 

be inspected before use and at least annually by a qualified service person. 

-

Safety Requirements 

1.  Never locate the heater directly below electrical lines, gas lines or sprinkler systems. 

NOTE:

 Sprinkler head heat fuse link performance may alter with age. 

2.  Do not locate heater too close to vinyl or plastic wall coverings. These materials may 

discolour or soften well before they reach combustible limits.

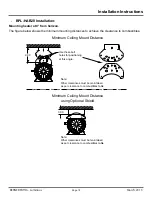
3.  The heater requires a minimum clearance from combustible materials.  See the Clearance 

to Combustible Materials section for specific requirements.

4.  Always allow room for maintenance purposes. 
5.  The heater aspirates air for combustion. Do not locate heater where there are severe draft 

conditions or airflow restrictions to the burner. 

CAUTION:  FIRE OR BURN INJURY HAZARD

March, 2013

BERNER PATIO+ Luminous

Summary of Contents for BPL-HAB20

Page 1: ...er flammable vapours and liquids in the vicinity of this or any other appliance An LP cylinder not connected for use shall not be stored in the vicinity of this or any other appliance IMPORTANT OWNER...

Page 2: ...March 2013 BERNER PATIO Luminous...

Page 3: ...onal Low Clearance Ceiling Mounting Kit HAB M20 Only 15 Using Optional Low Clearance Ceiling Mounting Kit HAB M40 and M50 Only 16 Using Optional Low Clearance NON COMBUSTIBLE Ceiling Mounting Kits all...

Page 4: ...rictly supervised when in the area of this heating appliance Playing or running around the structure should be strictly forbidden Clothing or other flammable materials should not be hung on or near th...

Page 5: ...ndoor or outdoor installation Not for use in residential dwellings refer to Rating plate Gas Supply Lines Gas supply pipe sizing must be in accordance with the National Fuel Gas Code ANSI Z223 1 NFPA...

Page 6: ...4 12 34 11 25 32 91 11 41 10 64 12 34 11 25 Model Model 32 52 47 06 Gas Connection High and Low Operation Lights Optional Electrical Connection Note Connections shown for all Models 5 41 Electrical Co...

Page 7: ...closing its individual manual shutoff valve during any pressure testing of the gas supply piping system at test pressures equal to or less than psig 3 5 kPa Power Gas Specifications Gas Supply Natura...

Page 8: ...8 e g a P Equipment Standard Equipment Included March 2013 BERNER PATIO Luminous BPL HAB20 BPL HAB40 BPL HAB50...

Page 9: ...centres 3 8 X 3 Anchor Bolts minimum 4 per heater with minimum 16 0 mounting spacing on centres Optional Standard Ceiling Wall Mounting Kits Hanging Bracket Assembly QTY 1 Unistrut 18 0 Long QTY 2 Ex...

Page 10: ...Shield QTY 1 Heat Shield Mounting Bracket QTY 4 Heat Shield QTY 1 Heat Shield Mounting Bracket QTY 4 Extension Arm Hanging Bracket QTY 2 Hanging Bracket Assembly QTY 1 Low Clearance Mounting Bracket...

Page 11: ...ble materials for various installation configurations Additional clearance may be required for glass painted surfaces and other materials which maybe damaged by radiant or convective heat Combustible...

Page 12: ...eld 30 Model Dim A Dim B Dim C Dim D Dim E Dim F Dim G Dim H 13 75 34 48 10 16 66 9 13 75 34 48 10 16 66 9 9 47 17 29 8 5 9 38 3 D B C F Less than 30 mounting angle Less than 30 March 2013 BERNER PATI...

Page 13: ...ritical dimension watching for interference from overhead beams etc Figure below provides a general overview of the components utilized in the installation as well as their general relationship Cautio...

Page 14: ...as per clearance to combustibles table when cutting Unistrut Step 2 Cut Unistrut to desired length and attach them to extension brackets as shown using 1 2 X 1 Hex Bolts Qty 8 hardware supplied Cut t...

Page 15: ...wn using 5 16 X 3 4 Hex Socket Qty 4 hardware supplied Step 1 Mount Low Clearance Brackets to ceiling using 3 8 X 3 long Lag Bolt or Anchor Bolt Qty 4 not supplied 31 0 Step 3 Slide Heat Shield over b...

Page 16: ...ong Lag Bolt or Anchor Bolt Qty 4 not supplied Step 3 Slide Heat Shield over brackets as shown 9 00 Use these two bolt holes to attach bracket to extension arm refer to step 4 Step 4 Install Extension...

Page 17: ...bolt holes Step 2 Attach heater to Brackets as shown using 5 16 X 3 4 long Hex Socket Qty 4 hardware supplied 3 00 Attach heater to hanging bracket assembly using these bolt holes Non Combustible Cei...

Page 18: ...onfiguration Use these bolt holes when mounting heater from ceiling at any angle 0 15 30 15 30 Right side of bracket Left side of bracket Use these bolt holes when mounting from wall at any angle 0 15...

Page 19: ...clearance to combustibles 9 00 Minimum Ceiling Mount Distance Minimum Ceiling Mount Distance using Optional Shield Use these bolt holes for positioning at this angle 3 00 Note Other clearances must be...

Page 20: ...t to 13 75 to achieve the minimum clearances to combustibles for this model Use these bolt holes for positioning at this angle Use these bolt holes for positioning at this angle Cut unistrust to 10 00...

Page 21: ...ount Distance using Optional Shield Use these bolt holes for positioning at this angle Note Other clearances must be maintained as per clearance to combustibles table Use these bolt holes for position...

Page 22: ...es must be maintained as per clearance to combustibles table Cut unistrust to 13 75 to achieve the minimum clearances to combustibles for this model Use these bolt holes for positioning at this angle...

Page 23: ...ada CAN CGA B149 1 and B149 2 National Gas and Propane Installation Code latest editions Do not use high pressure above psig to test the gas supply system with the appliance connected Failure to compl...

Page 24: ...grams below for guidance on electrical wiring of heaters If any of the original wire as supplied with the heater must be replaced it must be replaced with wiring having a rating of at least 105 C temp...

Page 25: ...115 VAC Grounded Supply Ensure A Good Ground Source Manual Line Switch with Hi LO wiring diagram Two Stage Switch wiring diagram 24 Volt AC Supply 24 Volt Transformer Ensure A Good Ground Source 115...

Page 26: ...s heater is NOT approved for any indoor Residential application If in doubt of your application consult with your local fire marshal or gas authority having jurisdiction Indoor spaces include but are...

Page 27: ...etected the gas valve will close after 20 sec A wait period commences and lasts approximately 5 sec and a second trial for combustion commences The electronic control will attempt three trials for ign...

Page 28: ...ct the igniter Replace igniter if there is excessive wear or erosion breakage or other defects The reflector sections may be cleaned by wiping with a damp cloth Annually verify hose gas supply in heat...

Page 29: ...HG035 1 Ignition Wire not shown Electronic Ignition Module Gas Valve NAT Burner Assembly HAB M20 Burner Assembly HAB M40 and HAB M50 3 4 5 SE004 SE009 20VA 24V Transformer not supplied SE010 6 40VA 24...

Page 30: ...warranty does not cover any shipping installation or other costs incurred in the repair or replacement of the product No materials will be accepted for return without authorization This warranty will...

Reviews: